Latest Post :
Recent Post

How to Clear Cache and Cookies Google Chrome

How to Clear Cache and Cookies Google Chrome - Having previously discussed how to delete cookies and cache of Firefox, this time we will give you tips on how to delete cookies and cache of Google Chrome. As you know, Google Chrome is now more widely used by Internet users. One of the main reasons that is always mentioned is because Chrome is lightweight, simple yet fast. Just like any other browser, Google Chrome uses the cache and cookies to speed up the loading process as the user of the website so you can enjoy a faster browsing experience.

And just like any other browser, if the cache is stored too much, then it will take storage capacity (hard disks). While Cookies store personal data such as your username and password to login to the website.

Cache and Cookies need to delete or clean regularly to reduce the usage of hard disk and also for the security of your online accounts. Here is how to remove Google Chrome Cache and Cookies:

How to Clear Cache and Cookies Google Chrome

How to Clear Cache and Cookies Google Chrome

1. Click on the Customize and control Google Chrome icon or a vertical line in the top right.
2. Click on "Tools".
3. Select the "Clear Browsing Data".
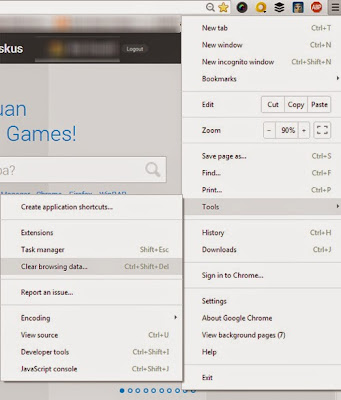
clear-browsing-data.jpg
Clear Browsing Data
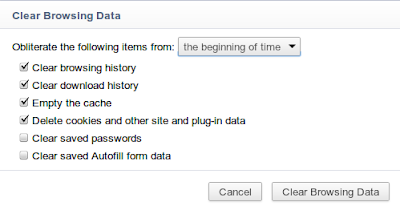
4. You will be faced with several options such as term deletion of data. Select the "beginning of time" if you want to delete all the cache and cookies in the browser Google Chrome, or select based on the time available and in accordance with your wishes.

clear-chrome-cache.jpg
Clear Chrome Cache
In addition there is also the choice of data to be deleted:
  • Clear browsing history: delete / purge the data you've visited the website, the address of the website, the cached text, web snapshot that appears in the New Page tab / New Page.
  • Clear download history: delete a list of files that you downloaded using Google Chrome, but the files are not deleted.
  • Delete cookies and other site and plug-in data: delete cookies and any data stored on the client websites using plug-ins using NPAPI ClearSiteData API.
  • Empty the cache: clear text stored web pages that you've visited using Chrome. A number of web page elements are stored by the browser in order to open more quickly when re-visited.
  • Clear saved passwords: username and password erase data stored on the Chrome browser.
  • Clear saved Autofill form data: Autofill delete all the text on the form of the website.
  • Clear the data from the hosted apps: delete data from the Apps that you add to Google Chrome from the Chrome Web Store, such as local storage used Gmail Offline.
  • Deauthorize content licenses: prevent the Flash Player to play protected content, such as movies and music you buy officially.
Please choose according to your wishes.

5. Next, click the "Clear Browsing Data" to begin to clear your cache and cookies of Google Chrome.

Keyboard Shortcut = Press (Ctrl + Shift + Del)

Those are some ways on How to Clear Cache and Cookies Google Chrome. If you are using Mozilla Firefox browser, you can figure out how to clear the cache and cookies in How to Clear Cache and Cookies Mozilla Firefox. Thank You.
Cut the Rope: Time Travel 1.4 APK

A new update for Cut the Rope: Time Travel is rolling out with new levels that take Om Nom back to the Industrial Revolution. Head into Google Play Store to download or pick .apk file here so you can transfer and install it easily on your Android phone and tablet.

Cut the Rope: Time Travel

Cut the Rope: Time Travel is a puzzle game that lets you join Om Nom as he travels back in time to feed his ancestors with candy. There is a rope, and your mission is you have to cut different ropes to get the pieces of candy in the little characters mouth.

This game is for anyone who loves a good challenge and loves to have fun at the same time. There are many stages where to collect all stars. Every level contains new mystery, enjoyment and targets; you have to think hard really. You can never go wrong with Cut the Rope, and this one is no different with adding lots of great gimmicks and ways to utilize them.

The game itself was fun, and now it's better with new adventures in the age of Industrial Revolution. You have to play two cute monsters to feed and use the power of magnetism to levitate the candy and deliver it safely to our heroes.

Cut the Rope: Time Travel is the best game in all cut the rope series that available for free-to-play with ads that you absolutely don't mind as long as you don't pay a penny for it. It's a well-made game that deserves the over 10 million downloads it has achieved. The gameplay is quite engaging and makes you use your brain that you will like about it. For Who want refreshment and enjoyment must try this app.

Requires Android: Varies with device
Download File: 50MB (Cut the Rope: Time Travel APK)

Cut the Rope: Time Travel APK

Aeris Wear Weather– Weather app for Android Wear

There are watch faces with weather add-on feature that allows you to see the current weather, but if you are looking for a dedicated app for weather well here is one of the best weather app for Android Wear, Aeris Wear, a weather app with a radar feature.


See the hourly status of weather, get notified when there is a weather advisories as well as alerts, so far it has a simple graphics, but enough to tell you the latest weather report. You can also have customizable cards. Whether it's regional or a local weather updates see satellite/radar data, current conditions, forecast information right on your Android Wear watch.


Name: Aeris Wear Weather
Developer:HAMWeather
Category: Weather

Description:

Aeris Wear brings weather and radar to your wrist. Key features include: severe weather notifications, local and regional satellite/radar data, current conditions, forecast information, and customizable cards.


How to Clear Cache and Cookies Mozilla Firefox

How to Clear Cache and Cookies Mozilla Firefox - The browser is a software that is currently used daily by most people to work. In the browser, Cache and Cookies are terms that you may often hear. What does it mean? Cache in a web browser is used to store web pages, images, or content download for temporary (temporary) on the computer so that when switching pages will be noticeably faster because web pages you've visited before will be saved without having to reload the current in the open back.

While Cookies are data stored on the computer when we do log in, be it email or log on other web pages. If the cache is stored too much, it will spend a data storage capacity (hard disk) and if cookies are not deleted, then the data username email or other accounts will remain on your computer. This can be dangerous if a computer is used by many people, because they may know your username and password to login via cookies.

How to Clear Cache and Cookies Mozilla Firefox

How to Clear Cache and Cookies Mozilla Firefox

How to Clear Cache Mozilla Firefox

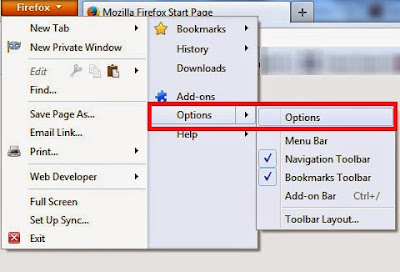
  • Select the Tools menu at the top of the Mozilla browser, Click "Options" -> "Options"
  • cache-mozilla-firefox.jpg
    Clear Cache Mozilla Firefox
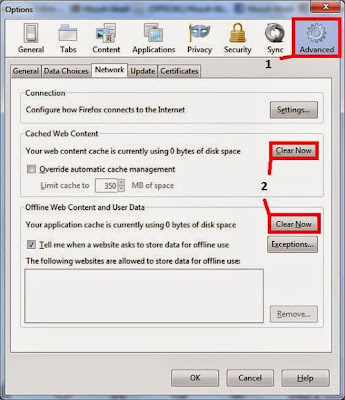
  • Select the "Advanced" menu.
  • Select "Network" on the sub menu.
  • Select the "Clear Now" on the offline storage
  • cache-mozilla-firefox-2.jpg
    Clear Now Mozilla Firefox Cache
  • Select "OK or Close"
Delete Cache Firefox Shortcut: Press (Ctrl + Shift + Del).

How to Clear Cache Mozilla Firefox

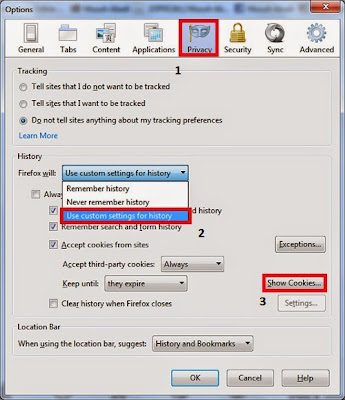
  • Select the Tools menu at the top of the Firefox browser. Tools> Options.
  • Select the "Privacy".
  • In the Firefox will select "Use custom settings for history".
  • Select "Show Cookies"
  • cookies-mozilla-firefox.jpg
    Clear Cookies Mozilla Firefox
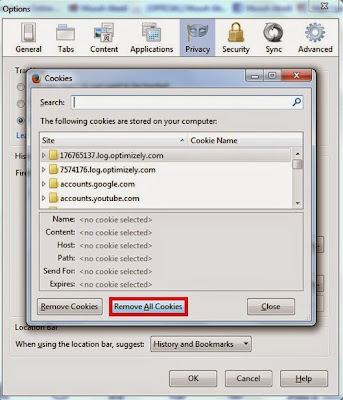
  • Select Cookies contained in the list that appears, then click "Remove Cookies" to delete the cookies on the list one by one, but to be able to delete all cookies that are registered you can choose "Remove All Cookies".
  • cookies-mozilla-firefox-2.jpg
    Remove All Cookies Mozilla Firefox
  • Select "OK or Close"
Delete Cookies Firefox Shortcut: Press (Ctrl + Shift + Del)

Hopefully the article How to Clear Cache and Cookies Mozilla Firefox can be useful for you. If you are using Google Chrome browser, you can see how to clear the cache in: How to Clear Google Chrome Browser Cache.

How to Clear Google Chrome Browser Cache

How to Clear Google Chrome Browser Cache - Are you a new user of google chrome browser? Still confused with the navigation? Still confused how to delete the 'cache' and 'cookies' on this browser? I had also got confused because previously very familiar with navigating the Firefox interface. Once tried Chrome, I actually distraught because the display menu is very much different. After a long time eventually become familiar and loyal users to date.

There is a short and practical way to delete the data as 'browsing history', 'download history', 'cache', 'cookies', and data sites that have opened (including password data).

How to Clear Google Chrome Browser Cache

Try press Ctrl + Shift + Del on the keyboard of your PC. Box will appear as below. You can click on the following Clear browsing data such as this.

How to Clear Google Chrome Browser Cache
Or like this if you're using Chrome version 10x and above.

clear-chrome-cache.png
Clear Chrome Cache
Well, the job is finished. If you want to delete the data, such as passwords or data that you will ever form field contents when browsing, just check settings on one/both (default is not checked).

The advantages of the cache and cookies deletion in Chrome than any other browser.

One of the main advantages removal systems 'cookies' on Google Chrome is immediately visible effect when tested on a web page / blog using CSS visited link code or a: visited. Especially if the color of links that have been clicked on a different set. For example in this blog.

Try to open this blog via google chrome, then open one or several pages. You will see the color of links that have been clicked will turn purple. Not correct? Try to observe the list of links to recent posts or the posts menu option (if you ever open one of the links in the navigation menu).

Then do the elimination of 'cache' and 'cookies' to the above technique. After that, try to observe the color change occurring on links that you never opened before (on the same page). What happened? Yes, the link color will return to normal as the color before it clicked.

I have not found a direct effect of such changes on other browsers. You can also test the google search results page if you have one-click link. The color purple on the link that you click on the blue will be back to normal shortly after you delete cookies in Chrome. Already tried it? Thank you for reading How to Clear Google Chrome Browser Cache, If you are using Mozilla Firefox browser, you can figure out how to clear the cache in Mozilla Firefok in How to Clear Mozilla Firefox Browser Cache.

How to Clear Mozilla Firefox Browser Cache

How to Clear Mozilla Firefox Browser Cache - The Internet browser cache is the same as the Temporary Internet Files folder, where a collection of records or records of browsing history trail that you did on your browser. These records include images, sounds, cookies, web pages and so on. If you check the cache files before, you would be surprised to see that the shape of the favicon files will be stored in the temporary internet files from the sites you've visited.

You may wonder why the browser needs to keep all this garbage while browsing on the internet? Sometimes I think the same way, but if these files are not stored as a cache, you will definitely accelerated Internet browsing slower. Why is this so?, This temporary files stored in the cache to make web browsing so much faster. These items are stored in a temporary folder that can be accessed more quickly than having to read the same thing over and over again when you return to the same website address later. For example, certain elements of a website you've ever visited will be stored to facilitate and speed up access to browse.

How to Clear Mozilla Firefox Browser Cache
This is an option, if you want to erase traces of your browsing, all you have to do is clean the cache files in the Firefox browser every time you want to exit the application. Maybe you are using Internet Explorer or other browsers, but the principle still applies to any browser cache should always be cleaned. Is very important to do the file deletion browser cache to get the reinvigoration of an internet web page or even to remove an assortment of cookies. For example, you may have to fill out the registration form registration on a site, and then run into problems because of the message "warning" saying that you've never been to the previous page, or your name has been registered. If you delete the browser cache files including cookies, you will be free to fill out the registration form above as a new user.

Another benefit you cleared the browser cache in Firefox on a regular basis is to allow you to see the new version of the Web page that is being accessed in case updating is done by the owner of the web. I often find things that experienced by other webmaster friends who can not view web pages that are the same as me access. This is because the browser they show look older version that has not been updated from a web page.

What should you do to clear your browser cache files? . Please refer to the following steps to clear the Firefox browser cache:

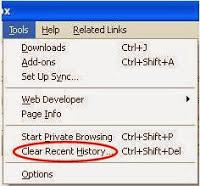
1. On the Tools menu click Clear Recent History

clear-firefox-cache.JPG
Clear Recent History
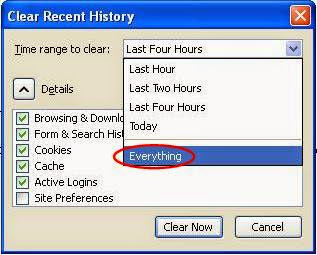
2. In the Time range to clear options: select Everything

clear-firefox-cache-2.JPG
Time Range to Clear : Everything
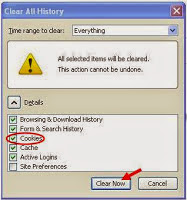
3. In the drop down list do not forget to check Cookies Details

clear-firefox-cache-3.JPG
Mark Cookies
4. Click Clear Now to run the cleanup.

Thus the explanation of How to Clear Mozilla Firefox Browser Cache. Good luck, may be useful.

Angry Birds Transformers 1.1.25 APK

Rovio has launched its new series of action-packed, 3D shoot ‘em up adventure Angry Birds called Angry Birds Transformers for Android smartphones. Head into Google Play to download or pick .apk file here so you can transfer and install it easily on your Android phone and tablet.

Angry Birds Transformers

Angry Birds Transformers is another great game of the angry birds saga. Angry Birds was fun and then now, Rovio makes a different series game but still with the characters. A good new way to enjoy angry birds and the best part is the transformers. It combined Classic transformers, 3d graphics, classic arcade and of course angry birds.

Did you guys watch the old Transformers shows when you were a kid? This game will remind you of it. Angry Birds Transform into robots? How cool is that? The music, sounds, art style all replicate 80's transformers perfectly. You can tell a lot of love went into this, its pretty fluid a makes a great change from the norm.

The gameplay is outstanding, and characters are excellent with gorgeous graphics and along with angry birds go. Its a departure from the original angry birds gameplay, but keeps a bit true to the essence of the series (squash pigs) in a new way.

The new Angry Birds Transformers game it's so fun and has a good concept also and changing the way you play Angry Birds, it's just different but fun. It's available for free and offers in-app purchases as well for Android and iOS platform.

Game Features:
- DESTROY! Leave the slingshot at home – this time you have some SERIOUS firepower!
- COLLECT! Unlock a roster of heroes (and villains) with unique attacks and abilities!
- UPGRADES! Get stronger weapons and new abilities for every Transformer!
- TELEPODS™! Scan ‘em to unlock, revive or boost your bots!
- VEHICLES! Oh, yes! Car, truck, tank or plane – transform to dodge falling hazards!
- TAG TEAM! Borrow a friend’s character to unleash a devastating two-bot assault!

Requires Android: 4.0+
Download File: 40.6MB (Angry Birds Transformers APK)

Angry Birds Transformers APK

See the Content of Google Chrome Cache Folder

See the Content Of Google Chrome Cache Folder - Maybe you are often confused, whether Google has a cache file or not, but it was clear at the option also exists cache settings. Well, here I discuss about google cache is hidden. after we discuss about how to See the Content of Mozilla Firefox Cache Folder, now we will try to look anything contained in the cache of your browser after some time we skate. What is a browser's cache or linguistic nature to 'browser cache'?. The browser cache is a folder in which to save all open files when a browser to access a particular page. The files here are temporary or transient with a variety of formats such as images, audio files, video files, css files, javascript and others. These files exist in the cache as long as we do not clean it using a system cleaner. However, due to the form of a binary file then we need a special tool to be able to open and 'read'.

After I search firefox cache and have found, it is time to explore my google chrome, now I'm confused, how ya how to view and run the google chrome cache files, the cache folder alasa not know, finally I explore the internet, google chrome has turned out that the file cache and I finally found a software named "Chrome Cache View".

To be able to read the contents of the cache files in a browser, we need a tool called the cache viewer. This time I will discuss about how to see the Chrome browser cache which I downloaded from the developer's website is NirSoft. For the first let's start step by step.

  1. To open the Firefox browser cache we need a tool ChromeCacheView. This tool works for all browsers Mozilla.
  2. Download the ChromeCacheView tool and unzip files that have been successfully downloaded earlier.
  3. After ChromeCacheView extracted files, double click to run it.
  4. Wait a moment, if you have long skating with the Chrome browser and stored cache is large enough, ChromeCacheView may take some time to decode all the cache files.
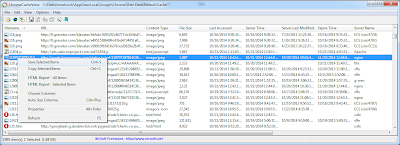
  5. As this is the view of the application.


See the Content of Google Chrome Cache Folder
Google Chrome Cache View
In addition we can see the cache files that have been collected google chrome, you can also use its files, Chrome cache software like winrar review of this work (for the layman in order to understand), this software extract cache files that you select, after the extract you just run the file that has been extracted earlier, is not it? You can also see the cache folder manually, the location of the Chrome cache folder is located at :

C:\Documents and Settings\Name\Local Settings\Application Data\Google\Chrome\User Data\Default\cache

See the Content of Mozilla Firefox Cache Folder

See the Content of Mozilla Firefox Cache Folder - You need to know that Mozilla Firefox stores images, scripts, and other parts of our websites when browsing the site. Cache folders that exist in our Firefox profile helps to load pages faster when it reopened, rather than having to download the entire page when it was first opened. This is why the page has been visited sites will open faster than when it first opened because Firefox stores a cache of the web site pages.

See the Content of Mozilla Cache Folder
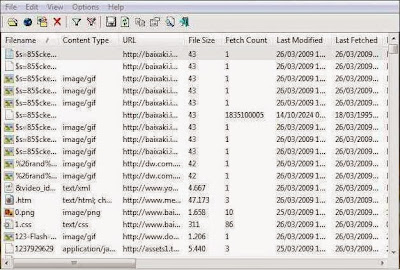
MozillaCacheView
If Mozilla Firefox is not configured to delete the cache and browser history automatically when the browser is closed then you can delete it using free software like CCleaner. If the necessity to own you to see the contents of the Firefox Cache can use a freeware called MozillaCacheView.

MozillaCacheView can be used to view and read the cache folder of Firefox to know the files contained in the folder. The location of the cache folder on a Windows computer is usually located in:

C:\Users\username\AppData\Local\Mozilla\Firefox\Profiles\sample.default\cache

ES File Explorer File Manager 3.2.2 APK

The ES APP Group has released an update for its File Manager for Android. Head to the Google Play Store and you'll find the newest version of ES File Explorer with Support Toshiba Wireless Devices, Chromecast Plugin and more.

ES File Explorer

ES File Explorer is one of the best file explorer for Android, no annoying ads and great functionality. It has all the tools you need, absolutely full of useful options and executes tasks perfectly. You don't need any other file manager, this does it all plus. Once you use it you can't find any reason to uninstall it.

If your device doesn't come with a file browser, or even just use this as your default file browser. The interface is brilliant, and you can do so much with this app. Moving, copying and deletion of files can be done easily. Also can be used to access pen drive in devices with OTG support. This is definitely a must have app for all android users out there.

Features list:
- ES Image Viewer
- Media Player
- Cool themes and icons
- Note Editor
- App share (apk share)
- Rar/Zip Compression or Extraction
- Stable and Fast, etc.

The app itself is a simple to use but powerful file browser with some great features like easy moving of files and fast transfers over ad hoc wireless with other android devices. It helps a lot with all the management of your files, and it also prevents from the abusive apps authorizations request, you can also use this as an MP3 audio player. The best feature is easy transfer from your phone to cloud storage. It even moves files from Dropbox, Box, and Drive to each other.

Here's the full changelog for the new version of ES File Explorer File Manager on Android:
- Release Chromecast Plugin
- Support Toshiba Wireless Devices
- Unzip tar, cab, bz2...
- Dozens of improvements

Requires Android: 2.3.3+
Download File: 4.2MB (ES File APK)

ES File Explorer APK

How to Change the Default Application For Extension Files On Mac

How to Change the Default Application For Extension Files On Mac - In some cases we need to change which application is used for a particular file extension. If you find a movie player, text editor or image viewer better, you might want to use the app for all files with the same file extension. For example, QuickTime Player is the default application to view MP4 movie files on OS X, but VLC media player can be a choice.

Follow the steps below to change your default preferences:

1. Locate the file with the extension you want to change the default.
2. Right-click on the file to see the menu, and select "Get Info". (right-click is a click with two fingers on the trackpad in the Finder).

How to Change the Default Application For Extension Files On Mac

3. A window will appear with the file information, see the section called "Open with"

spotlight-open-with.jpg
Choose Spotlight > Open With
4. It will show the current application that is used to open the file, use the dropdown box to select a new application to open it. If you do not see the new application in the dropdown box, select the "Other" to find the application.

VLC-open-with.jpg
Open With VLC
5. Click on the "Change All" to apply the changes to all files that end with the same file extension. That's it.

change-all.jpg
Change All
Note further:

You can always override the default by manually opening files in different apps with right click, and select "Open With" if the default application to open inappropriately.

To make it easier to distinguish between the file extension, you might want to also make all file extensions visible. In the Finder, select Preferences on the top menu, and click on the Advanced tab. Check the box labeled "Show all filename extensions".

Read our other article How to Make Internet Connection Sharing on a Mac

Farm Heroes Saga 2.14.4 APK

Farm Heroes Saga for Android has just picked up an update. Head to the Google Play Store and you'll find the newest version of Farm Heroes Saga with 20 new levels in the episode Rustic Redwoods, and there’s a new guy in town! The Bull has charged his way into level 706.

Farm Heroes Saga

Developed by King, Farm Heroes Saga is a match-three game that tasks you with collecting the right crops and materials for your farm. This is a very addictive game and lots of fun to play. If you want a game that is frustrating, exciting, and you only put down when you have run out of lives then you need get this. But be warned it is very addictive you have to hand it to King they definitely know how to create games that get you hooked.

The game will challange your brain, play without thinking fun or really think about it for strategic game. Just when you think they can't possibly make a new variation, there it is. It can be frustrating at times but over all its a great game to pick up and play during downtime or in between things.

There are tons of levels, different challenges every time and the best thing you can cross every episode on your own then waiting for others to accept the request. As all games of this kind it starts out slow and you need to get a few matches. Then just as others you start learning that you have to learn the difference types of items you need to clear off the board and you learn different ways of accomplishing each level. Its hard at times but if you keep at it, it all works out.

Grab the updated Farm Heroes Saga from the Google Play Store and let us know what you think of the new level.

Requires Android: 2.3+
Download File: 40MB (Farm Heroes Saga APK)

Farm Heroes Saga APK

How to Share Internet Connection On Mac

How to Share Internet Connection On Mac - Mac OS X has a built-in function that Internet Sharing can be a lifesaver when you are traveling. If you are in a hotel room with an ethernet cable, you can create a wireless hotspot to share the Internet connection with other computers. On the other hand, if you only have wireless access / Wi-Fi, only possible to share internet connection using a LAN cable. Read on this article to find out how to share internet connection on Mac.

How to Share Internet Connection On Mac

It has two parts:

1. Share your Wi-Fi connection via Ethernet
2. Share a wired Ethernet connection wirelessly (Make a hotspot)

Sharing Wireless Connection via Ethernet

My MacBook Pro is connected to the Internet via Wi-Fi, and I want other computers are Windows computer to get online. You can only connect the internet via an ethernet cable/LAN. What can be done?

1. Connect the Ethernet cable connected to a Mac Wi-Fi, and a Windows PC to which you want to get Internet access. Do not need a crossover cable or other network hardware required.
2. Open the System Preferences. Can usually be found in your dock, if no, search in your Applications folder.
3. In System Preferences, under Internet & Wireless, go to the Sharing menu.
4. In the Sharing menu, select Internet Sharing from the list on the left. You will see the Internet Sharing option.
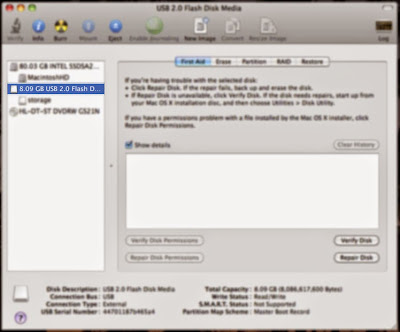
How to Share Internet Connection On Mac

5. Select to share your connection from Wi-Fi to a computer via Ethernet.
6. Finally, click on Internet Sharing check box to activate the service.
7. Your Windows PC should now get an internet connection. If not, try restarting the computer.


That's it. Have fun!

Sharing Wireless Connection Through Ethernet Cable (create a hotspot)

For example, I am currently in a hotel that does not have Wi-Fi, but no Ethernet jack in the wall. While I have some wireless devices (iPad, iPhone, other computers, etc.) that require internet access. What can be done?

Say your Macbook is no LAN port and plug that computer into a wireless hotspot your Mac. However, if you have any of the MacBook Air or MacBook Pro Retina is no LAN port, unfortunately you need an adapter / converter from USB or Thunderbolt to Ethernet.

1. Connect your Mac to the network with Ethernet. Check and make sure your Mac is connected to the internet.
2. Open System Preferences, under Internet & Wireless, search Sharing menu.
3. From the list on the left, click on Internet Sharing, and you will see the Internet Sharing option.
4. Choose to share your connection from Ethernet to Wi-Fi.


5. Click on the Wi-Fi Options button to configure the name and password of your wireless network. The name is up to you, let the choice of such a channel. And set the password for the wireless network you created.


6. Finally, do not forget to check that Internet Sharing is checked to enable sharing.


7. Now your Mac to act as a wireless router, providing a Wi-Fi for all your gadgets.
8. Connect your wireless device to your new hotspot.

This guide was written on Mac OS X 10.9.3 Mavericks, there may be differences in previous versions. The steps are a little different.

Read our other article How to Know the Wi-Fi password on Mac.

How to Display WiFi Password Stored In Keychain On OS X Mavericks

How to Display WiFi Password Stored In Keychain On OS X Mavericks - Here are the steps to display the password one of your Wi-Fi.

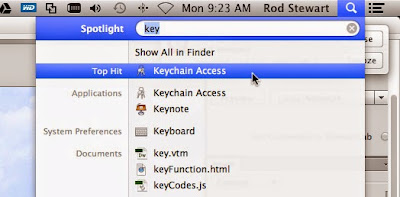
1. Open the Keychain Access application. Can pass the /Applications/Utilities/KeychainAccess.app, or press Command + spacebar to open Spotlight search, then type in "Keychain Access" and press Enter.

How to Display WiFi Password Stored In Keychain On OS X Mavericks

2. In the upper right corner, find the name of your Wi-Fi network. This search will find your network password entry stored in the Keychain.


3. Double-click on your network name from the list of results.


4. Tick the "Show password" and enter your admin username and password of your Mac, and then click the OK button.


And as a result, your network password will appear.


Good luck and hopefully useful! Check our other article on how to check internet speed on Mac.

How to Format External Hard Drive Compatible With Mac and Windows Without Third Party Software

How to Format External Hard Drive Compatible With Mac and Windows Without Third Party Software - The external hard drive can quickly move large files between computers. If the external hard drive you want to run smoothly both on Mac and on Windows, you must use a filesystem that is supported by both platforms. The problem is by default Windows uses nfts, and Mac using HFS. Windows can not read or write HFS drives, and the Mac can not write to NTFS drives but can only read it.

Mac and Windows having different file systems. To be able to use an external hard disk (read write delete) for Mac and Windows, will need to select the "MS DOS File System" for the format of your hard disk.

There are third party solutions that free and paid so that the Mac can work with NTFS, and Windows understand HFS. But it costs money, slow / bug, or you may not have permission to install software on the computer. Below article will explain how you can use FAT or exFAT filesystem to make your external hard drive is compatible with both Mac and Windows for free.

Warning: The following guide includes re-formatting the external hard drive, it will erase all the data on your external hard drive. Do not forget to make a backup copy of your files in order not to lose.

How to Format External Hard Drive Compatible With Mac and Windows Without Third Party Software

Option 1: FAT
Pros: Works natively with all Macs and all Windows.
Disadvantages: Can not handle files larger than 4GB if 1x transfer.

How to Format using FAT

1. Open Disk Utility on your Mac. (faster using Spotlight, click on the magnifying glass and type in Disk Utility).

Mac Spotlight Disk Utility - How to Format External Hard Drive Compatible With Mac and Windows Without Third Party Software

2. Select the drive you want to format.

Mac Drive - How to Format External Hard Drive Compatible With Mac

3. Select the "Erase" tab in Disk Utility.

Mac Erase Disk Utility - How to Format External Hard Drive Compatible With Mac

4. Select MS-DOS (FAT) from the drop down box.

Mac MS DOS FAT - How to Format External Hard Drive Compatible With Mac

5. Click Erase and follow the prompts.
6. Allow the process is complete.

Option 2: exFAT
Pros: Can work with large files.
Disadvantages: Not compatible with older operating systems / old. You have to use the Mac OS X 10.6.5 or later, and Windows must be Windows Vista SP1, Windows 7, or later.

How to use exFAT format (on Windows)

1. Connect the hard drive to a Windows Vista SP1 or Windows 7.
2. Open the Computer window.

Windows Explorer - How to Format External Hard Drive Compatible With indows

3. Right-click on your external hard drive, and select Format.

Windows Format - How to Format External Hard Drive Compatible With indows

4. Select the exFAT from the drop down box, and click Start.

Windows ExFat Format - How to Format External Hard Drive Compatible With indows

5. Done! Now the external hard drive you can work on Mac and Windows.

Although FAT is more compatible with the old system, can not transfer files over 4GB that's shortcomings. You will not be able to use this hard drive if using FAT for file transfer HD video long duration and image files / ISO large, for example. For this reason I would recommend exFAT.

How to Take a Screenshot on a Mac

How to Take a Screenshot on a Mac - Apple minimalist design means that the keyboard has keys that you need, everything else is done by means of a keyboard shortcut. No special printscreen button as you get on the PC, so you need to use the keyboard shprtcut way.

To take a screenshot of the full screen resolution of the entire screen, hold down the Command and Shift keys simultaneously and do not release then press the number 3. To take a screenshot of a specific part of the screen, the same way, press the Command and Shift keys simultaneously and press 4.

Take Screenshot Mac - How to Take a Screenshot on a Mac

The result is a PNG image file on your desktop, and file names based on the date and time of capture screenshots.

Bonus: The PNG format is pretty good for screenshots, since it provides a good balance between file size and sharpness of the image, but if you choose JPEG instead, you need to enter the following two commands into the terminal (one by one).

default write com.apple.screencapture type jpg

killall SystemUIServer

The first line change the screenshot file format, and the second line to restart the process that used to take pictures. The default is PNG, but you can choose GIF, JPG, TIFF, and even PDF. Read our other article How to Record Screen on Mac With Free.
 
Support : Creating Website | Johny Template | Mas Template
Copyright © 2011. Technology Share - All Rights Reserved
Template Created by Creating Website Published by Mas Template
Proudly powered by Blogger