
Latest Post :
Recent Post

Android App Review Center


Android App Review Center - About Us


Android App Review Center is a website with one aim in mind - to share out all infromation about the most useful, relevant and interesting apps out there on Google Play.

We have a team of testers, people of all ages who own all manner of devices who test out the apps and provide a report of their experience with the apps in question. 

Our testers reports are then compiled into reviews, manuals and tip pages.  

Android Review Center Pageviews Stats

We may be contacted through the contact form at the end of each page and directly to our email at: 
appreview74[at]gmail.com

You may also contact us for information about our ads, sponsored articles and advertisement packages. 

We offer several types of promotion:
  • Featured Article - A short promotional article reachable from the featured apps section of the site.
  • Full Reviews - A complete review of an app, along with tips and tricks and recommendations.
  • Social Networking Promotion - Promoting an article for 25000 users on Google Plus
  • Ad - A site wide ad on the right sidebanner for a specific time
  • Slider Banner - A featured banner and text on the homepage's main slider banner.

Our prices for a single promotional item: (US dollars)
Permanent Featured Article: 25 $
Permanent Full Review: 50 $
Google Plus Promotion: 20 $
Ad: 15 $ (for a month long ad)
Main Homepage Slider Banner: 30 $ (for a month long banner)


Of course, if several promotion items are selected, some discount can be given.
 

Android Apps - Tools & Utilities

Final Countdown - Android App Review
A calendar app with a beautiful timer that counts down, with miliseconds.

Advanced Stock Screener - Android App Review
A screener app that locates stocks according to user defined strategies.


WhenDidI - Event Logger by eWorld Tech - Android App Review
An event logger with amount measurements for time, money calories and much more.

365 Daily Bible Wallpaper - Android App Review
A simple app to automatically change homepage wallpapers every day and include a bible quote.

Passbook by PassbeeMedia
An interesting coupon collection and managing app with time and location alerts.
Digital Clock Widget by Hainan Mobile Studio
A very useful digital clock homepage widget with a configurable smart tool bar.
Android App Review - My Piano by Borce Trajkovski.
A simple yet fun and feature rich piano playing app.
Android App Review - Tiny Flashlight + LED
A flashlight app that shows battery status and lights up when tapping the smartphone, even if the smartphone is locked. 
Android App Review - Battery by MacroPinch
A app that monitors battery status and health and shows time till the battery runs out of power. 
Android App Review - Speedtest.net by Ookla
A app that monitors cellular upload and download speeds.
Android App Review - ES File Explorer File Manager by ES APP Group
One of the best file explorer file managers apps, with tons of options, simple interface and cloud services features.
Titanium Backup Pro by Titanium Track - Android App Review
A professional backup and app control utility for Android.

Blurring Waterfalls and Beaches with Long Exposure


Blurring Waterfalls with Long Exposure
Blurring Waterfalls with Long Exposure - Photo: Samson P Samuel

Flowing water when photographed with long exposure times create a soothingly smooth effect. Blurring water is a relatively easy trick if you have your settings right. 

Things to Remember


Blurring Beaches with Long Exposure
  • Water looks best when shot at shutter speeds ranging from 1” to 10” seconds.
  • To keep your camera steady you will need a solid tripod.
  • A remote trigger / cable release could be a nice thing to have, but not mandatory as you can easily use your camera’s self-timer instead.
  • If your camera has a mirror lock up mode then use it to eliminate any vibrations caused by the camera mirror. Shooting in live view is a quick fix for this.
  • A polarizing filter could be of great help to eliminate / reduce reflections and to get more saturated colours. It could also function as a two stop ND filter in case you have trouble increasing shutter speed.
  • If you compose with a little bit of sky in the frame then you will most definitely need a Graduated Neutral Density Filter to prevent the sky from clipping.


Work Flow – Step by Step Guide


Blurring Waterfalls and Beaches With Long Exposure
  1. Look/walk around the scene with your camera in hand and check it from every angle to select the best. The live view in your camera is very helpful to check compositions.
  2. Once you have decided the composition and the camera position, carefully set up your camera on a tripod, attach cable release if you plan on using it.
  3. Attach the polarizer to your lens and adjust it till you get a pleasing combination of little or no reflection and rich colours.
  4. Make sure you have your ISO set to the lowest value. ISO 100 in case of most cameras.
  5. Now its time for you to take the picture, use any of your preferred modes, set it so that you have one full second as your shutter speed, and depending upon the effect make corrections by either increasing or decreasing the shutter speed. If you increase the shutter speed the water will get more blurred and vice versa.
  6. Carefully review your pictures in the LCD panel on the back of your camera.
  7. Take pictures with varying speeds, often times the picture you liked best while reviewing on your little camera screen might not be the one you like best when viewing later on a larger computer screen.

Related Reading


Insomnia – Trick Photography

Insomnia – Trick Photography


How to get this kind of shot.


Insomnia is a Photoshop work where you first take a picture of your subject’s face, and then another one with the subject covering his/her face with hands. Later you include both the pictures as layers in a single document in Photoshop. Picture with just the face as bottom layer, and the one with hands on top. You then change the top layers blending mode to overlay (try other blending modes too, sometimes they give better results), experiment a bit with opacity settings, try changing to black and white, adding some texture etc.

How I Did It


The pictures were shot with a Canon 5D MKII and Canon 100mm f/2.8L IS USM Macro. Set to f/2.8. ISO 800, speed 1/25.

Use a Solid Tripod


Place your camera on a tripod; it helps when aligning layers if you have not shifted much between exposures.

Use a Portrait Lens


Use a portrait lens (focal length from 85mm – 135mm). It is not mandatory but it will surely make your subject look good by not distorting perspectives. 

Shoot Manual


 I recommend you shoot in manual mode so that your exposure does not change between shots. 
It is better if you could ask your subject to sit somewhere, and not shift too much between shots, ask to sit straight, take a picture, ask to place hands on the face gently, it is important that the hands are centered else it will look odd in the results. Now take the second picture and you are done with the shooting part. Just to be sure repeat the process once or twice more, some pictures just won’t align.

None of the above mentioned things, tripod, portrait lens, using manual mode etc are mandatory, you could easily get the shots shooting handheld in aperture priority mode, but taking the extra effort to set up and perfectly frame the shot, making sure that you use the right equipment for the job and that your subject stays still, exposures are consistent etc helps get better results. The pictures used in this article were shot in a garden restaurant; only light available was coming from a couple of candles and serial lights used for decoration. In spite of raising the ISO to 800 I was only getting speeds of 1/25. Having a tripod helped get sharp pictures without raising ISO any further. 

Here’s our first shot

Insomnia – Trick Photography


And the second one with hands covering her face

Insomnia – Trick Photography


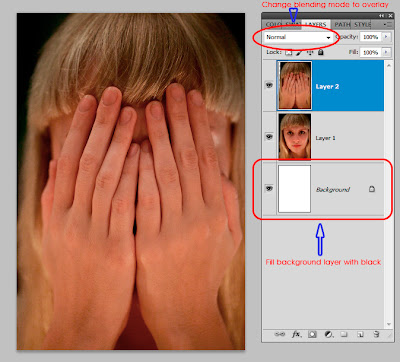
Open a document in Photoshop, add both images as different layers on to the document, the picuture with hands covering her face should be the top layer. 

Click edit > auto align layers to align both layers perfectly.
Insomnia – Trick Photography


Now that you have both images as layers, change the blending mode of the top layer to overlay, do try other blending modes too, sometimes they give better results depending on the base pictures.

So this is how our picture now looks once I changed the blending mode to overlay and adjusted the opacity a bit.

Insomnia – Trick Photography


Click Layer > Flatten Image to merge the layers into one.

 Now we will see how the image looks in black and white.

In Photoshop, either press Alt+Shift+Ctrl+B or click image > adjustments > black and white. 

Insomnia – Trick Photography


Try adjusting the sliders or contrast settings to get the right balance between black and white areas in your picture. Now all I did was to use the eraser tool to clean up a bit and the result is the image on top of this page. You could also try to add some texture or using any other filters on the image for different effects.

Related Reading


SlideShow

It is the Content Area

How to Mute Boot and Shutdown Sounds on Rooted Sprint Samsung Galaxy S2 or S3

This guide will show you how to easily mute the startup and shutdown sounds on a rooted Sprint or Ting Samsung Galaxy S2 or S3.

Update: if you do not wish to root your device or want to mute other sounds, learn how to silence any sounds on any device with Tasker.

This is a very easy fix if you have already rooted your phone. If you have not yet rooted, I would highly recommend it as you can root the stock roms very easily. I am not going to cover rooting in this post as it is extensively covered by many other people - just google "how to root [your phone] [your software version]" and you will find all the information you need. See the beginning of this post for brief instructions how to root the latest (and final) release for the Sprint Galaxy S2.

So, now that your phone is already rooted, this is the by far the best method to mute the boot up and power down sounds. The screenshots shown below were taken with a Galaxy S2, but should be nearly identical with the Galaxy S3 (let me know if they are different). 

First, if you do not already have some sort of root file browser, download one - I am using root browser lite in this tutorial - but anything that can change file permission will work fine. 

Now open root browser and navigate to system → media → audio → ui as shown below: 
Now find PowerOff.wav and PowerOn.ogg as shown below:
Long press on PowerOff.wav and then select "Permissions." Once you have selected permissions, UN-check all of the permissions as shown below and press OK. The first time you do this your phone will ask if its okay for the app to have root privileges - grant them, and it won't bother you any more. 
Repeat this process for PowerOn.ogg, again turning off all of the permissions. Once you have turned off all the permissions the PowerOff and PowerOn files should look like this with no read or write permissions:
That is it! No more annoying boot and shutdown sounds on the rooted stock ROM.

If you would like to learn more about silencing the Sprint Galaxy S2, I wrote posts on how to silence the camera and video camera as well.

Samsung Galaxy S4 & HTC One Are Now Available at Ting


Some new developments at Ting, my new favorite mobile phone provider, that are pretty exciting.

The Samsung Galaxy S4 and HTC One are now officially supported and available to buy from the Ting device page. As of now devices "are shipping in 2-3 weeks." The Samsung Galaxy S4 costs $596 and the HTC One costs $536. If you are new to Ting, or would like to learn more about it, check out my in-depth review.

You may also buy Sprint versions of these phones and activate them on the Ting network since the bring your own device program now includes LTE devices.

Because Ting is a no-contract carrier, the phones are somewhat expensive new, but if you look around on eBay or other places, you can find these devices for cheaper, especially if don't mind buying a used device.

The iPhone has made its way to the Ting device page as well - you can sign up to be notified when Ting offers the iPhone, but there is no specific time-frame for when it will be available. Update: you can get the iPhone 4, 4s and 5 now. To stay up to date you can follow this or the Ting Blog for more information.


Support : Creating Website | Johny Template | Mas Template
Copyright © 2011. Technology Share - All Rights Reserved
Template Created by Creating Website Published by Mas Template
Proudly powered by Blogger