Guest Post By Mariesol
First of all I would like to introduce myself: My name is Mariesol, better known as "SunnyMarry" and I work as a self-portrait-photographer most of the time. So the big deal in most of the shots is to set everything before I take the picture with my remote, because I cannot see the picture when I take it. I need to set everything up before, like sharpening, lightening and after all I have to find the right place in front of the camera, so it focusses on me.
First of all I would like to introduce myself: My name is Mariesol, better known as "SunnyMarry" and I work as a self-portrait-photographer most of the time. So the big deal in most of the shots is to set everything before I take the picture with my remote, because I cannot see the picture when I take it. I need to set everything up before, like sharpening, lightening and after all I have to find the right place in front of the camera, so it focusses on me.
 |
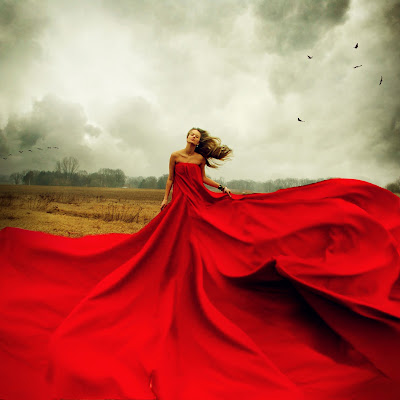
| Photo By Mariesol |
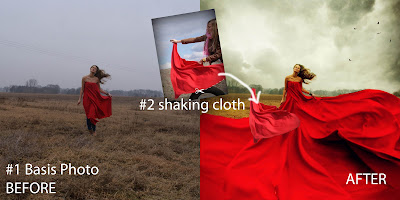
As you can see on the "Before"-Picture of "Don't die wondering" I simply used a little piece of red cloth to create the red dress. It is about 1 x 1,5 m large, but that is indeed enough to make it look huge!
So the first step was to take the "Basis-Photo", that should show a woman with a dress on a field. And since I always had been a great fan of photographs with shaking hair ( this is adding so much dynamic), this also had be part in my image.
The second step is to make the dress grow. What you need to do for that is take some additional shots, where you only capture the red cloth as you shake it. I added a behind the scenes-photo from that, too. These "shaking-photos" are something like your stock-images for the dress. It is really important to take these images right after you took the "Basis-Photo" because you need similar lights, contrasts and colours for the cloth, too - that will save you a lot of work in the post-processing.
 |
| Capturing the flowing garment |
And that will the the third step for this image: Collect the best shots of the jolted cloth and fit them into your picture as little parts of cloth! This takes some time, because it is kind of hard to make it look real- it is important to mind perspective, colours and contrasts.
 |
| before and after blending |
Additionally I changed the sky in the background to make it look more interesting and dynamic and I also added some birds, saturated the picture (especially the red dress) higher and I always use to vignette the corners of my pictures dark, that makes you focus more on the middle of the picture :-)
 |
| before and after comparison shots |
Post a Comment