 |
| DIY Light Tent |
Light tents are popular among photographers who do a lot of product photography inside of studio. Light tents are collapsible white fabric box with a hole in the front. You keep the product to be photographed inside the tent, place your lights out side, you may place lights on the sides or on top, the fabric will diffuse the light and produce soft light that wraps around the subject.
A light tend is the easiest method of lighting small objects, It also gives consistent results, but on an average light tents cost around $100. Here’s a diy light tent that costs next to nothing but gives similar results as that of commercially available light tents.
Materials Needed for this project
 |
| DIY Light Tent |
1. A cardboard box, the size of the box depends on the size of the products you wish to photograph.
2. Some diffusion material, I used tracing paper, you could use any white paper or white fabric.
3. Ruler and Marker
4. Kinfe / cutter to cut out the inside of the box.
5. Glue or tape to stick the paper / fabric to the box.
Step by Step
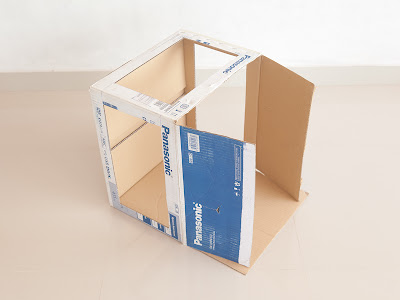
What we need to do is cut out windows on three sides of the box, we will also completely take off the flap which now comes on top.
If you need to use the tent outdoors to shoot flowers or other subjects then you should also cut out the bottom so you can slide it over your subject.
 |
| DIY Light Tent |
Step 1. Measure and mark 2 inches from the side of the box on multiple points and join them using a ruler. Do this on three sides of the box, leave the front and back as it is.
Step 2. Use a razor to cut out the inside on all the three sides (two sides and top), you should also cut out the top flap on the front, the ones on the sides will come in handy to block extraneous light.
Step 3. Stick white paper or white fabric on all the three sides (on the areas you cut off).
Step 4. Attach a seamless background (in this case white paper).
Step 5. Place your subject inside the light tent and lights on the outside, you have the flexibility to use off camera flashes, studio strobes, tungsten or cfl continuous lights, or plain daylight (just place the light tent outside in bright sunshine, simply rotate the box to make the sunlight come from the desired direction).
 |
| DIY Light Tent |
Now you have completely wrapped your subject in high quality light. You have the ability to place your lights on either side or the top or any combination of the three. The thing to remember when using light tents to photograph subjects is that even if you use just one light the diffusing material on the sides and top will reflect some of the light back on to the subject thus acting as fill. When using multiple lights vary the power of the lights (light ratio) to achieve different lighting effects. If you are using continuous light sources you can achieve varying light ratios by moving the light sources closer or farther to the light tent. If you want to kill the reflection on any side or the top, stick a square of black poster board on the inside on that side or the top.
Post a Comment