Latest Post :
Recent Post
Showing posts with label Photography Lighting. Show all posts

How to Photograph Wine Bottles Using Dark Field Lighting

Article by: Trevor Dennis

This was done as part of a poster project for Chris. The glass is pure dark field. The bottle is a bit of a mishmash using the dark field setup I had in place for the glass, but with a manual blend of three exposures and finally an exposure with my largest white reflector each side of the camera.


how to photograph wine bottles


I have taken to using the largest scrim I can manage behind the subject to maximize the wrap round. You can see this worked better camera right than camera left, and that's because I was holding a two meter high reflector while pressing the shutter release, and I could not reach on the left side, so had to improvise. (I was set up in the corner of our bedroom because it’s too cold to work in the garage)

Post Processing


The BG is Photoshop, as are the shadows. The texture was placed behind the glass by:

  1. Ctrl click the Glass layer to select it.
  2. Select the BG layer with texture, and press “Ctrl + j” to copy the glass shape.
  3. Move the new layer above the glass layer, and set its blend mode to Lighter Color.
  4. Ctrl click the new layer to select it.
  5. Contract and feather the selection (enough to shrink it back from the glass edges)
  6. Add a layer mask to the new layer. (I think I have that the right way round, but if not, just invert the mask – Ctrl i)
  7. I also reduced opacity a bit as you would not see the full texture behind a real glass.


BTW When you add noise to a gradient to produce texture, it lightens it. There’s no way round it if you already started with full black, so you need to use curves or levels on the texture layer. The smart way is to do it with a linked adjustment layer so you can run a gradient down the mask to control where and how much.

Lighting for the Shot


Bowens Gemini, (triggered Pocket Wizard Plus 2s), with 1.2 meter octobox, fired into 1.5 meter scrim behind subjects, with dark card between subject and scrim (dark field - as in Fil Hunter's 'Light Science & Magic' book)


Related Reading


Collapsible Reflectors for Photography - Which Color Reflector to Use


In earlier days Collapsible Reflectors were double sided and where available in combination of Gold and White, Silver and White and Gold and Silver. But now a days these collapsible reflectors have improved and they come in variation of 3 in 1, 5 in 1 and 7 in 1.


Foldable Photography Lighting Reflector


One question most beginners ask is how we choose the colour of reflector to use. The most common combination found in collapsible reflectors is silver, gold, black, white and translucent. Each has its own purpose and modifies light differently.

White and Silver Reflectors


While shooting indoors using studio strobes or flashes it is recommended to use either white or silver reflectors. The reason being studio strobes and camera flashes are day light balanced and they produce white light, so if you use gold reflector in combination with these lights you will end up with white light on one side of the subject and much warmer toned light on the other.

These also do work well when shooting outdoors during daytime (except golden hour). The choice between Silver and White is more a matter of personal choice. In general Silver reflectors bounce more light than White and they produce a slightly hard light than White so I personally use Silver reflectors when I use bare strobes/flashes (without softboxes) or when shooting with a beauty dish. White reflector produces very soft light and so is used more in combination with softbox, it could also be used as a white background for head and shoulders portraits and for small subjects like flowers and products.

To increase the amount of light reflected back, simply move the reflector closer to the subject and vice versa.

Golden Reflector


Golden reflector adds a golden cast to the light and simulates light during sunrise and sunset (golden hour) and is the preferred choice when shooting at those times. It works well with tungsten lights and other warm light sources (also with strobes and flashes gelled yellow or orange).

The Translucent Panel


Translucent panel is designed to be used as a Scrim which is placed between the subject and the light source to soften the light. When the translucent panel is placed between the subject and the light, the panel now acts as the light source, the size of the panel is now the effective size of the light and subject to light distance is now measured from the subject to the panel and not subject to actual light. The closer you move the panel to your subject the softer will be the light and vice versa.

The Black Panel


The black panel included in the collapsible reflector has two uses; firstly it could be used as a gobo. A gobo is something you place between the light source and the subject to prevent light from reaching the subject. It is used when you need to control the areas being lit by the light. Secondly it could be used as a black background for head and shoulders portraits and for photographing small subjects like flowers and products.

Related Reading


  1. Photography lighting - 12 Questions to ask yourself before clicking a picture
  2. Wide Panel in Camera Flashes, What is it? What does it do?
  3. Inner Diffuser Baffles in Softboxes – What is it for? What does it do?
  4. The Inverse Square Law and Practical Photography
  5. What Happens When Light Falls On a Surface

How To Photograph Christmas Trees


Now that everyone has their Christmas trees decorated and have piled up presents underneath it, let’s see how best to capture the beauty of the Christmas tree in our photographs.


How To Photograph Christmas Trees
Photo by: Stephen Vance


Here are some tips to photograph Christmas Trees.


1. Use a Tripod


Shooting Christmas trees means shooting indoors mostly in low light situations (often times the main lighting in the room is turned off or reduced in strength to reveal the beauty of the Christmas tree and to make it stand out in the scene) using a solid tripod gives you the ability to get sharp pictures even with very slow shutter speeds.  This also helps you shoot in low ISO’s for better image quality.

2. Cable Release / Remote or Self Timer


To further improve the sharpness of our pictures we can use a cable release or camera remote to release the shutter, if you don’t have a cable release or a remote you can simply set your camera to self timer and get sharp images.

3. Use White Balance Creatively


christmas tree photography technique
Photo by: Andy Castro


You can play with white balance settings of your camera to get creative effects. Set white balance to warmer settings and give your Christmas images a Cozy feel alternatively set your white balance to cooler settings and give your Christmas images a wintery feel. Do also try shooting in black and white, Christmas images look great without all those colors detracting attention of the viewers from the subjects.

4. Shoot RAW


christmas tree photography tips
Photo by: Trey Ratcliff


The previous tip was about creative use of white balance to enhance the feel of your shots, one could either experiment while shooting or shoot in RAW and choose the settings that work best later while post processing. Shooting in RAW format also gives you more control over exposure in post processing.

5. Use Evaluative or Matrix Metering Mode


Photographing Christmas lights could prove tricky to your camera’s meter, it is better to use Evaluative or Matrix metering modes rather than spot metering mode.  If you use spot metering mode, depending upon where you get your meter readings from (it could be from a bright light source or a shadow) your exposure could be way off.

6. Meter from a Neutral Subject


While taking a meter reading it is recommended to meter off a neutral subject in the scene, and not with the camera pointed directly at a light source or a shadow area consider some area that is somewhere in between.

7. Use Your Camera’s Histogram to Correct Exposures


christmas tree bokeh
Photo by: Jack


Consult your camera’s histogram regularly to determine correct exposures, in such tricky situations your cameras metering system could fail and will give you incorrect exposures. Do not rely just the LCD display to check your exposure but use the histogram feature (use both RGB and Luminosity histograms) to make sure your exposure is correct and you are not clipping highlights or shadows.

8. Play with Depth of Field


Try experimenting with depth of field to get different effects, if you have an uninteresting background or if you wish to make your Christmas tree stand out in your picture use wide apertures (f/2.8, f/4 etc). if you wish to include the features in the background also reasonably sharp use narrow aperture (f/11, f/16 etc).
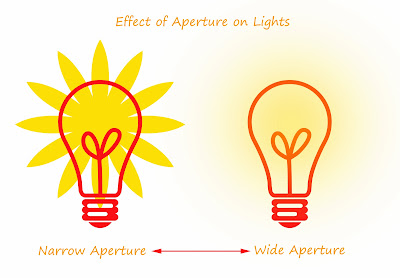

Christmas Light Photography


Shooting light sources with narrow apertures in lowlight has a very nice side effect; all the lights in your picture will look like starbursts (similar to the effect you get using a starburst filter). This could make your picture stand out from the rest, but remember shooting in low light conditions with narrow aperture will require either a very high ISO setting or very low shutter speeds or a combination of both.

9. Shutter Speeds and How it affects the lights


The shutter speed used to capture the scene also affects the way the lights are rendered in the picture. Slower shutter speeds capture movement in the lights and faster shutter speeds freeze them completely.
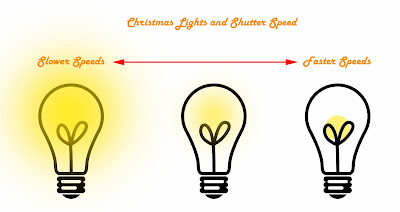

Christmas lights and shutter speeds


Lights appear larger and a bit blurred when shot using slower shutter speeds whereas they appear smaller (like points of light) when shot with faster shutter speeds.

10. Capture Details


how to photograph christmas tree
Photo by: Flood G


You have taken a lot of care to make sure your Christmas tree look great and have decorated it with all sorts of items carefully chosen to match the scene. Once you have captures wide shots of the Christmas tree it’s time to move in close, use a macro lens if you have one and capture details like branches, presents and lights.

11. Mind the Reflections


christmas tree photography
Photo by: Mohammadali F


When shooting up close, shiny objects could reflect the world around them and that could mean you and your camera could also get reflected. Sometimes it creates a very interesting picture and sometimes it appears as a detail which the photographer forgot to notice while photographing the object. Keep this in mind and if you choose to keep reflections it should appear intentional and make it artistic else it is better to avoid it entirely by changing shooting angles.

12. Take Christmas Portraits with Your Christmas Tree Included


christmas portraits
Photo by: Jeff Meyer


Take pictures of your friends and family and try to include your Christmas tree also in the shot, to get best results, turn on every light on the Christmas tree, adjust ambient light (light in the room) to match the brightness of the lights in the Christmas tree. It is better to keep the ambient light a bit lower than the lights on the Christmas tree to create a mood. Remember when photographing people in such conditions it is better to get shutter speeds a bit faster even if you are shooting on a tripod as chances are your subjects could move slightly and cause blur. Raising the ISO is many times the only option to get the required shutter speed.

13. Add Light to the Scene


photographing christmas trees
Photo by: Lulu Lovering


To get a sparkly feel to your Christmas pictures you will need an additional light source (other than the lights on the Christmas tree) this is even more important when shooting with narrow apertures. It could either be a continuous light source or your camera flash.

14. Using Flash to Add Light


tips for photographing christmas trees
Photo by: Jason Mrachina


When using flash to capture Christmas pictures make sure you only use it as a fill light source and never as the main light. Also never use flash front on, use it bounced off the walls or the ceiling. Control the brightness of the flash or use adequate flash exposure combination to get the balance between the ambient and the flash right. It is also advisable to set your flash to rear curtain (second curtain) sync and drag the shutter to expose the scene. If you room is lit predominantly with tungsten lights then gel your flash yellow to match the colour temperature of the room lights.

Have fun, use the tips, take lots of pictures and do share it with us in comments… Merry Christmas.

Related Reading


  1. Best Camera Settings for Photographing Christmas Lights
  2. 12 Photography Tips for Better Party Photos
  3. Shaped Bokeh Tutorial
  4. 20 Digital Photography Tips for Better Christmas Pictures
  5. How to Photograph Christmas Lights

Diy Flash Diffuser for Macro Photography Using Styrofoam Plate


This is perhaps the easiest flash diffuser project ever. Take a styrofoam plate, the larger the plate the better, it need not be circular even rectangle or oval shaped plates work quite well.


diy flash diffuser
diy flash diffuser


Take out your lens filter, press it gently on the styrofoam plate so as to make a mark, then cut out the circle,  (cut the inside of the line so that the plate attaches tightly on to the lens filter) attach the filter back on to the lens, slid the styrofoam plate on to the filter and you are good to go.


styrofoam dish flash diffuer


There is some light loss with this setup as a considerable amount of light gets reflected back from the white surface of the styrofoam plate. But the impotant thing for us is that most of the light will pass through the plate, the surface of the plate now acts as the light source which is many times larger than the flash head also the light gets spread in all angles evenly illuminating the area ahead.

With this diy flash diffuser it is possible to get soft light very close to the lens which is not possible without it as the lens itself would cast its shadow on the subject. 


macro photography flash diffuser


This will also work with a dedicated flash unit mounted on top of the camera. The most important thing to remember is that this setup is only effective for macro photography, for subjects that is a little bit distant from the camera this wont work well due to the light loss and spread of the light beam. But for macro photography this works like a charm.

Here's a shot taken with our diy flash diffuser


flash diffuser for macro photography


Related Reading


  1. How to turn any Lens into a Macro Lens the Lens Reversal Technique
  2. How to Lock a Lens at a Certain Aperture
  3. Stacking Lenses with Coupling Rings for Extreme Macro Photography
  4. Macro Photography Using Extension Tubes
  5. Lens Extension and Effective F Stop

How to Photograph Coins using Dark Field Lighting Technique

In the previous posts we have covered various tips and techniques for photographing coins, now its time to play with lighting setups to create works of art.

Here's a Coin shot using dark field lighting setup.

Coin Photography Tips


A little invention for dark field shooting: 

coin photography lighting tutorial


A black cardboard cylinder, with a small paper border at the bottom. This setup ensures, that the light for the coins really only comes from the side (through the white paper rim).

Here's how the setup looks from the top with a couple more flash units added.

dark field lighting setup for coin photography

And here's couple more taken using the dark field lighting technique for your inspiration.

coin photography tutorial

coin photography using dark field lighting technique

Have Fun: Vicco Gallo

Related Reading


  1. A Complete Guide to Photographing Coins Using Different Lighting Setups
  2. Using Axial Lighting for Photographing Coins
  3. Infinity Focusing – What is it? How does it work? How to manually set a lens without a distance scale to Focus on Infinity?
  4. DIY Flash Extender for Macro Photography
  5. Relationship Between F-Stop Numbers and the Size of the Diaphragm Opening Explained

Using Axial Lighting for Photographing Coins


Axial lighting is ideal for photographing coins; with it there are no actual shadows, only brighter and darker areas, depending on how much light is reflected back to the camera.

Here’s my setup for photographing coins using axial lighting.


Coin Photography Tutorial


The setup is very easy to make, make a foamcore box, keep one of the sides and top open,  line rest of the box with black velvet (it absorbs stray light preventing unwanted reflections and increasing contrast). Mount a thin piece of glass in it at a 45-degree angle and you are ready to roll.

The camera is mounted on a copy stand, aimed down into the open top of the box.

When light is shined from the open side of the box, it strikes the glass and is reflected down to to the coin which rests on the bottom. The effect is as if the light were coming directly from the axis of the camera lens.

The photo given below shows the results of this lighting...


How to photograph coins


With this lighting, any surface perpendicular to the lens reflects the light brightly. Any surface angled away from this axis shows up as increasingly darker.

The light in this case is a focused LED flashlight. The narrow beam also helps to avoid stray reflections. The important thing to remember is to place the light parallel to the sensor plane.

Coin Photography - Axial Lighting Setup


If you are using continuous light sources it is much easier as you can change the tilt angle of the glass and observe the lighting change and thus find the best lighting that suits your need.

To check the angle of the light, substitute a small, flat mirror for the coin. The light should be bright and clearly visible in the viewfinder of the camera.

Enjoy: Jim Salvas

Related Reading


  1. Infinity Focusing – What is it? How does it work? How to manually set a lens without a distance scale to Focus on Infinity?
  2. DIY Flash Extender for Macro Photography
  3. Relationship Between F-Stop Numbers and the Size of the Diaphragm Opening Explained
  4. Making Sense of the Odd Progression of the F-Stop Scale?
  5. Complete Guide to Choosing Macro Lenses

A Beginners Guide to Low Key Photography

low key photography
Photo by: Pauli Järviluoto


In the previous article we discussed High Key Photography and how it is done in camera, now its time for us to discuss the opposite, Low Key Photography.

What is Low Key Photography?


low key photography tutorial
Photo by: Jeremy Kunz


Low key photography makes use of dark tones and colours, the main feature of a low key photograph is the shadows; the intention here is to increase the contrast in the image and to direct the viewers’ attention directly to the subject, low key is an exercise in illumination and elimination.

Unlike high key photography where we use generous quantity of light, low key requires much less, only the most important features/elements are illuminated and the rest are kept in the shadows. This helps convey atmosphere and mood to the viewers, when high key images feels airy, light and rich low key images feel dramatic and is full of mystery.

Why is it called Low Key Photography?


low key photography lighting setup
Photo by: Paul Burnett


In photography we refer to the mid tones as key tones, and we achieve low key effect by placing these key tones low on the exposure scale thus making them darker. The majority of the tones in a low key photograph will be below 128. So low photography means the image’s key tones are low.

Equipment Requirements for Low Key Photography


Unlike High key photography Low key photography could be done with very little equipment, all you need is your camera and a lens. Lighting can be purely natural light, a single flash or a strobe or just a reflector. As a photographer to create low key images all you need to do is make sure the light ratio between your subject and its surroundings is high. The subject (or the most important part of the subject) should receive at least a couple of stops more light than its surroundings.

Also make sure you generate maximum contrast in your shots by carefully choosing dark backgrounds, dark colour clothes, props etc.

Low Key Lighting


low key lighting photography
Photo by: Andy Leddy


You can easily achieve low key lighting using a single light source. That single light source can be the sun, a flash or a strobe, or any other light source.

During sunny days you can create low key lighting by simply placing your subject in the shade, in a door way that opens out (shooting from outside), near a window, near a door adjoining another room which is brightly lit etc. or you can simply use a flash, strobe or any other light to sidelight your subject keeping the other side relatively dark. The amount of contrast should be determined based on the subject/scene being shot and the effect you wish to achieve with your photos.

In low key photography the requirement is not of more light, but for devices like scrims, gobos, cutters and other light modifiers like barn doors, grid spots etc to control the light so as to keep certain areas illuminated while keeping certain others in the shadows.

Camera Settings for Low Key Photography


low key photography settings
Photo by: Sacha Fernandez


Creating low key photographs in a studio environment or in a dimly lit scene is quite easy, but when you are faced with the challenge of creating low key photographs in normal conditions these tips could come in handy.

Here your primary aim is to kill most of the ambient light present on the scene.

Keep your ISO Low


Keeping your ISO low will make creating low key images easy and will also ensure noise free images. 
If you are Shooting with available light or any continuous light source Use any combination of aperture and shutter speed to get the desired effect.

If you are using Flash or Strobe Set your Camera to its Sync Speed

Sync speed is the maximum shutter speed possible with flash without having to use high speed sync mode. Now all you have to do is to adjust aperture and flash power to get the desired effect.

Sculpting with Light


low key photography tips
Photo by: David Kracht


In creating low key images it is important to control the light, it should only fall on areas that it is supposed to, use light modifiers like gobos, cutters, scrims, barn doors etc to eliminate light spill over that would reduce contrast and produce undesired effects. It’s the shadows that make the image, make sure they fall exactly as you want them, low key photography requires a good understanding of light, shadow and tone. Manipulate your subject and modify your light until you get the precise light required for the shot.

What is High Key Photography What is High Key Lighting and How to Achieve High Key Effect In Camera


high key photography
Photo by: Boudewijn Berends

High key photography was first used by fashion photographers of the early 60’s; they discovered that combining the soft glamour lighting with a little bit of overexposure when shooting on a white background renders a very interesting look to their photographs, smoothing out skin tones and making their models look skinny. The technique also helped them make their work stand out from everything else that was prevalent at that time.

Another take on the advent of high key photography is that High key methods were originally developed as a solution to deal with monitors that only had limited capabilities to reproduce high contrast ratios, but the technique soon developed into more of a stylistic choice.

What is High Key Photography?


High key photography is photography using high key lighting which results in a photo with the majority of image data recorded in bright tones.  The picture will have very low contrast range with almost no dark/shadow areas. A histogram of a high key image will look like the following.

High key photography is perfect for subjects that are funny, lighthearted or beautiful. A high key image usually conveys a positive or upbeat tone and is used regularly for model photography, flowers and other subjects that are feminine in nature. Another area perfect for high key is product photography the reason is that psychologically, a product shown on white tends to suggest that it is high quality or upscale in nature.

How to Achieve High Key Lighting


high  key lighting
Photo by: Russ Robinson


When digital photography became popular many people were confused regarding what is a high key image, they were led to believe that any image with a white background or where the subject’s skin is overexposed is a high key image. But nothing can be farther from the truth; in reality a high key image is one where the subject is lit fairly flat without any deep shadows. It is common practice that background and any props used and the clothing of the subject be some light color preferably pastel or white and not some dark shades. This combined with the flat lighting will help reduce contrast and the resulting image will have majority of tones well above 128 without overexposing the skin.

Why is it called High Key Photography?


high key photography tips
Photo by: Katinka Bille Lindahl


In photography we refer to the mid tones as key tones, and we achieve high key effect by placing these key tones high on the exposure scale thus making them lighter/brighter. So high key photography means the image’s key tones are high.

Now let us take a look at what really happens when we drag our key/mid tones higher.

When the key/mid tones are placed higher in the exposure scale it affects the image in two ways. Firstly the highlights (brightest areas of an image) will get even brighter and if one is not careful could easily clip and secondly shadows or dark tones are dragged up and they become much brighter, so the shadow details now effectively becomes the mid tone detail. The real secret behind successful high key photography is in the precise control of these dark tones.

How to achieve High Key Effect in Camera


high key photography tutorial
Photo by: Massimo Regonati


A high key effect could be simulated in post processing by controlling highlights and shadows (which we increase exposure and at the same time brighten the shadows), but it causes loss of image data and the results are not very impressive. High key effect is best achieved in camera; it produces natural tones which appear more convincing. Now let us take a look at the different aspects of high key photography.

High Key is Not Over Exposure


high key photography outdoors
Photo by: Daniel Zedda


Over exposing a scene would not give you a high key image, doing that will only blow out highlight details and brighten the shadows a bit. You will be able to make the former shadow tones to mid tones, but you cannot make them high tones as this will cause most of the highlight areas to clip completely.

High Key is Not Only High Contrast


high key photography camera settings
Photo by: Dima Bushkov


High contrast images in which mid tones are mapped to white are not high key (adjusting levels using the black and white sliders), it is just a high contrast image.

Real High Key Photography


high key photography examples
Photo by: Tor Kristensen


Achieving high key effect is easier if you have light coloured background, props, clothes etc. Light your subject/scene using a generous quantity of light which will help you avoid deep shadows, the light scene will reflect a lot of light and thus help lighten/eliminate shadows.

When working with way too much light one should concentrate more on the overall shape and forms rather than texture and detail. Your photography style should adapt to the flat lighting, remember in such lighting saturation is decreased. The colours go paler as you increase your exposure so exposure is critical, you will need to expose you shot to the right, how much is actually determined by the subject/scene at hand and your personal taste, but it’s always a good idea to bracket your shots so you have plenty of options to choose from and need not do any manipulation of levels, curves, hue/saturation etc in post.

Photography Creative Lighting Tutorial – Ghostly Visage

Guest post by: Ben Heys

Ok, before I get stuck into the tutorial I’ve got a quick challenge for those of you photographically minded: have a look at the shot, look at the shadows and have a guess yourself at what lighting setup I used, then read on to see if you are right!


photography
Photo by: Ben Heys


The reason I thought I’d do a quick lighting tutorial on this particular image here as it’s probably the number one image I get asked about in terms of technique used in the lighting setup. These questions often come with explanations of attempts made or theories as to what the setup was. I’ve had every theory under the sun thrown at me, some with up to 6 lights coming from various angles at varying strength ratios through various modifiers etc

Funny thing is though, that as these theories get more and more intricate they also get further and further from the truth. The real lighting setup was in actual fact nothing more than a cheap piece of cheesecloth type material pegged (yes literally held up with clothes pegs) to my garage rolla door which was opened fully at about 4o’clock in the afternoon.

We then wet the cloth and Lutetium (the model) jumped behind the cloth and moved against it in different ways with my shooting effectively her 4pm shadow (ok that sounds a bit wrong, but you know what I mean!)

There was no photographic studio, no “professional” model (though Lu is still one of the most amazing models I’ve ever had the good fortune to work with – thanks Lu!), no studio lights, no makeup artists, assistants etc and the complete cost of the shoot was ~$5 (for the material, which has been reused many times for other shoots).

Now at this stage in my career I often worked in fully equipped photographic studios, however that didn’t stop me from pegging a bit of cheesecloth to the garage door and going nuts when at home. Which brings me to one of the main points I want to make here. The lack of such high end devices as studios, strobes, light modifiers, even makeup artists (I very rarely use them in my work) etc need not stop you from being creative and making the most of whatever you have.

This image has gone on to be one of my all time most popular photos and is even among my own personal faves. I guess other people just find it to be a pretty picture. But for me it’s a little more than just a piece of eye candy. It also epitomizes everything I love about photography – which is the ability for creative souls to use passion and drive (as opposed to gear and resources) to capture the world around them in unique and beautiful ways and then share that vision with others.

So next time you are bemoaning your lack of studio lighting gear or that L series lens you crave take a step back and think about what you can do with what you DO have – it may be much more than you at first realise.

Related Reading


Perfect Lighting Technique for Photographing Texture and Pattern

Texture of an image is the feel it gives about the surface of the object; it gives the viewer valuable information about how the particular object will be to touch. An image with perfectly captured texture gives the information where even thousand words may fail to convey.

The ‘secret formula’ to perfectly capture the details in texture is the use of right lighting. Believe me you'll be surprised at how much texture you can bring out in a seemingly flat object by lighting it differently.

There are three things to consider when photographing textures.

1. The nature of the light whether hard or soft
2. The angle at which the light hits the subject
3. Distance of the light from the subject

Texture Lighting
Texture Lighting


The ideal light to shoot texture is neither hard nor soft; it is somewhere in between. First thing to do is to remove any sort of diffusers you have mounted and let the harsh light hit the directly.

Place the subject to be photographed somewhere that allows you to set up your light on the same plane as the subject, a table which is a foot or two high can be a good solution. If not consider placing both the object to be photographed and the light on the floor. The idea is to let the light rake across the surface. Using a table gives you the ability to vary the height or angle of your light source to create different looks, even seemingly small shift in the height or angle of the light dramatically changes the appearance of the texture.

Using a table gives you the maneuverability to change the height or angle of your light source to create different looks.Even seemingly small shift in the height or angle of the light dramatically changes the appearance of the texture.

Finally let us experiment about possibilities about of capturing textures by varyingdistance between subject and light source. Get started by placing your light a few feetaway from your subject and observe the results, then try increasing or decreasing the distance; till you find the perfect lighting for the texture you wish to capture.

Here are some examples. Remember our previous article about Finding Great Texture; I needed something to illustrate the point being discussed here. But I was tired and lazy so settled with the nearest object that I could find. I shot the very fabric of the couch I was sitting; no hassles of texture-hunting!

Lighting for texture photography

The picture above is shot with light coming from the same angle as the subject (diffused on camera flash). A dull example of front-lighting that gives the fabric surface a flat look with insignificant details.

Lighting setup for photographing texture
Now I just moved the light to a 90 degree angle; behold the texture of the same subject now! Both the flash and the subject are at same height.  (again diffused flash light at same level as the fabric)

photographing texture and pattern

Now I just removed the diffuser and shot it using bare flash the light was now placed a bit higher than the subject slightly angled down. Side-lighting is no mean thing; it can work magic bringing out textures that lie hidden in anything; here it just happened to be a fabric that is all.

 
Support : Creating Website | Johny Template | Mas Template
Copyright © 2011. Technology Share - All Rights Reserved
Template Created by Creating Website Published by Mas Template
Proudly powered by Blogger