 |
| Photoelasticity photography effect |
As per Wikipedia Birefringence is the optical property of a material having a refractive index that depends on the polarization and propagation direction of light. These optically anisotropic materials are said to be birefringent (or birefractive). The birefringence is often quantified as the maximum difference between refractive indices exhibited by the material. Crystals with asymmetric crystal structures are often birefringent, as well as plastics under mechanical stress.
Birefringence is responsible for the phenomenon of double refraction whereby a ray of light, when incident upon a birefringent material, is split by polarization into two rays taking slightly different paths.
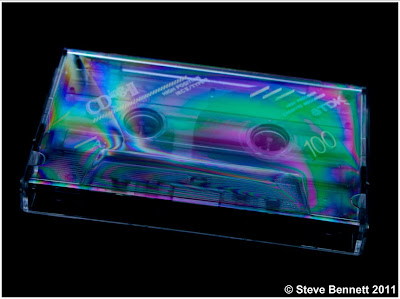
Leaving the theory aside let’s get to the more practical side of photography. Birefringence is also called photoelasticity and is an effect created using a polarizing filter while photographing transparent plastic under polarized light. The effect shows the stress contained in the plastic.
 |
| Birefringence Photography Trick Tutorial |
So basically there are two polarizing filters at work here one in between the light source and the subject to make the light polarized and another on the camera lens. The polarizing filter used to polarize the light should be a linear polarizer but the one on the lens could either be a linear polarizer or a circular polarizer. The good news is getting a polarized light source is not that hard, we already have it in our home, yes most computer monitors and LCD TV screens are linearly polarized if you don't want to use a laptop screen or need to get rid of the RGB pixels, you can use a light table with polarizing paper on top of it instead. Similar is the case of polarizing filter for the lens, if you do not have a polarizing filter you can get the job done with a polarized sun glass, as simple as that.
Materials that work well with this trick are cheap transparent plastic materials like spoons, forks, knifes, cd separators, cd covers, cassettes, packaging materials etc.
Creating Birefringence or Photoelasticity Effect
 |
| Photoelasticity Tutorial |
- Photoelasticity effect works well when the subject is backlit.
- Place your laptop on a table with keyboard side up.
- Make the screen perfectly white, open notepad or paint and make it full screen.
- Turn up the brightness if need be.
- Attach polarizing filter on the camera lens, turn it around and observe how the subject’s appearance changes.
- The process is much easier if you have live view available on the camera.
- Look at the LCD screen and take your picture when the subject looks really good.
- Multiple layers of plastic could create an even stronger effect.
and here's a couple more for your inspiration;
 |
| Photoelasticity or Birefringence Photography Trick Tutorial |
 |
| Photoelasticity or Birefringence Photography |
 |
| Photoelasticity Photography Trick Tutorial |
Have Fun: Steve Bennett

Post a Comment