Now that everyone has their Christmas trees decorated and have piled up presents underneath it, let’s see how best to capture the beauty of the Christmas tree in our photographs.
Here are some tips to photograph Christmas Trees.
1. Use a Tripod
Shooting Christmas trees means shooting indoors mostly in low light situations (often times the main lighting in the room is turned off or reduced in strength to reveal the beauty of the Christmas tree and to make it stand out in the scene) using a solid tripod gives you the ability to get sharp pictures even with very slow shutter speeds. This also helps you shoot in low ISO’s for better image quality.
2. Cable Release / Remote or Self Timer
To further improve the sharpness of our pictures we can use a cable release or camera remote to release the shutter, if you don’t have a cable release or a remote you can simply set your camera to self timer and get sharp images.
3. Use White Balance Creatively
You can play with white balance settings of your camera to get creative effects. Set white balance to warmer settings and give your Christmas images a Cozy feel alternatively set your white balance to cooler settings and give your Christmas images a wintery feel. Do also try shooting in black and white, Christmas images look great without all those colors detracting attention of the viewers from the subjects.
4. Shoot RAW
The previous tip was about creative use of white balance to enhance the feel of your shots, one could either experiment while shooting or shoot in RAW and choose the settings that work best later while post processing. Shooting in RAW format also gives you more control over exposure in post processing.
5. Use Evaluative or Matrix Metering Mode
Photographing Christmas lights could prove tricky to your camera’s meter, it is better to use Evaluative or Matrix metering modes rather than spot metering mode. If you use spot metering mode, depending upon where you get your meter readings from (it could be from a bright light source or a shadow) your exposure could be way off.
6. Meter from a Neutral Subject
While taking a meter reading it is recommended to meter off a neutral subject in the scene, and not with the camera pointed directly at a light source or a shadow area consider some area that is somewhere in between.
7. Use Your Camera’s Histogram to Correct Exposures
Consult your camera’s histogram regularly to determine correct exposures, in such tricky situations your cameras metering system could fail and will give you incorrect exposures. Do not rely just the LCD display to check your exposure but use the histogram feature (use both RGB and Luminosity histograms) to make sure your exposure is correct and you are not clipping highlights or shadows.
8. Play with Depth of Field
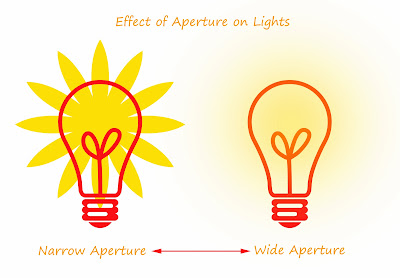
Try experimenting with depth of field to get different effects, if you have an uninteresting background or if you wish to make your Christmas tree stand out in your picture use wide apertures (f/2.8, f/4 etc). if you wish to include the features in the background also reasonably sharp use narrow aperture (f/11, f/16 etc).
 |
| Christmas Light Photography |
Shooting light sources with narrow apertures in lowlight has a very nice side effect; all the lights in your picture will look like starbursts (similar to the effect you get using a starburst filter). This could make your picture stand out from the rest, but remember shooting in low light conditions with narrow aperture will require either a very high ISO setting or very low shutter speeds or a combination of both.
9. Shutter Speeds and How it affects the lights
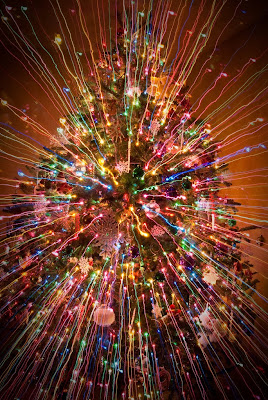
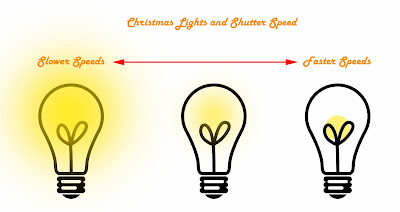
The shutter speed used to capture the scene also affects the way the lights are rendered in the picture. Slower shutter speeds capture movement in the lights and faster shutter speeds freeze them completely.
 |
| Christmas lights and shutter speeds |
Lights appear larger and a bit blurred when shot using slower shutter speeds whereas they appear smaller (like points of light) when shot with faster shutter speeds.
10. Capture Details
You have taken a lot of care to make sure your Christmas tree look great and have decorated it with all sorts of items carefully chosen to match the scene. Once you have captures wide shots of the Christmas tree it’s time to move in close, use a macro lens if you have one and capture details like branches, presents and lights.
11. Mind the Reflections
When shooting up close, shiny objects could reflect the world around them and that could mean you and your camera could also get reflected. Sometimes it creates a very interesting picture and sometimes it appears as a detail which the photographer forgot to notice while photographing the object. Keep this in mind and if you choose to keep reflections it should appear intentional and make it artistic else it is better to avoid it entirely by changing shooting angles.
12. Take Christmas Portraits with Your Christmas Tree Included
Take pictures of your friends and family and try to include your Christmas tree also in the shot, to get best results, turn on every light on the Christmas tree, adjust ambient light (light in the room) to match the brightness of the lights in the Christmas tree. It is better to keep the ambient light a bit lower than the lights on the Christmas tree to create a mood. Remember when photographing people in such conditions it is better to get shutter speeds a bit faster even if you are shooting on a tripod as chances are your subjects could move slightly and cause blur. Raising the ISO is many times the only option to get the required shutter speed.
13. Add Light to the Scene
To get a sparkly feel to your Christmas pictures you will need an additional light source (other than the lights on the Christmas tree) this is even more important when shooting with narrow apertures. It could either be a continuous light source or your camera flash.
14. Using Flash to Add Light
When using flash to capture Christmas pictures make sure you only use it as a fill light source and never as the main light. Also never use flash front on, use it bounced off the walls or the ceiling. Control the brightness of the flash or use adequate flash exposure combination to get the balance between the ambient and the flash right. It is also advisable to set your flash to rear curtain (second curtain) sync and drag the shutter to expose the scene. If you room is lit predominantly with tungsten lights then gel your flash yellow to match the colour temperature of the room lights.
Have fun, use the tips, take lots of pictures and do share it with us in comments… Merry Christmas.
Related Reading
- Best Camera Settings for Photographing Christmas Lights
- 12 Photography Tips for Better Party Photos
- Shaped Bokeh Tutorial
- 20 Digital Photography Tips for Better Christmas Pictures
- How to Photograph Christmas Lights


