Note: this was initially written specifically for SpazeDog roms, but as they have not been updated in a while I have provided links to the Evervolv roms as well. If you would like to try a different ICS or JB rom this guide should work, just substitute with the appropriate rom and depending on the one you choose, you may also need to install Google apps (if not included).
Disclaimer: This guide involves making changes to your phone that potentially could brick your phone leaving it unusable. I am not liable for any changes you make or problems you may have with your phone. You should at least be familiar with entering commands using command prompt. This procedure will erase ALL the data on your phone. Make sure you have a backup of everything. A nandroid backup is recommended. Proceed at your own risk.
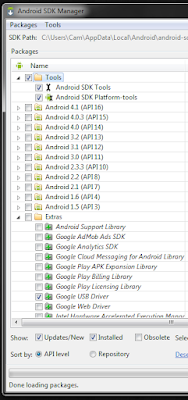
Before we get started make sure you have the following: a rooted Nexus One, a USB cable to attach your phone to a computer, and the Android SDK. If you are just now installing the Android SDK, open the SDK manager and make sure to install the "Tools" and in "Extras" the "Google USB Driver" as shown in the screenshot. Alternatively, you just download ADB and Fastboot (just google "ADB Fastboot Download"). If you have a Mac see this thread to get started with ADB and Fastboot.
If you Nexus One is NOT already rooted, then follow this guide from Cyanogenmod to root your phone.
Links to popular roms that will work using this guide:
Step 1 - Download everything you will need:
- 4EXTRecovery Updater - the first link will download the .apk.
- BlackRose - go down to bottom of the first post to "Attached Files" and download the latest BlackRose zip file.
- If you don't want to do it yourself, check out this thread to flash a pre-made partition scheme. Often the developers (Evervolv) will also have a partition schemes that you can flash via Fastboot from your PC as well.
- Your rom of choice - go to the downloads section and choose which rom you would like to try. Download the zip installation file.

- The easiest thing to do is go to this 4ext link, download and install it, directly from your Nexus One. You can also install it by copying the APK file to your SD card, then using a file manager to find it and install it or you can use command prompt by opening command prompt, cd to the location of the Android SDK tools, and then type in the following command (replacing "path" with the path to where the APK is located on your computer): Code:
adb install /path/4EXTRecoveryUpdater.apk
- After you have installed 4ext open the 4EXT Recovery Updater. Tap "Settings" → "Allow" superuser request → "Yes" to connect to 4ext to get new data. Now select "Online install/upgrade" → "Yes" assuming it detects your Nexus One correctly → select and install the latest 4ext recovery (at the top of the list).
- IMPORTANT: After 4ext has installed, it will have placed a recovery image on your SD card - find it (it is called recover.img) and it should be located in SD/Download/4EXT_Recovery_Touch/ folder. Copy this to your computer in case something goes wrong later and you need to re-flash the recovery image!
- After installation of the 4ext recovery turn off your phone and boot into recovery by turning off your phone, turning it on again while holding the trackball down. Your Nexus One will now boot into the bootloader. Once in the bootloader press the trackball once to select "bootloader", use the Volume Down key to select "recovery" and press the trackball to select. Alternatively, you can input the following:
- Your phone should now boot into the 4ext recovery menu. Select "tools" →“partition sd card” → “remove all partitions and start from scratch.” Then for the 1st partition select “1024″ for a 1GB partition (this will be where ICS or JB will be able to put your applications & data). Select "skip" for the 2nd partition and for the swap partition. Finally select the final system “ext4″.
Code:
adb reboot recovery
- Download the ICS or JB zip file above and copy it to the root of your newly formatted SD card.
- Download the BlackRose application and install it on your computer.
- This is not always necessary. Some developers have made flash-able partition schemes that you can just flash from your PC - usually links are provided in the rom's installation thread, Evervolv's here). If you do have access to a computer you can check out this thread at xda developers to download files you can flash from recovery.
- If you choose to change your partition scheme using one of the above methods skip to step 5.
- Make sure your Nexus One is attached via USB to your computer and is booted into Android normally.
- Open the BlackRose application and follow the instructions as shown in this video. Note that the video resizes for JB roms, so if you are planning to use an ICS rom follow the instructions below.
- Open the application and BlackRose will install on your phone, rebooting once. The application will then close.
- Open BlackRose again and then select "apply stock/custom blackrose" by pressing 1 and enter.
- Then select "custom blackrose" by pressing 2.
- Then type "resize" when prompted.
- Now the sizes depend on whether you are installing the ICS or JB Roms:
- You will need to change the sizes of the system partition to 220 (ICS) or 260 (JB)
- Change the cache size to 10.
- Finally name the new system partition, you can name it "ICS" or "JB" depending on which ROM you plan to install.
Code:
fastboot flash recovery /path/recovery.imgIf that does not solve your problems (inability to get into recovery) then I would recommend going back to the cyanogenmod wiki and installing Amon_Ra's recovery. Then you can use it to flash your installation zip.
Step 5 - Install ICS or JB:
- Now turn your phone off and boot into recovery as you did in step 2.4.
- 4ext will load. Select "wipe/format" → "format all partitions (except sdcard)" and then also "wipe data/factory reset."
- Now go back and select "install from sdcard"→ "choose zip from sdcard" → and then select the ICS or JB zip you copied to the SD card in step 3.
- Now the installer will load. Just follow the prompts to install and enjoy!
Update #2: Learn how to install Google Now on SpazeDog rom, one of the major new features in Jelly Bean (Evervolv roms you can just install the Google search app from the play store).
Update #3: Updated guide to reflect easier ways to do certain things like flash partition schemes, provided links for apps-to-sd scripts and others, and emphasized steps that will save you if anything happens to go wrong during the process. Hope it is more helpful.
