Latest Post :
Recent Post
Showing posts with label Tutorials. Show all posts

How to Activate the Sharp AQUOS Crystal on Ting

Sharp AQUOS Crystal on Ting

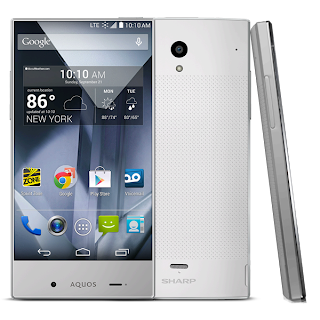
The Sharp AQUOS Crystal has just been released as a Sprint, Boost, and Virgin Mobile exclusive device with a retail cost of $149. To learn more about this device check out my full review. In this post, I wanted to go ahead and share how to activate the device on Ting, my mobile service provider. As I explained in the Ting Moto G activation guide, this is not an "officially" supported device, but functions near-perfect on Ting.

I was able to get the Boost Mobile version of the Sharp AQUOS Crystal to activate perfectly on Ting. Voice, texting (SMS and MMS), and data including tri-band LTE work as intended. However, this phone does not have built-in tethering or a mobile hotspot and the third party tethering apps I tried did not work. Much like the Moto G, tethering or a mobile hotspot is not possible with this phone on the stock software. Other people have also had success with the Sprint prepaid version - both should work fine on Ting.

Activation of the Sharp AQUOS Crystal on Ting

The short version:

  1. Buy a Sharp AQUOS Crystal. I have personally tested the Boost Mobile version but have heard numerous reports that the Sprint prepaid version also works.
  2. Go to the Ting activation page and follow the prompts, entering the information they ask for.
  3. Restart the device and let it activate automatically.
  4. If the device does not immediately activate, open the phone dialer and press ##72786# to force a restart and the automatic activation sequence.

This phone activates no differently than any other Ting device. If you are familiar with activating a device on Ting simply follow the usual steps. For those who are new to Ting check out the detailed version below.

If are becoming a new Ting customer you may use my referral link right before starting the activation guide to get a free $25 credit to your Ting account. If you use it, I will also receive a credit, so thank you!

The detailed version for beginners:

  1. Buy a Sharp AQUOS Crystal. My device was purchased from Amazon, but you can also get it directly from Boost Mobile or from retailers like Best Buy, Target, RadioShack, and Walmart.
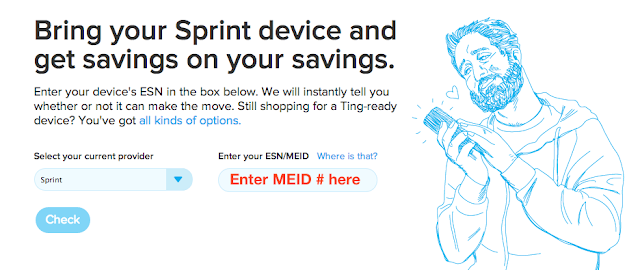
  2. Find the MEID number by checking the phone's box, or on the device go to Settings → About phone → Status → scroll down for the MEID (DEC) number, and input that number into the BYOD page on Ting, and press the "Check" button.
  3. Device can come to Ting
  4. The next page will say, "Your device can come to Ting!" with a button to "Activate now." Click the activate now button:
  5. Activate Now
  6. You will then be asked to enter your ICCID, which is the number associated with the LTE SIM card that comes pre-installed in the device. It can be found by navigating to Settings → About phone → Status → and scrolling down until you see the ICCID number. Enter the ICCID number:
    Enter ICCID
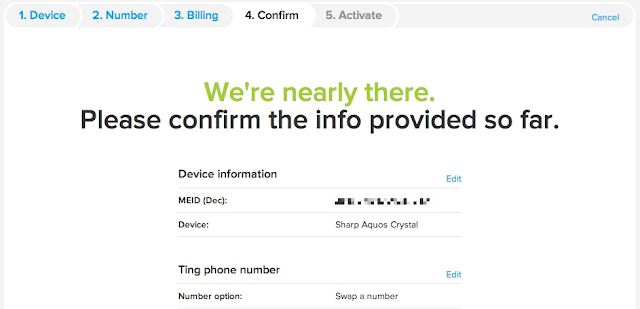
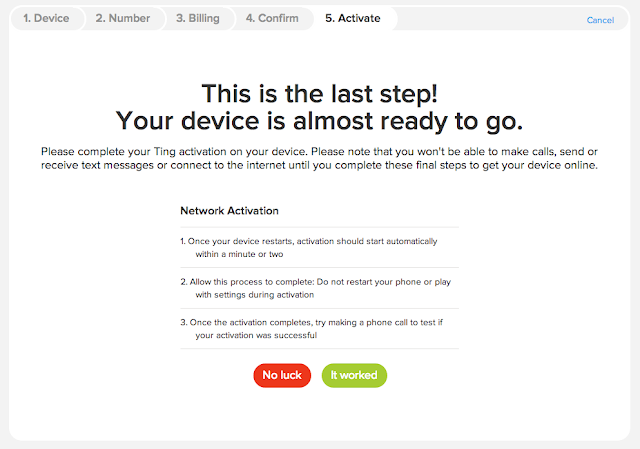
  7. Now you have to select whether to swap numbers, port your number in, or get a new number, followed by verifying your billing details. The confirmation page and final activation page should look like this:
  8. Activation confirmation
    Aquos Crystal Activation Success
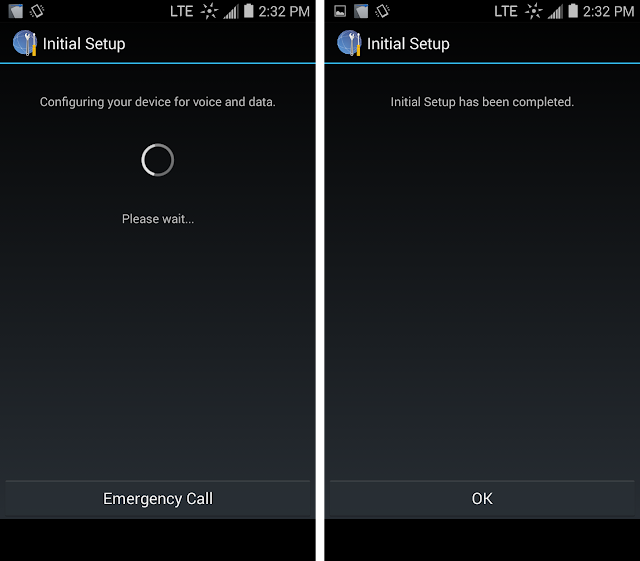
  9. Your new Sharp AQUOS Crystal should now be activated online. To ensure the device itself is activated, restart the device. It should begin the initial setup and activation sequence:
  10. Sharp Aquos Initial Setup
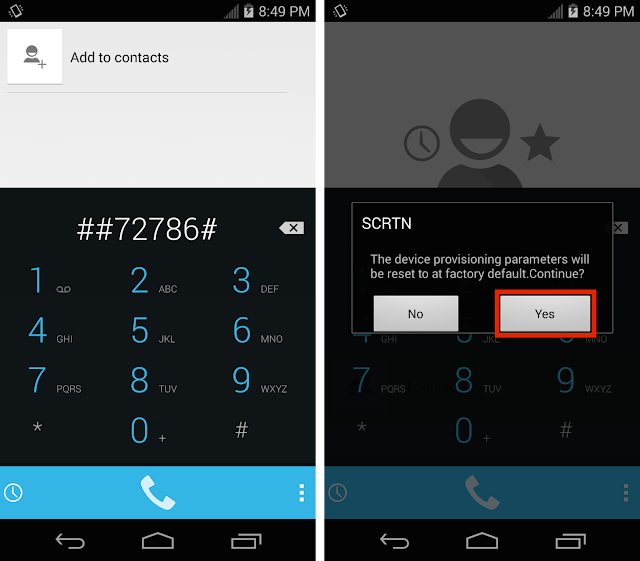
  11. If it does not start the "Initial Setup" shown above automatically, simply go to the phone dialer and enter ##72786# and tap "Yes" on the pop-up window as shown below. This will reset the carrier settings to default, restart the phone, and force the "Initial Setup" to activate your device.
  12. Reset to Carrier Defaults SCRTN

The self-activation sequence should complete without any errors and then the device will restart. To check that everything works properly make a test call, send a regular text (SMS), a picture message (MMS), and browse a webpage with WiFi off to ensure data is functional. If anything does not work properly read the troubleshooting section below.

Troubleshooting and FAQs

Do I need a SIM card for this phone?

  • The phone requires a UICC SIM that is included pre-installed in the device. Assuming you are buying a new Sharp Aquos Crystal, the required SIM card will come pre-installed. You do not need to buy a SIM card from Ting.

Will only the Boost Mobile version work on Ting? What about the Sprint and Virgin Mobile variants?

  • All I can say for certain is that I have personally tested the Boost version and it activates without any issues. I have heard that the Sprint prepaid version also works, but I have not personally tested that device.

I am having trouble with roaming, what should I do?

  • To fix roaming issues make sure to update the PRL by going to Settings → System updates → and tap "Update PRL." After any system software updates (like to Android 4.4.4 or 5.0) you will need to update the PRL again at that time.

If you have any other questions or issues please tell us about them in the comments section below.

If you found this guide helpful please use the buttons below to share this guide or to give it a +1. Thanks!

Device Specifications
Display: 5 inch HD LCD with a resolution of 1280x720
Operating System: Android 4.4.2 KitKat
Processor: Qualcomm Snapdragon 400, 1.2GHz Quad-core CPU
Storage: 8 GB expandable up to 128 GB with a microSD card
RAM: 1.5 GB
Cameras: Rear: 8MP with flash; Front: 1.2MP
LTE: Sprint Spark tri-band LTE

How to Activate the Moto G on Ting

The Motorola Moto G is an excellent "low-end" smartphone that has been available since the end of last year, but has recently dropped in price from its already low retail price of $180 to an astounding $80. Unfortunately, Ting, my mobile service provider, does not officially support the Moto G.

However, since Boost Mobile is a Sprint MVNO similar to Ting and some of Boost's phones have been known to activate just fine on Ting, I thought I would give it a try. I assumed that if it just wouldn't activate - the worst case scenario - all I would have to lose is a few minutes of time.

I am happy to report that the Boost Mobile version of the Moto G will activate on Ting. Everything works as intended, except for creating a WiFi hotspot. Please note that creating a WiFi hotspot and tethering on this phone do NOT work (Edit: rooting the device and installing a custom ROM resolves this issue). Voice calling, texting (including SMS and MMS), and 3G data work perfectly. The Moto G does not have LTE.

Do you have concerns if this procedure still works or need to know if tethering is possible? Check out the FAQs at the bottom of the page.

Ting Activation Guide for the Motorola Moto G:


The short version:
  1. Buy a first generation Moto G (the Boost Mobile version).
  2. Go to the Ting activation page and enter the information they ask for.
  3. Turn on the device and let it activate automatically. You may need to connect to WiFi first.
This phone activates no differently than any other Ting device. If you are familiar with activating a device on Ting just follow the usual steps. For those who are new to Ting check out the detailed version below.

If are becoming a new Ting customer you may use my referral link just before starting the activation guide to get a free $25 credit to your Ting account. If you use it, I will also receive a credit, so thank you!

Detailed version for beginners:
  1. Buy a Boost Mobile Moto G (other versions will not work). I bought mine directly from Amazon for $79, but you can also buy one directly from Boost Mobile or from local stores like Target or Best Buy.
  2. Since this phone is not officially supported by Ting, and it is remotely possible you could have to return it (unlikely though), I would try to activate the phone on the Ting website before you even open the box. Check the bottom of the box for the MEID (DEC) number and have it handy for the next step.
  3. On a computer, go to the bring-your-own-device (BYOD) page on Ting and follow the steps, entering your MEID (DEC) when prompted. After entering your MEID and clicking the "Check" button, the next screen should come up, saying that "Your device can come to Ting!" with a button to "Activate now." Click the activate button, then decide whether to swap numbers, port your number in or get a new number, followed by verifying your billing details. At the end of this your new Motorola Moto G should be activated online.


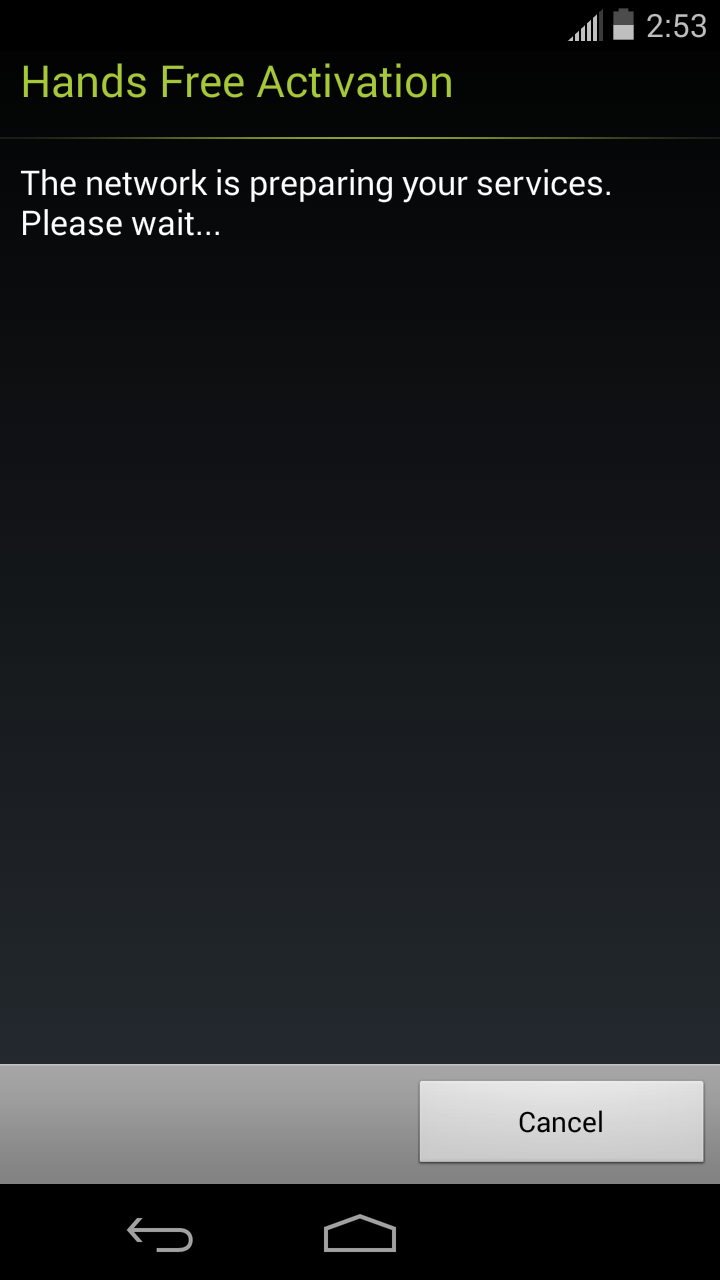
  4. On the last step, it tells you to open the phone dialer and enter ##72786# which will reset the carrier settings to default - if the phone has never been activated before you probably won't need to do that. I just turned mine on, and the self-activation sequence started on first boot as shown below.
    Ting Moto G Hands Free Activation
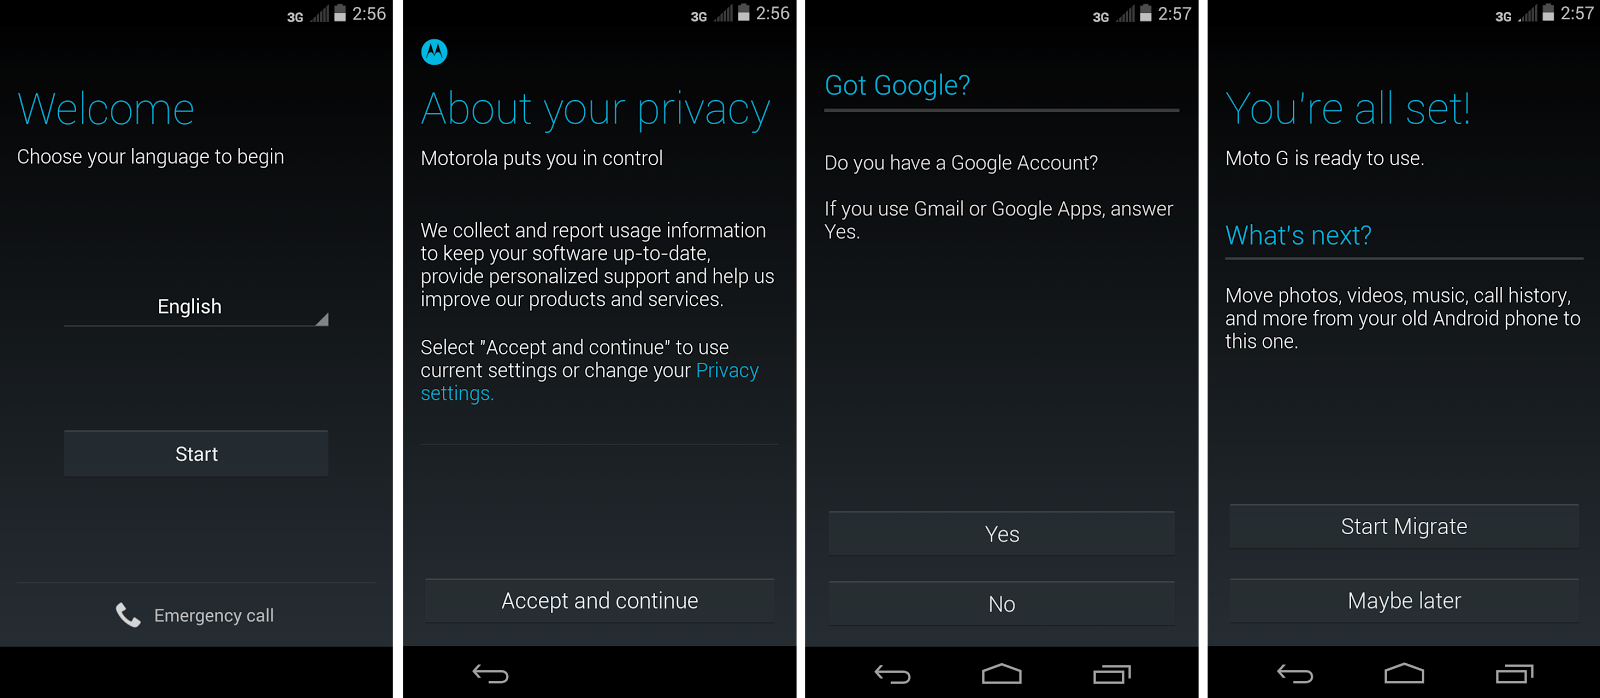
  5. During the hands free activation, it will notify you it is updating the "PRL" and "Profile" - do not press anything, just let it finish this activation sequence. If for some reason activation fails, go ahead and turn on WiFi and connect it to your network, open the phone dialer and enter ##72786#, and then restart. When activation is completed the Moto G will restart. Now tap through the following screens typical of first boot on any Android device.
  6. Check to make sure your Moto G has activated successfully on Ting by placing a test call, sending a regular text message (SMS), and make sure you are receiving data by opening a web page in the browser (with WiFi off). Voice, texting (SMS and MMS), and data should work at this point.
  7. To make sure picture messaging is turned on go to the Device Settings section of your Ting account, click on your Moto G, and make sure "Can send and receive picture & video messages" is turned on.
All of this may seem like a lot if you have never done it before, but that is because I have spelled everything out to the last detail. From opening the box, to being completely set-up with everything working (except the WiFi hotspot), only took between 5-10 minutes.

Just to show what happens when you try to activate a WiFi hotspot on the stock ROM, as I said before, it does not work:

The Moto G is the perfect device for people who do not want to spend much, but want to have a decent smartphone on Ting. It is incredibly inexpensive, but is relatively powerful, and runs near-stock of the latest major version of Android 4.4 Kitkat. Hopefully Ting will be able to sell the Moto G and officially support it soon, but until then you can try this route if you are adventurous and do not care about tethering.


Frequently Asked Questions

  • Does this activation guide still work?
    • Yes, it still works. I will update this guide if there are any changes. You can check out the Ting forum posts to see how others have followed this guide and their experiences with the Moto G.
  • Is there any way to get tethering and WiFi hotspots to work?
    • Yes, installing a custom ROM such as Cyanogenmod will resolve the tethering issue. Just make sure to fully activate the device before installing any custom ROMs.
  • Since this is an unsupported workaround could Sprint or Ting deactivate the device at some point?
    • Essentially no, this is not a major concern.
    • A Ting employee on their official Reddit page stated, "if we ever have to restrict the activation of Moto G's, everyone who has already activated with Ting won't be affected... That being said, we're pretty confident that it won't happen :)"
  • After a software update (4.4.4), my phone is no longer roaming... what happened?
    • You need to update the PRL (preferred roaming list) so that your Moto G will fetch Ting's PRL settings that allow voice roaming on Verizon instead of Boost's settings that do not allow any roaming. When you updated, because the software is designed for Boost, the PRL version was overwritten with a Boost specific version.
    • To update the PRL go to Settings → System update → and tap Update PRL.
  • My phone is getting a "MIP error 67" all the time, what is that?
    • That error seems to occur when data roaming is turned on (data roaming is not supported on Ting, only voice). To turn off data roaming go to Settings → tap "more" under the Wireless & Networks section → Mobile networks → CDMA Roaming Settings → and make sure "Domestic data" is unchecked.
  • What about the new second generation (2014) Moto G? Will it work on Ting?
    • No, the currently available second generation Moto G, is a GSM variant only and will not work on Ting. If a CDMA (the technology Ting uses) version is released by Motorola, I will be sure to test it and post that information here and on social media.
If this activation guide and FAQs was helpful for you please let me know by hitting the "1+" or "like" buttons.

How to Buy an iPhone 5s to Activate on Ting

Do you want to activate an iPhone 5s or 5c on Ting? Do you know where and how to buy one? Here is everything you need to know.

It is now possible to activate the iPhone 5s and iPhone 5c on Ting. Although the major carriers are currently launching the iPhone 6, because Ting is a Sprint MVNO, Sprint does not allow them to activate the latest generation of Apple iPhones. Only until one year after the initial release does Sprint allow iPhones to be brought to Ting.

Another issue to contend with is the fact that you cannot buy an iPhone 5s or 5c directly from Ting at this time. Ting does offer refurbished iPhones for sale in their online store, but only the iPhone 5 and older. To get an iPhone 5s or 5c now, you will have to buy your phone through a third party seller.

Since the iPhone 6 has just been released, prices for last generation 5s and 5c will likely come down significantly in the next month as a large number of devices flood the market.

If you are a new customer or will be adding a new line to your account, you should definitely take advantage of the device swap program:
Sell any AT&T, Verizon or T-Mobile device and we will credit you an extra 30% of your proceeds to cover the cost of a comparable Ting-compatible device.

Where Do I buy a Ting iPhone 5s or 5c?

To buy an iPhone 5s for Ting you can get one from eBay, Amazon, Craigslist, Glyde, Swappa, or anyone who is selling a Sprint iPhone 5s or 5c that meets the below requirements. Shop around to try to find what you are looking for at the best price. Below are links to iPhones that filter out everything but the required Sprint versions:

Amazon - check out the "other sellers" section to see more selection and prices.
iPhone 5s
iPhone 5c

eBay - make sure you buy one that has a "clean/good ESN" and is not "iCloud locked."
iPhone 5s
iPhone 5c

Glyde
iPhone 5s
iPhone 5c

Swappa
iPhone 5s
iPhone 5c

You can buy one from almost anywhere, but to bring an iPhone 5s or 5c to Ting it must meet all the following requirements:
  • Originally sold by Sprint. In other words, it must be a Sprint branded device - iPhones from other carriers will not work.
    • One aspect of being a Sprint model is that they are CDMA variants. "Unlocked" or "SIM unlocked" iPhones are GSM versions that do not use the same frequencies and will not work on Ting.
  • It cannot be reported lost, stolen, or currently active on someone else's account. Being eligible for activation and not reported lost or stolen is often expressed by sellers as a phone with a "clean ESN or IMEI" and "not iCloud locked." If you are buying from eBay, Craigslist, and even 3rd party sellers on Amazon you need to make sure of this. 
  • You must have a UICC SIM card installed for activation (this enables LTE data), model #SIMGLW416C, that you can buy directly from Ting here
Now that you have your iPhone, the next step is to activate it on Ting. If you are a new customer you can get a $25 credit on your account by using this link immediately prior to activating your first Ting device.

How Do I Activate the iPhone 5s and 5c on Ting?

  1. Insert the Ting SIM card and then turn on the device.
  2. Go to https://ting.com/go on a computer to begin the activation process.
  3. On your iPhone find the MEID and ICCID by going to Settings → General → About and scroll down until you see the MEID and ICCID numbers.
  4. Enter the MEID and ICCID when prompted and then follow the instructions to port in your existing number, create a new number, or swap out an existing device on your account.
Are you still having trouble or not sure what to do? Ask in the comments section below or go to the official Ting iPhone FAQs page. If this page has been helpful, please share it or hit the +1 button below.

How to Mute Boot and Camera Sounds with Tasker

How To Turn Off Annoying Sounds With Tasker

Sometimes there are sounds that a smartphone or tablet makes that cannot be turned off with a specific setting and in order for a specific app or action to not make noise the phone has to be in silent/vibrate mode. That is annoying! If my phone makes noise it should be for a reason, like a notification, or because someone is calling me, not because a carrier wants me to hear their jingle or because someone thinks its a good idea to have the shutter sound of the camera super loud all the time. This is typically not the case with stock Android, but skinned versions of Android often have these annoyances added by the manufacture of the phone or the carrier.


I have helped people deal with these annoyances before by rooting their devices. If you really want ultimate control that is still the best way to go, but understandably, not everyone is technically inclined, or simply doesn't want to deal with the "hassle" of rooting their device. Also, things have improved somewhat with versions of Android 4.4 KitKat: devices like the Sprint Galaxy S3 that prior to KitKat made a loud shutter sound when using the camera (no matter what the volume settings were) no longer do so if the phone is in silent or vibrate mode. However, there are still annoying sounds like the boot and shutdown sounds that I literally never want to hear again, but are difficult to remember to silence every time. The following method of dealing with these sounds does not require root access, but does require the Tasker app. Tasker is an expensive app, but if you are in to customizing and automating your device, it is a good buy and can do almost anything you can think of. There is a 7 day free trail so you can try it out before you buy.

Tasker is a great automation app and handles tasks like muting your device in specific apps or at boot and shutdown with ease. In this tutorial I will teach you how to create Tasker profiles and tasks to mute any sounds on your device. The sounds that I mute on my Sprint Ting Galaxy S4 are all camera sounds and the boot and shutdown jingles, so these are the ones I will show you how to mute, but the same principals apply for any other sounds.

Before we start you will need to turn off beginner mode. In the Tasker app, tap the menu button → Preferences → and uncheck "Beginner Mode." This will show additional Tasker features and allow projects.
Tasker beginner mode

Tasker beginner mode off

Download project:

If you want to download the Tasker project and modify it to your preferences, you can do that here.

Download Tasker Project* This is set up to mute boot and shutdown sounds
as well as the default (Samsung) camera app.

*Please do not upload this project to other sites. If you want to link to this project please link to this page, rather than the download link. For personal use only. Thank you.

To import the Tasker project you downloaded, simply open the notifications panel, tap the file you downloaded, "Mute_Sounds.prj.xml" and then choose Tasker to open it. After doing that, you should see the a notification near the bottom of your screen that states, "File Import. The import is now accessible from my UI. Long-click on the relevant top-tab." Occasionally this auto-import function fails. If that happens to you either move or copy and paste the Mute_Sounds.prj.xml file from the /Downloads folder on your device to the /Tasker/Projects folder with a file manager app or a computer.
Import to tasker
Tasker import sucessful
Now open Tasker, long-press on the home icon in the lower-left corner, select "Import" and then select "Mute_Sounds" as shown below. Now all the necessary profiles and tasks should be loaded on your device.
import tasker project

This Project's Profiles and Tasks

First of all, some Tasker basics for those who are new to this app (you can also checkout the Tasker website for more information or this extensive beginner's guide on Pocketables). Tasks are mini programs that do whatever task they were programmed to do each time they run. Profiles are essentially situations that you define in order to trigger a task.

Let's look at the profiles and tasks in this project. There are three simple profiles: device boot, device shutdown, and camera. To prevent the shutdown and boot sounds, the device shutdown profile activates the mute task. When the device is turned back on, the unmute task turns the sound back on after the boot process is complete. You will notice that the camera profile has two tasks associated with it: an enter task (mute) and an exit task (unmute) which occur when opening and closing the app, respectively.
Tasker sound profiles
You can change the name of any of these profiles without affecting their functionality. If you would like to add more apps to be silenced simply tap the camera icon in the "Camera" profile to open a list of your current applications and then select which application(s) you want to be silenced (multiple selections are allowed). You can even add your own profiles to trigger the mute and unmute tasks if you want your device on silent mode in other situations - anything from specific locations, to physical orientation (face-down for example), to certain dates or times, just to name a few.

The mute and unmute tasks are as lean as possible but are probably slightly more complicated than you might first assume. That is because the mute task needs to know whether or not the device was in silent or vibrate mode prior to being triggered and remember that information for the exit task (unmute) even after a reboot. Otherwise, if you had your phone on vibrate but then opened the camera app, it would switch from vibrate to silent mode while the camera app was running, but would then turn the sound back on afterwards, overriding your original preference of having the device on vibrate. We don't want that, as it could be more annoying than the original sounds you are trying to silence. To get around that issue, a global variable is created, "%Wassilent" to keep track of whether or not the device was originally in silent or vibrate mode when the mute task was triggered. It then informs both the mute and unmute tasks what they should do depending on its value, in this case, "yes", or empty (cleared).
Mute and unmute tasks

Tasks Explained Line-by-Line

The Mute task:
1. If the device is in silent or vibrate mode
2. Set global variable %Wassilent to "yes"
3. And then stop (don't change the sound settings)
4. Else (in other words the sound is on - the device is not on vibrate or silent)
5. Clear the global variable %Wassilent
6. Turn silent mode on
7. And then stop.

The Unmute task:
1. If the variable %Wassilent is set to "yes"
2. Then stop (this ensures that if the device was previously in silent or vibrate mode it will stay that way)
3. Else (the device sound was previously on)
4. Turn silent mode back off
5. And then stop

If you found this tutorial helpful, please let me know by sharing it or by clicking the 1+ button below. If you have any questions, please ask them in the comments section.

How to Update Nexus 5 or 7 to the Android L Developer Preview

How to Install Android L Developer Preview on a Nexus 5 or 7

A beginner's guide to flashing factory images to Nexus devices. This tutorial will show you how to install the new Android L developer preview on a Nexus 5 or Nexus 7 from a Mac, the easy way!
Want to try out the Android L preview announced at Google IO on your Nexus 5 or 2013 Nexus 7 but do not know where to start? Follow this guide to get your Nexus 5 or Nexus 7 flashed to the latest Android L OS from Google. I have a Nexus 5 and wanted to try it out. I thought since I was doing it anyway for myself, I would document the process to share. I hope you find it useful.

*Important*: please note that this is a Developer Preview. That means things are still broken, there are bugs, and a number of apps simply won't run on it yet. It has only just been released, so undoubtedly things will improve over time as the official launch nears, but I would NOT recommend putting this on your "daily driver" or your primary/only phone right now (June 2014).

First backup your device. Backup everything that is important to you and store in on your computer. Seriously, do this - everything will be erased in the following guide.

Make sure you have the Android SDK downloaded and unzipped into a folder (we will call it "Android") and have located the "platform-tools" folder within the sdk folder: ~Android/sdk/platform-tools. Note, if you are on a Windows PC, it may be easier to install this much smaller Windows ADB installer - it contains everything you need: adb, fastboot, and drivers. If you are on a Mac you do not have to worry about drivers.

Get the factory image for your device. Unzip and move the contents into the "platform-tools" folder or wherever adb and fastboot are located.

One of the best ways to familiarize yourself with the process is to open the included scripts (flash-all.sh or flash-all.bat) in a text editor and look at the commands. The scripts are easy as you can just type in one command and everything gets installed, but if something goes wrong you need to know what has happened.

Note: I am using a Mac so all commands will start with "./" in terminal. If you are using a Mac, type ./ immediately proceeding any adb or fastboot commands. If you are using windows you can just type the commands without the "./" in front. The adb and fastboot commands that you need to type into terminal or command prompt will be center-justified and in bold.

The following step-by-step guide to flashing Android L developer preview is specifically for the Nexus 5 with the initial release, so if you are using a Nexus 7 (2013) or a subsequent Android L release, you may need to adjust the file names near the end of the guide. Each step will be followed by screenshot(s) demonstrating that step.


Step 1 - Enabling USB Debugging
Plug in your Nexus device into your computer with a USB cable

On your device go to Settings → About phone → Build number → tap on Build number until you see a notification that says, "You are now a developer" → tap the back key → Developer options → now check the box next to USB debugging to turn it on.
Nexus 5 about phone build numberNexus 5 dev options usb debugging


Step 2 - Open Terminal and Locate ADB and Fastboot
On your computer open terminal (on a mac) or command prompt (on a windows pc) and type: "cd" without the quotes, hit the spacebar once, now drag the "platform-tools" folder into the terminal window so that it looks like:
cd *your-folder-location*/sdk/platform-tools

and now press return (enter on Windows). This tell the computer you are working in the "platform-tools" folder so you no longer have to specify the location of files.
cd to platform-tools

Step 3 - Set up ADB and USB Debugging
Now on your computer, in terminal or command prompt, type the following command (remember ./ is required immediately preceding the command on Macs):

adb devices

If you have never used adb on your computer/phone before, the serial number of your device will show up under "List of devices attached" in the terminal window but it will say, "unauthorized" next to it. To fix this, check you phone, there will be a notification asking you to, "Allow USB debugging? The computer's RSA key fingerprint is...." Check the "Always from this computer" box and then "OK."
allow usb debugging
After allowing USB debugging on your device, type in the adb devices command again and the output in terminal will be your device's serial number with just the word "device" next to it.
adb devices

Step 4 - Reboot into the Bootloader and Fastboot Mode
Now set your phone/tablet aside leaving it connected to the computer. We are going to do everything else on the computer. Now type the command:

adb reboot bootloader


ADB reboot bootloader
This will reboot the device's bootloader. Let the device reboot into fastboot mode. It will look like this:
fastboot mode locked

Check to make sure fastboot is now recognizing your phone by typing:

fastboot devices

You should see that your device is connected as before.
Fastboot devices

Step 5 - Unlock the Bootloader
If you have never unlocked the bootloader, you will need to do that now, otherwise skip to step 6. To unlock the bootloader (this will erase all your files) type the command:

fastboot oem unlock

Fastboot oem unlock
As soon as you type this command, look at your device - a warning regarding unlocking your bootloader will appear requiring you to press the up volume key followed by the power button to select, "Yes, unlock bootloader."
Nexus 5 unlock bootloader
Step 6 - Run Installation Script and Troubleshoot if it Doesn't Work
You are now ready to run the script that uses fastboot to flash the new bootloader, radio, and other update files. Remember the unzipped contents of the Nexus factory image must be in the same location as fastboot, namely, the Platform-tools folder. There should be 6 files that you unzipped and copied into the Platform-tools folder: a bootloader and radio .img files, 3 scripts (flash-all.sh, flash-all.bat, and flash-base.sh), and finally the image.zip file.

To run the script on a mac type in terminal:

./flash-all.sh

flash-all.sh script
If you are on a windows machine type the following into command prompt:

flash-all.bat

More than likely, the script will fail as shown in the screenshot below. Do not panic, this is a common problem.
flash-all.sh script error
If you are on a mac and see similar errors as in the screenshot, open the "flash-all.sh" script in textedit and place a period and slash before every fastboot command:
flash-all.sh script fixed
The script should now work. It will reboot your phone back into the bootloader a few times and there will be a lot of activity in the terminal window showing its progress of sending and writing all of the new Android L files. This process should take about 2 minutes or so until the terminal script ends:
flash-all.sh script finished
Assuming the script worked, you are done! At this point you can exit the terminal or command prompt. Your Nexus 5 or 7 will now reboot and you will see a cool looking new boot animation... for a very long time. I timed mine at about 5 minutes before it actually booted from the time the boot animation started, so just leave the device alone for maybe 10 minutes before worrying about a boot-loop.  Just wait for your device to start up and begin enjoying Android L. Do not proceed to step 7 unless the script failed.

Step 7 - Flashing the Android L files without the script:
If, for whatever reason, you cannot get the flash-all script to work, do not worry, it is very simple - just 5 fastboot commands that you can do manually. In order to get the file names correct I would suggest either copy/pasting the names in or editing the file names to much simpler things like, bootloader.img, radio.img, and update.zip. For the example below I am going to use the actual (but complex) names of the Nexus 5 files. Enter each of these commands in order, and wait until it is completed before entering the next command:

fastboot flash bootloader bootloader-hammerhead-hhz11k.img

fastboot reboot-bootloader

fastboot flash radio radio-hammerhead-m8974a-2.0.50.2.08.img

fastboot reboot-bootloader

fastboot -w update image-hammerhead-lpv79.zip


That should be it. Enjoy the Android L developer preview. If you have any questions or comments please leave them below. If this guide helped you please like or 1+ this post. Thanks.

The iPhone 5 is Now Available on Ting

ting iphone 5
I have been a Ting customer for a while now and have been very happy with their service. I have written a critical assessment and overview  of Ting's mobile service and told all my friends and family about them. Many people I told about Ting have switched to Ting's no-contract, pay for what you use service, but one of the main reasons I have been given for not switching has been the simple fact that Ting did not support the latest iPhones. The iPhone 4 and 4s have been supported by Ting since last fall, but those phones are not LTE compatible and operate on Sprint's much slower 3G network. It is understandable that iPhone users don't want to be stuck with a device that is over 2 years old.

Now you can activate the Sprint iPhone 5 in addition to the older 4 and 4s models. At this time Ting is only able to allow "bring your own" iPhones as they apparently have not yet finalized a purchasing agreement with Apple and/or Sprint directly.  Honestly, iPhones are so expensive new (without a contract) that this is not all bad.

How to Find and Buy an iPhone for Ting

The Apple iPhone 5 can be found consistently on eBay, Glyde, Swappa, etc. for around $250-350 in excellent used condition. Just ensure, if buying used, that the phone is a "Sprint iPhone" has a "clean ESN" and is not "iCloud activation locked" (in other words, it is not lost or stolen). If you are not comfortable trying to find a used iPhone online or just do not have the time, Ting staff can find a device for you through their personal shopper program. If the person you are buying the Sprint iPhone does not include a LTE SIM (ICC) card, you will need one for activation. You can order it directly from Ting or stop by your local Apple store and ask them to give you a "Sprint nano-SIM" specifically part number SIMGLW406R.

Ting is unable to offer the latest generation of iPhones - the iPhone 5s and 5c - but plans to support them beginning in September of 2014. That means that Ting will likely be able to offer iPhones that are one generation behind the latest for the remainder of this year.

Since I primarily write about Android devices, I suspect most of my readers are more interested in phones like the Nexus 5 or other Android phones. But, many of us have family members who prefer the iPhone and other Apple products, so now may be a good time to get them off that expensive plan with AT&T or Verizon and on to your Ting account.

How to Activate an iPhone 5 on Ting
  1. Buy a Sprint iPhone 5 that has a clean ESN. Check the ESN to make sure.
  2. Make sure you have the appropriate Sprint LTE SIM card installed.
  3. Find the device's MEID by going to Settings → General → About → MEID.
  4. Go to https://ting.com/go to begin the activation process.
  5. Enter the MEID and then follow the instructions to port in your existing number, create a new number, or swap out an existing device on your account.
  6. Restart the iPhone. Within a minute or two it should automatically begin the activation process. If you are having trouble you can try the additional troubleshooting options found on Ting's help site/forum.

How to Activate a Google Nexus 5 on Ting

Google Nexus 5 on Ting

Nexus 5 on TingAs soon as the Nexus 5 went live on the Google Play store and I confirmed that it in fact would work with the Sprint network, I ordered one hoping that I could use it on Ting. I knew it was a bit of a gamble as having a totally unlocked GSM and CDMA device is an industry first and totally foreign to CDMA providers.

I am glad I took the risk because my new Nexus 5 is activated and working as intended on Ting. It is still early in the process for Ting, but I have my phone up and running with 100% functionality: voice, SMS, MMS, and data (3G and LTE) are all working well. Ting is in the process of creating a more standardized method of activating the Nexus 5 so it is in an "open beta" phase at this point. It may take a few weeks to work out all the kinks, but if you have a Nexus 5 and would like to activate it on Ting, it can be done now.

If you have never heard of Ting before or are thinking about becoming a new customer, read my review of Ting to get a better idea of what Ting is all about. If you are a new customer you can also use my referral link for a $25 credit towards your first month's bill.

All the information you need to activate a Nexus 5 on Ting is in the linked blog post above, but below are the basic steps in a more condensed version.

How to Activate the Nexus 5 on Ting:

  1. Buy an unlocked Nexus 5 from the Google Play store (other versions will not work).
  2. Obtain a UICC Micro SIM card for Sprint, part # SIMGLW206R, by buying one directly from Ting or by finding your own (Best Buy, Apple Stores, Sprint Corporate stores, eBay, or a compatible UICC SIM from a device you already own are all options.) 
  3. Insert the UICC SIM into your Nexus 5.
    1. Note if you got your SIM and put in in the Nexus 5 prior to first boot or you inserted the SIM and then factory reset the device you should be able to get your 18 digit MEID by going to Settings → About phone → Status → scroll down to show your MEID. 
  4. Go to the bring-your-own-device (BYOD) page on Ting and follow the steps, first inputing your MEID (DEC) or IMEI (Ting will convert it to the MEID for you) and then the 20 digit ICC ID from your SIM card - the Nexus 5 should then activate online. 
  5. Go to the Device Settings section of your Ting account, click on your Nexus 5, and make note of your MSL number in the left hand side of the device settings page. 
  6. While you are in the "Device Settings" section check the boxes for "Can send and receive picture & video messages" and "Allow other devices to tether to this device" as they are unchecked by default. 
  7. Now restart the Nexus 5 or turn it on if it is currently off. It will go through a self-activation process and at the very least the voice service and SMS texting should work. 
    1. If a self-activation sequence does not complete skip down to the troubleshooting tips before proceeding to step 8.
  8. UPDATE: the remaining steps should not longer be required. Ting is now able to use the default MMS url. Check to see if MMS is working after activation, if not you can proceed with the following steps, but they should not be necessary.
  9. In order to get MMS working correctly you will need to go through the following steps: in the phone app dial *#*#DATA#*#* → MMSC → Edit → Enter your MSL → change URL to http://mms.plspictures.com → press the back soft-key → the phone will now restart saving the changes you made, as shown in the screenshots below: Nexus 5 Ting MMS SettingsNexus 5 Ting MMS Settings
  10. In order to activate all 3 LTE bands on the Nexus 5 that are available for Ting and Sprint: in the phone app dial *#*#DATA#*#* → LTE → Edit → Enter your MSL → now enable bands 26 and 41 → press the back soft-key → the phone will now restart saving the changes you made, as shown in the screenshots below:
    Nexus 5 Ting LTE SettingsNexus 5 Ting LTE Settings
At this point everything should work perfectly - voice, texting, and data. If you are still experiencing difficulties getting your Nexus 5 working check out my list of troubleshooting tips and FAQs below.

Troubleshooting and FAQs:

  • Problem: When I activated online everything went through on the Ting website, but my new Nexus 5 won't ever finish the self activation sequence. 
    • Solution 1: Try a factory data reset by going to Settings → Backup & reset → Factory data reset.
    • Solution 2: or a carrier settings wipe by dialing *#*#72786#*#*. 
    • Note: if you do this you will have to reapply the changes made above to get MMS and all 3 LTE bands working. 
  • Problem: I have voice and sms texting working on my Nexus 5, but I can't seem to get data to work. 
    • Solution 1: Go to Settings → More under Wireless & Networks → Mobile networks → Carrier settings and update the PRL and profile. 
    • Solution 2: In the phone app dial *#*#DATA#*#* → More → change eHRPD to disable. Some users have reported that this initially helps get data working and can be changed back to eHRPD "Enabled" once 3G and LTE are functioning okay. 
  • Problem: LTE data is working on my Nexus 5, but I have noticed calls and texts are not coming through while I am connected to LTE. 
    • Solution: Go to Settings → More under Wireless & Networks → Mobile networks → and change the Network Mode from "Global" to "LTE" or vice versa.
      • Which mode works correctly to allow incoming calls and texts when connected to LTE seems to vary depending on the region you are located, so if one setting is not working for you try the other one. 
  • Problem: LTE data is on but not working on my Nexus 5 as well as my other LTE phone(s). 
    • Solution: In the phone app dial *#*#DATA#*#* → LTE → Edit → enter your MSL → now change the priority (its actually misspelled "proirity") of the cellular bands, testing each band with a priority of 1 while the others are set to 0 → press the back soft-key to save and restart → after restart test your LTE to see if you have a stronger signal or faster data speeds. 
    • Note: in regions that used to have WiMax 4G Sprint may be rolling out LTE on that spectrum, AKA band 41.


    Support : Creating Website | Johny Template | Mas Template
    Copyright © 2011. Technology Share - All Rights Reserved
    Template Created by Creating Website Published by Mas Template
    Proudly powered by Blogger