Latest Post :
Recent Post

A Tutorial on How to do Smoke Photography


Photographing smoke is an interesting field which is gaining popularity among the photographer communities. It is a fairly simple process which can be done indoors with very little equipment. The results though unpredictable could be quite rewarding. Here is a tutorial on how to do smoke photography.


A Tutorial on How to do Smoke Photography
 

Equipment Requirements to Photograph Smoke


  1. Camera – preferably a DSLR
  2. Flash – pretty much any flash would do. It is better if the flash has controls to vary power.
  3. Flash Trigger - the flash need to be used off camera so either a sync cord or wireless trigger is required.
  4. Snoot, Grid or Black Cards – to control the light from spilling on to the background  and reducing contrast or towards the camera and creating flare.
  5. Tripod – though it is quite possible to shoot without one, I personally prefer the camera on a tripod as I could watch the smoke patterns, may be modify it a bit and trigger the shutter when I find an interesting shape or pattern form.

Other than the above mentioned equipments you will need the following.


  1. Black Background – though any dark colour would do, black produces the maximum contrast.
  2. A Table Lamp – a table lamp or any suitable light source to enable you to see smoke.
  3. Incense Sticks – any material that could produce smoke would do. I personally prefer incense sticks as they are not very harmful to us and have a pleasant smell; moreover the smoke it produces has nice texture to it.
  4. Lighter – a lighter or match box to ignite the incense stick
  5. Pan or Plate – to collect ash

Smoke Photography Setup

First setup your black background for the shot; you need not use large backgrounds,  but a fairly large black background along with a large room would enable you to increase the distance from the background to the subject thereby eliminating chances of any stray light from hitting the background.

Place your incense stick on a stand; it would be better if you could put a pan or something to collect the falling ashes. 

Now place the table lamp to one side of the incense stick, adjust height so that the light would illuminate the smoke when it rises.

Place your flash on the opposite side of the table lamp; set the flash to appropriate power and attach snoot/grid/black card or whatever it is that you use to make sure that light from the flash does not spill either towards the background or towards the camera. Attach sync cord or wireless trigger to the flash.

Finally put the camera on a tripod and focus on the incense stick, once focus is right switch the control to manual focus so that focus does not change and recompose your shot as required.

smoke photography setup
camera on manual and flash triggered wireless cardboard pieces acting as gobos preventing flash light from falling on the background and towards camera causing flare.

Camera and Flash Settings


Aperture – consider using an aperture of f/11 or more for increased depth of field.

Shutter Speed – set your camera to its sync speed or a little bit lower. For example if your sync speed is 1/200 then set it to 1/160 it will help overcome any lag when using remote triggers.

ISO – Use the lowest possible ISO setting on your camera. For most cameras it is ISO 100.

Shoot RAW and use Flash as white balance setting.


Flash settings – put flash to manual mode, zoom it as much as it allows, most flashes zoom up to 105where are some new ones zoom up to 200. Set the power as desired most often to get apertures of f/11 you will need to use the flash on either ¼ or ½ or even 1/1. It all depends on your flashes make and model and its guide number. So trial and error is the best method.

Choosing a well ventilated room will ensure that smoke do not build up there by raising health hazards and also fogging the shots. One important tip while attempting smoke photography is that if you studio has either smoke detectors or sprinklers, disable them before igniting your incense, else………..

 Smoke Photography – Post Processing

Open the RAW file in photoshop. If you have light spill on your black background or if you find your black background is not entirely black adjust the black slider to get it completely black. Once you are satisfied click open image.

Adding Colour To Smoke

You can add colour to your smoke in a number of ways, remember in all these settings the colour will only be applied to the smoke and the background remains unaffected. First method is with the hue and saturation tool.

Click Image > Adjustments > Hue Saturation - adjust sliders to get different effects

The second method is using photo filters

Click Image > Adjustments > Photo filter – choose any filter to see its effect on smoke

The third method is to use the gradient tool

Click Layer > New > Layer or press Shift+Ctrl+N to create a new layer select the gradient tool (keyboard short cut G), choose your preferred gradient and drag across the new layer as desired. Now change the blending mode of the new layer to multiply and you have your coloured smoke.

smoke photography post processing
Smoke photograph coloured using the gradient tool


Changing Background to White

Click Image > Adjustments > Invert to change your background colour to white; however doing so will change the colour of the smoke too, it will be opposite colour chosen for the smoke in black.

tutorial on smoke photography
smoke photography - background changed to white

Working with layers to create interesting Shapes and Designs

Click Layer > Duplicate Layer > OK

Edit > Transform > Flip Horizontal

So now we have the exact opposite of the first layer.

Click Image > Canvas size and Double width of the canvas

Now align both layers perfectly to form the shape.
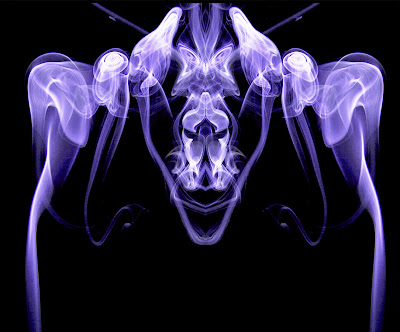
photographing smoke
Shape created using mirrored layers

If needed you can click Image > Adjustments > Invert to change one of the sides to white
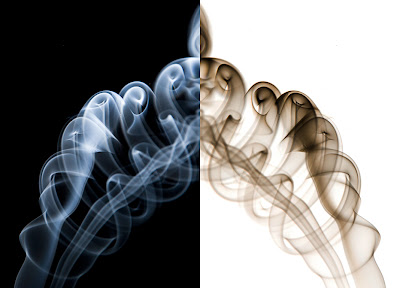
smoke photography tutorial
one side of the photo changed to white

Doubling the canvas size vertically

Click Image > Canvas size and Double the height of the canvas

Now duplicate layers and click Edit > Transform > Flip Vertical

Align layers to create your shape.
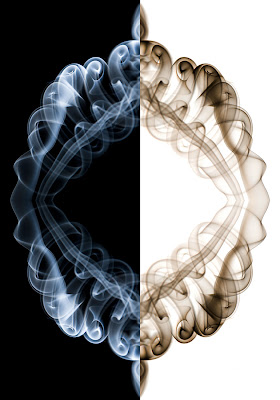
smoke photography tips
mirrored vertically

Your imagination is the limit as to how you create different effects.

Here is another variation
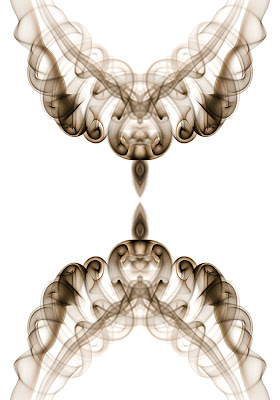
how to do smoke photography
smoke photography tutorial

And yet another

advanced smoke photography tips
smoke photography tips

Self Portraiture

Guest Post By Mariesol


First of all I would like to introduce myself: My name is Mariesol, better known as "SunnyMarry" and I work as a self-portrait-photographer most of the time. So the big deal in most of the shots is to set everything before I take the picture with my remote, because I cannot see the picture when I take it. I need to set everything up before, like sharpening, lightening and after all I have to find the right place in front of the camera, so it focusses on me.

self portraiture
Photo By Mariesol

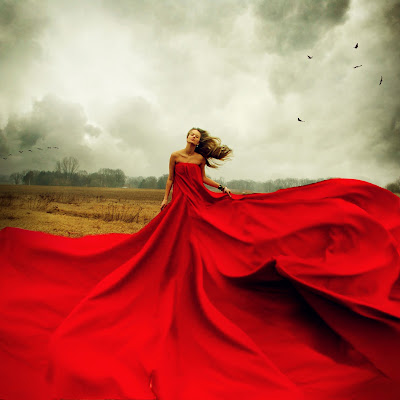
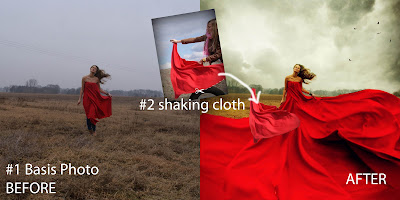
As you can see on the "Before"-Picture of "Don't die wondering" I simply used a little piece of red cloth to create the red dress. It is about 1 x 1,5 m large, but that is indeed enough to make it look huge!

So the first step was to take the "Basis-Photo", that should show a woman with a dress on a field. And since I always had been a great fan of photographs with shaking hair ( this is adding so much dynamic), this also had be part in my image.

The second step is to make the dress grow. What you need to do for that is take some additional shots, where you only capture the red cloth as you shake it. I added a behind the scenes-photo from that, too. These "shaking-photos" are something like your stock-images for the dress. It is really important to take these images right after you took the "Basis-Photo" because you need similar lights, contrasts and colours for the cloth, too - that will save you a lot of work in the post-processing.

self portrait
Capturing the flowing garment

And that will the the third step for this image: Collect the best shots of the jolted cloth and fit them into your picture as little parts of cloth! This takes some time, because it is kind of hard to make it look real- it is important to mind perspective, colours and contrasts.

self portraiture tips
before and after blending

Additionally I changed the sky in the background to make it look more interesting and dynamic and I also added some birds, saturated the picture (especially the red dress) higher and I always use to vignette the corners of my pictures dark, that makes you focus more on the middle of the picture :-)

self portraiture tutorial
before and after comparison shots

Adobe Photoshop Tutorials A small Hero

Guest Post By:  Giuseppe Parisi

Digital Matte Painting / Illustration:

50% Hand Painting, 50% Photo references

photographic material blended with digital paint done in photoshop to simulate photo-realistic scenes


Adobe Photoshop CS4 and Wacom Intuos4 Tablet

Adobe Photoshop Tutorials A small Hero
Adobe Photoshop Tutorials A small Hero By:  Giuseppe Parisi

A lone climber on the edge of a high mountain, beholding the landscape in the mist at the sunset.

Watch the Making of A Small Hero Video:


Photography Trick Heart Shaped Shadow on a Book With a Ring

The heart shaped shadow is a classic photographic effect that interests many beginner photographers to try it. This is also a very simple trick and requires not much equipment. Only things you need to perform this trick are:
  1. A light source – an off camera flash or strobe will do; for those who does not have access to these a table lamp or even sunlight during morning and evening hours will do.
  2. A Ring – any circular object will do
  3. A Book – preferably a large book with hard binding. A thicker book works better because when open, the pages curve more thereby creating a rounder heart.
 In this example I shot all the frames with a single table lamp as my light source. It had in it a 60 watt bulb. (Milky white / frosted white).

Even though I was shooting in RAW format, the white balance of the camera was set to Tungsten. If you are shooting in Jpeg this point is all the more important as you cannot adjust your white balance settings later while post-processing.

Placement of light is what determines the shape of the shadow, best method to find out the right light placement is to first fix the ring on the book, take the table lamp in your hand and move it to see how the shadow shapes, fix it at the position that looks the best.

The most difficult part of this experiment is to make the ring stand straight on the book. I had to try many times to get it right, but I managed without using any adhesive or modelling clay or anything.

While selecting the book for this trick try to select one with some meaningful text that could create a context for the shot, eg religious books, medical journals etc. The book i used was the Oxford Advanced Learners Dictionary.

First I tried the heart shadow with my gold ring, I kind of like the effect of gold colour on the black and white scene.

heart shaped shadow photography trick
Golden Ring - also used of narrow aperture for increased depth of field

To make the above picture a narrow aperture was used. But i chose to shoot the rest of the frames using a wide open aperture of f/2.8.

Next I used a 52mm UV filter ring to make my heart shadow. It produced shadows with very thin borders.

photographic trick heart shaped shadow of a ring
52 mm UV filter used to create the heart shape

The inside of the heart shape was given a reddish colour in photoshop. Also the ring used is a wooden bangle which is broader than the UV filter used in the picture given above.

creating heart shape on a book with a ring photography trick
colour of heart shadow changed in photoshop

A much broader plastic ring was used for this, it was green in colour, but I didn't like the feel of it so the picture was converted to black and white with increased contrast.

book ring and heart photographic trick
Picture was converted to black and white

 Two rings of different diameters one standing and the other resting.


how to create a heart shaped shadow on a book photography trick
two rings used for multiple shadows - one standing, one lying

Both rings in resting position, one in the center of the other.

how to create a heart shaped shadow on a book
two rings used for multiple shadows - both lying

A variation of the earlier example with a broader ring. The image was also cropped in square format.

photography trick creating heart shape on a book with a ring
to rings used for multiple heart shapes one broader than the other

Set-up Shots


heart shape on a book with a ring photography trick
Set up Shots - Heart Shaped Shadow - Photography Trick


Related Reading


Adobe Photoshop Tutorials Time Portal

Guest Post By:  Giuseppe Parisi

Digital Matte Painting / Illustration:

50% Hand Painting, 50% Photo references

photographic material blended with digital paint done in photoshop to simulate photo-realistic scenes


Adobe Photoshop CS4 and Wacom Intuos4 Tablet

Adobe Photoshop Tutorials Time Portal
Adobe Photoshop Tutorials Time Portal By:  Giuseppe Parisi

Watch the Making of Time Portal Video:


Adobe Photoshop Tutorials Shatter and Flee

Guest Post By:  Giuseppe Parisi 

Digitally Enhanced Portrait + Matte Painting Background

Model: Federica

Adobe Photoshop Tutorials Shatter and Flee
Adobe Photoshop Tutorials Shatter and Flee By:  Giuseppe Parisi
A beautiful girl sitting on her bed and witnessing the destruction of a city at the window, as a projection of her thoughts turned into reality.

This image is a digitally enhanced portrait which is enriched with details given by real photographs and hand/painted elements, wisely merged and manipulated to create a very realistic looking picture.

Matte Painting info:


Model photo in the room + buildings stock images + my own stock + Hand Painting [50%]

Lighting info:


1 butterlight lightning and 1 side fill.
----- Canon 580 Ex II in shot-through umbrella 45° above the model @1/1 out of the window

----- Nikon sb-26 in shot-though umbrella on the side of model as fill light @1/8
Triggered via Skyport.

Exif Data:


Canon 5D Mark II + Canon 16-35mm f/2.8L IS II
Adobe Photoshop CS4 and Wacom Intuos4 Tablet

Watch the Making of Shatter and Flee Video:


How to Maximize Impact When Using Wide Angle Lenses


Most wide angle scenes taken by amateur photographers fail to make an impression on the audience due to lack of interesting elements in the frame. Photographing wide open spaces usually ends up in a picture with lots of small detail and no particular element to catch the viewer’s attention.

wide angle
Photo By Justin Tippins


The trick to overcoming such issues when using wide angle lenses is to look for depth rather than width. Learn to resist the temptation to take whole of the scene, instead move in close to your subject, and place an interesting element in the foreground. Make sure the foreground element takes up at least a quarter of the picture frame, you could use anything available on the scene like a piece of driftwood, rock formations, a small bush etc or add an element like a person, a clump of blooms, an animal, a vehicle etc.

wideangle
Photo By Henri Liriani

The real secret to getting it right is to make sure the subject in the foreground is within the focus range. Apply principles of hyper focal distance to decide on subject placement. Also consider compositional rules like the Rule of Thirds and place your subject on one of the intersections. Never centre your foreground subject as it will result in a boring picture that looks static.
wide angle shot
Photo By Sathish J

Look for leading lines running from the distance into the foreground elements like roads, rail way tracks, small streams, lines on pavement etc and bring them into the frame on a diagonal or ‘S’ curve, rather than placing them down the middle. Try shooting vertical compositions with the camera slightly tilted forward – this will let you capture elements from the foreground to the background in focus.

Related Reading


Adobe Photoshop Tutorials New World Messiah

Guest Post By:  Giuseppe Parisi

Digital Matte Painting / Illustration:

30% Hand Painting, 70% Photo references

photographic material blended with digital paint done in photoshop to simulate photo-realistic scenes


Adobe Photoshop CS4 and Wacom Intuos4 Tablet

Adobe Photoshop Tutorials New World Messiah By:  Giuseppe Parisi
 A lonely man coming out of a time portal into a desert land

Watch the Making of New World Messiah Video:


Adobe Photoshop Tutorials I Met You There

Guest Post By:  Giuseppe Parisi

Digital Matte Painting / Illustration:

50% Hand Painting, 50% Photo references

photographic material blended with digital paint done in photoshop to simulate photo-realistic scenes


Adobe Photoshop CS4 and Wacom Intuos4 Tablet

 Adobe Photoshop Tutorials I Met You There
 Adobe Photoshop Tutorials I Met You There By:  Giuseppe Parisi
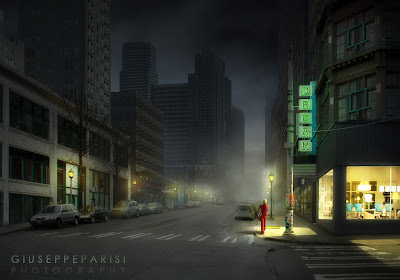
A woman in a red dress walking alone along an empty street of a city at night.

This image is a matte painting which is is an hand-painted illustration enriched with details given by real photographs, wisely merged and manipulated to create a very realistic looking picture.

This illustration comes from a dream I made.

It took a lot of work to be done because I wanted to be faithful to the dream I had, which was very cinematic and moving. I tend to dream rarely and most of the times I never remember my dreams. This time I dreamt of a wonderful scene and I quickly went write down all about it as soon as I awoke.

It was about my mother - passed away 9 months ago - she was there, in the street, late at night... and we met and held each others.Wonderful dream.

The woman in the red dress is actually my mother and the image comes from a photo I took of her a year ago or so.

Watch the Making of I Met You There Video:


Adobe Photoshop Tutorials Energy of Rock

Guest Post By:  Giuseppe Parisi

Digitally Enhanced Portrait + Matte Painting Background

Adobe Photoshop Tutorials Energy of Rock
Adobe Photoshop Tutorials Energy of Rock By:  Giuseppe Parisi

A handsome man standing in front of the camera into a magic blue vortex with a snare drum and drum sticks flating around with stones.

This image is a digitally enahnced portrait which is enriched with details given by real photographs and hand/painted elements, wisely merged and manipulated to create a very realistic looking picture.

Matte Painting info: 

4 photos + Hand Painting [33%]

Exif Data:


Canon 5D Mark II + Canon 70-200mm f/2.8L IS II
Adobe Photoshop CS4 and Wacom Intuos4 Tablet

Lighting info:


2 rim lights and 1 butterfly lightning for frontal fill.
----- Canon 430 Ex II in reflective umbrella 45° above the model @1/4
----- Bare Nikon sb-26 with side goboes on the right behind the model @1/8 +0.3
----- Bare Canon T277 with side goboes @ f/8 on the left behind the model. Triggered via Skyport.

3 takes for the model: 1 for the lifted coat, 1 for the right pose, 1 for the lifted scarf and vest.

Watch the Making of Energy of Rock Video:


Tips for Photographing Through an Airplane Window

1.    Book Yourselves a Window Seat


Many airlines let you choose the seat position, so make sure you book yourselves a window side seat, preferably on the side of the plane that will be away from the sun. Getting to know which side of the plane will be facing the sun could be difficult, but it will help your picture taking process if you are not facing the direct sun. The best seating positions for photography are window side seats which are in front of the airplane wing. If you are on a seat behind the wing the hot air and vapour emitted by the engines could ruin your shots.


airplane window photography
Photo By Kim Seng

2.    Carry your Camera With You


Always carry your camera on person and do not put it either in baggage or in luggage compartment. Since you will be seated near the window, it will be quite a hassle to get your camera out and it will also cause inconvenience to fellow passengers. It is better to have a general purpose zoom lens such as 18 – 135 attached to the camera as you will be able to cover most situations without the need for changing lenses.

3.    Shooting through Glass


a.    Clean the Window Glass


Airplane windows have multiple layers of glass on each window and chances are they might be scratched and dirty. While you cannot do anything about scratches you could clean the window from dust and other debris if any. The flight crew will be able to get you some paper towels or napkins with which you could thoroughly clean the window.

air plane window photography
Photo By Kim Seng

b.    Avoiding Reflections


The trick to avoid reflections from the window appearing in your shot is to shoot at the right angle. If you have a lens hood with you put it on and place your lens as close to the window as possible without touching it. If the lens or the hood touches the window the vibrations from the plane could spoil your shot. Another trick is to wrap the front of your lens hood with a piece of dark cloth (without covering the lens of course), and then place the lens close to the window glass, the dark material will prevent any light from leaking in and will thus eliminate reflections; a handkerchief, towel, a sock, a glove or anything suitable would do.

photographing from an airplane
Photo By Jonas Seaman

c.    Take Pictures Early


Take your pictures early during the flight, as the plane cruises in high altitudes, mist or even ice could form on the window glass making it impossible to take photographs through them.

4.    Camera Settings


a.    Use Manual Focus


The layers of glass just in front of the camera could trick most camera auto focus systems; the problem becomes worse if there are scratches in the glass. If your camera allows manual focus, it is better to focus manually.

how to photograph through an airplane window
Photo By Michael Foley

b.    Turn off Your Flash


Using flash while photographing out of an airplane window is useless; it only causes you problems, any subject you choose is well beyond your flashes effective range and the light produces by the flash could create reflections and flares with light being reflected off the window glass.

c.    Use Fast Shutter Speeds


You will need to use fairly high shutter speed to get sharp pictures when photographing out of a plane window. Anything above 1/500 should be good enough if light conditions permit it is better to use 1/1000. Shift your camera to shutter priority mode (TV) and select 1/1000 as your shutter speed. The camera will adjust aperture and ISO to match the shutter speed.

5.    Subjects for Aerial Photography


There are many good subjects to be photographed out of an airplane window such as the rising and setting sun, cloud formations, rainbows, landscapes down below, islands, another air plane etc. Night photography from an airplane window is yet another interesting option. But it presents a whole other set of challenges which we will discuss in a future article.

photographing from an air plane
Photo By Jamal Afzal

  6.  Secure your Camera


While using your camera during a flight it is always advisable to put the camera strap over your head. The flight could hit some turbulence or bank in one direction or other, else you may be clicking while take-off and landing or taxiying, having the camera secured with the neck strap makes sure you could safely take you hand off your camera in case of an emergency without damaging your equipment.

7.    Follow Rules and Regulations


While photographing in an air plane always keep in mind that there are FAA regulations limiting the use of electronic equipment inside of an air plane, especially during take-offs and landings. Always abide by the instructions given by the flight crew.

Related Reading


Support : Creating Website | Johny Template | Mas Template
Copyright © 2011. Technology Share - All Rights Reserved
Template Created by Creating Website Published by Mas Template
Proudly powered by Blogger