Latest Post :
Recent Post
Showing posts with label DIY Photography. Show all posts

Diy Flash Diffuser for Macro Photography Using Styrofoam Plate


This is perhaps the easiest flash diffuser project ever. Take a styrofoam plate, the larger the plate the better, it need not be circular even rectangle or oval shaped plates work quite well.


diy flash diffuser
diy flash diffuser


Take out your lens filter, press it gently on the styrofoam plate so as to make a mark, then cut out the circle,  (cut the inside of the line so that the plate attaches tightly on to the lens filter) attach the filter back on to the lens, slid the styrofoam plate on to the filter and you are good to go.


styrofoam dish flash diffuer


There is some light loss with this setup as a considerable amount of light gets reflected back from the white surface of the styrofoam plate. But the impotant thing for us is that most of the light will pass through the plate, the surface of the plate now acts as the light source which is many times larger than the flash head also the light gets spread in all angles evenly illuminating the area ahead.

With this diy flash diffuser it is possible to get soft light very close to the lens which is not possible without it as the lens itself would cast its shadow on the subject. 


macro photography flash diffuser


This will also work with a dedicated flash unit mounted on top of the camera. The most important thing to remember is that this setup is only effective for macro photography, for subjects that is a little bit distant from the camera this wont work well due to the light loss and spread of the light beam. But for macro photography this works like a charm.

Here's a shot taken with our diy flash diffuser


flash diffuser for macro photography


Related Reading


  1. How to turn any Lens into a Macro Lens the Lens Reversal Technique
  2. How to Lock a Lens at a Certain Aperture
  3. Stacking Lenses with Coupling Rings for Extreme Macro Photography
  4. Macro Photography Using Extension Tubes
  5. Lens Extension and Effective F Stop

DIY 10 Stop ND Filter Using Welding Glass


The purpose of Neutral Density (ND) filters is to reduce the amount of light entering the camera lens. This makes it possible to get long exposure times needed to blur moving water, clouds etc and can also be very helpful to get rid of people in a scene when shooting at locations favored by tourists.


nd filter
Shot taken with a 10 stop ND filter


ND filters are made of special glass that reduces the light level evenly across the visible spectrum there by retaining the original white balance intact. Superior glass also reduces chances of any aberrations or ghosting occurring in the image. All major manufactures like B+W, Hoya etc make quality ND filters. The only downside of ND filters are its price, like anything related to Photography, ND filters are not cheap good quality ND filters cost well in excess of $100 and many amateurs find it hard to justify the price.


neutral density filter
Shot of the same scene as above without the ND filter


So in this article we will discuss how we can create a 10 stop ND filter using welding glass. Welder’s glass comes in various strengths ranging from 4 stop to 11 stops, choose a strength depending upon your purpose (how bright is the scene and how long do you need the shutter speed to be) darker glass produces longer exposure times and vice versa.

When considering purchase of welding glass it is good to know that the numbers on the welding glass are not the same as stops. I have only worked it out for the ones I use which are:

#8 = 10 stops
#9 = 11.5 stops
#10 = 13 stops

One other thing when using very dark ND filters, is that the viewfinder needs to be covered to stop light leaking in through the viewfinder, which can get past the mirror when it is raised. Some modern cameras have a shutter built in to close the viewfinder but most doesn't. I use a piece of black gaffer tape over the eyepiece. This also stops the cameras meter giving an incorrect reading.


DIY Welding Glass ND Filter


Before we proceed any further let us be clear on certain aspects, welding glass is not designed with photography in mind, they are also not of the same optical quality as ND filters. This means there are chances of distortion, ghosting or loss of image quality when photographing using welding glass.

The pictures will also have strong color casts depending on the type of glass being used but this could easily be corrected if you shoot in RAW file format.


neutral density filter using welding glass
This is how the ND filter shot looks straight from the camera
without custom white balance.


However I have found that if you choose a reasonably good quality welder’s glass to make your ND filter you will get images comparable to that taken with dedicated ND filters, especially so if there is no light falling at the filter from angles that are far from perpendicular to the filter plane.

Attaching the DIY Welding Glass ND Filter to the Lens


If you google it, you will see that many photographers use different techniques to attach the filter to their lens.

Aaron Czeszynski’s article at Diyphotography.net shows a really simple method of attaching the filter to the reversed lens hood using rubber bands.


welding glass filter
Photo by: Aaron Czeszynski 


Alex Wise in his photography blog alexwisephotography.net uses rubber bands to attach the filter directly to the camera.

diy neutral density filter
Photo by: Alex Wise


Both techniques is simple to use, but one should be careful and ensure that there is no light leaking in from the point where the lens and filter meet, else everything is spoilt. Another disadvantage of these techniques is that you cannot use a lens hood when the filter is attached like this. And as we explained earlier non image forming light (light falling at the filter from angles that are not perpendicular to the filter plane) could seriously reduce image quality and a proper lens hood could do a lot of good in such situations.

So what I did was to remove the glass from a broken/damaged filter take it to a optic store and in no time they cut the welding glass to fit the filter perfectly.


DIY ND Filter
DIY ND Filter


Wow a neat looking 10 stop ND filter in no time, the welding glass cost me Rs 30 and the optician charged Rs 20, even if I put in my travelling expenditure it is well under Rs 70 (approximately 1 $).


diy welding glass nd filter

And what's even better is the fact that you could use a lens hood as normal which is a significant advantage over other methods. Check out this post if you need to make a hood for your lens.

Here are some shots taken with diy welding glass ND filter for your inspiration.


welding glass nd filter

welding glass nd filter

welding glass filter photography

neutral density glass filter

welding glass camera filter

diy 10 stop nd filter


Related Reading


DIY Flash Extender for Macro Photography


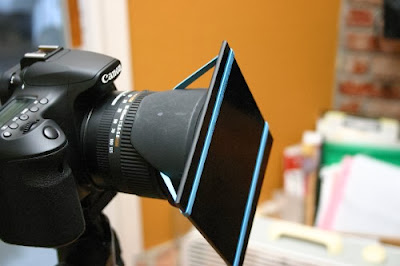
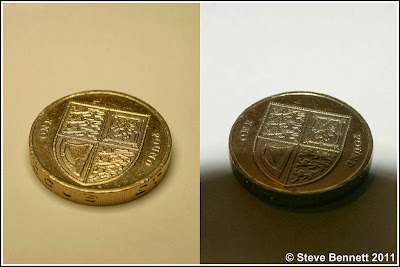
Anyone who has tried shooting close up or macro using the pop up flash on top of the camera might have encountered this problem at some time. When working distance is very small (usually in millimeters with high magnification) the lens blocks the light from the flash, casting a shadow of it on the subject and ruins the shot. This is more pronounced with longer lenses or with a close up attachment, as I had fitted here.

diy flash extender
diy flash extender


In the example given above the first picture (on the left) is taken using our diy flash extender and the one on the right is taken without it.

A quick fix solution to the problem is to extend the flash forward, so it provides light near the end of the lens. To extend the flash what I have used is a simple disposable paper coffee cup attached to the pop-up flash. This brings the light source forward and by leaving the domed plastic cap on the cup, provides a diffused light source close to the end of the lens.

This is how the set up looks.


diy flash extender for macro photography


Our diy flash extender is made from a paper coffee cup, cut a hole on the side of the cup near the bottom. The hole should only be large enough to let the pop up flash head in.

Probably worth mentioning, I have not used anything other than gravity to hold the cup on the camera here. In a studio situation, nothing more is really needed. But if going out and about, a couple of rubber bands will hold it in place. I use one around the base of the cup and hooked under the eyecap on the viewfinder, with a second around the lens and cup.

When we compare the 2 shots there are some obvious side effects to our techniques. Firstly, the amount of light is reduced, which is not such a bad thing when working in this close as you have plenty of flash power. The second is that due to the reduced light and the fact that the light is passing through the plastic lid of the cup, there is also a strong color cast to the picture. This is easy to fix by setting a custom white balance to match the light, or in editing afterwards; no big deal if you shoot RAW. I left it unaltered here to show the effect.

For longer lenses you will need some attachment that is longer enough to get the light where you need it (a Pringles can could be a good choice if you could find a way to cut through the metal base of the can).

Have been playing a bit more with extending the pop-up flash for close up work and decided to do a comparison between using a paper coffee cup and a Pringles tube version.


diy flash extender for macro photography using pringles can


Hopefully this shot shows how simple this is to do. The only modification required to the Pringles tube, is to cut a hole for the pop-up flash to fit into. On my Canon, the hole is a 45mm by 20mm rectangle, though you might need to vary this for different cameras. Then it just slots onto the top and is retained at the rear by a rubber band which is hooked under the rubber eye cup on the viewfinder to hold it securely in place.

As can be seen, this is a bit long for use with the 18-55mm kit lens on the camera and for really close macro work, may cause problems. A little further away though, it works fine, as can be seen below.


pringles can macro diffuser result

A giftwrap ribbon rosette being used as a test subject for an extender on the cameras pop-up flash. This one is taken with a Pringles tube placed on the flash to bring the light source forward and diffuse it.This prevents a shadow being caused by the cameras lens when working in close and also softens the shadows which are typical when using the on-board flash. It should be noted, that the addition of the tube does introduce a very slight hint of color to the image, but that is easily dealt with by using a custom white balance setting, or correcting in editing which was done here. The color shift is less with the Pringles tube, than with the paper cup version of this.

Also shown below, is a similar shot taken with a paper coffee cup version of the extender for comparison.


paper coffee cup macro flash diffuser result


Hopefully this will be useful to some of you. 


Related Reading


  1. DIY Flash Modifier
  2. DIY Flash Diffuser for Macro Photography Made from Coco Cola Cans
  3. How to Make a DIY Ring Flash Video Tutorial


DIY Flash Modifier

My Ghetto Flash Modifier

In my quest to get light onto macro subjects without carrying a lot of gear in the field or spending a bundle on a macro flash setup, I have come up with this, which I call MuzzBounce™ because I'm silly like that.

The main problem with using an ordinary on camera external flash and macros is you can't get the flash to hit the subject.The working distances with this macro lens are very close, so even if I could get the flash aimed at the subject without the lens casting a shadow (I can't: the flash doesn't point down that far) it would be way too bright at any setting.

Here is my first try at a cheap solution.

Step 1


diy flash modifier
DIY Flash Modifier


First, I found an ordinary translucent white plastic jug. This one used to contain windshield wiper fluid.

Step 2


DIY Flash Diffuser
DIY Flash Diffuser


I cut off the top, leaving a cylinder with a closed bottom. In the very center I placed the flash, marked the 4 corners with a pen, and cut an "X" slightly larger than the flash dimensions for an easy fit, and stuffed in the flash. The fit is firm... no wobbling. Take care when removing the flash not to break the retractable diffuser screen if your flash has one.

Step 2: Another View


diy flash diffuser milk jug
DIY Flash Diffuser


An alternate view. The plastic on the bottom of the jug is quite firm and the device fits snugly on the flash.

Step 3


DIY Flash Diffuser
DIY Flash Diffuser


Next, I cut down the cylinder at about a 45 degree angle. The angle is important... eyeball it with it mounted on the camera. in my case, I cut it 90 degrees off axis by mistake. Luckily, my flash unit swivels horizontally, so I'll get my light from above and to the right, which might be useful sometimes. Next time I make one of these, I will cut the 45 degree angle correctly so that the light will bounce from above. (You'll understand when you see the final product picture)

Take the cut cylinder and trace around it on a piece of corrugated cardboard. Cut out the cardboard and glue some white paper on one side to make a reflective surface.

Attach the cardboard to the end of the cylinder with the paper side inside, of course. I used duct tape to preserve the ghetto appeal


DIY Flash Diffuser
DIY Flash Diffuser


As you can see, I messed up the 45 degree cut off by a quarter turn. Fortunately my flash swivels. Rotate the cut counterclockwise (in this image) 90 degrees and you won't have to swivel the flash to aim the light on the subject.

What you end up with is a lot of relatively diffuse light very close to the front of the lens... perfect for very close focus distances.

(Oh, and sorry about the white balance on this point and shoot picture.)

How well does it work? It works very well indeed, considering the cost. The following two images are just my first tries, just to show an couple of examples, not for any attempt at art.


DIY Flash Diffuser Review
My dog's iris with home made flash modifier.

1/80th sec f/13 ISO 100 in a darkened living room

DIY Flash Diffuser Review
Icky nail shot with home made flash modifier. Note the lack of harsh shadows and specular highlights.

1/80th sec f/16 ISO 100 in fading afternoon light

Have you tried something similar, if not do give it a try and if yes post yours in the comments below, we would all love to see them. 

DIY Flash Diffuser for Macro Photography Made from Coco Cola Cans


DIY Flash Diffuser for Macro Photography Made from Coco Cola Cans


Having used the same diffuser for about 18 months (made from plastic milk bottle duct tape and kitchen towel) decided to try and make a new one with the aim of making it more light efficient; so I didn't have to wait for the flash to recharge when taking fairly quick sequences of shots.

As I needed something with a fairly shiny surface decided to see what I could do with a couple of coke cans :)

Finished prototype (lot of duct tape involved :)


diy diffuser for macro

how to make diy diffuser for macro


Just kitchen towel over the front at the moment

Note you need to be careful making this- very easy to cut yourself on the edges of the tin.

Ingredients- 2 empty drinks cans, duct tape, stapler, kitchen towel, scissors

Carefully cut the bottom and top off the cans- I made a slit with a sharp knife and then just used scissors to trim any sharp bits off the edge.


how to make a diffuser for macro photography


Then make cuts from one edge up to within about 2cms of the other edge with the strips about 1.5cms wide (the strips in the picture are a bit too narrow).


Macro Flash Diffusion


Cut several strips of duct tape about 1cm wide and have them ready. You then overlap the strips on the bottom edge one over the other (think the technical term is gathering) overlapping each one about half the width and when you have done about 5 stick them in place with the strip of tape and then continue round the whole piece of tin. Do this for the second tin as well. Fold over the edge with the cuts in at about 60' with about 2cms length.


DIY Flash Diffuser for Macro Photograghy


When you have done both tins stick the two halves together with a slight overlap and staple as well if necessary. At this stage it's a good idea to put duct tape over the sharp edges to stop any cuts. You should now find you can wrap the construction around the flash head- and temporarily stick the other edge with probably a large overlap together with duct tape. 

Take it off the flash and trim off most of the overlap and stick together with duct tape and staples if necessary. I covered the entire outside with duct tape and then just sellotape a piece of kitchen towel over the front.

macro photography flash diffuser

Here are a couple of shots taken with this diy diffuser.


How to Make a Cheap DIY Flash Diffuser for Macro Photography
Photo by: Brian Valentine

Best flash diffusers
Photo by: Brian Valentine


How to Make a DIY Ring Flash Video Tutorial

In this tutorial we will discuss how to make a ring flash for your dslr camera which is extremely useful for macro work. It is made out of an aluminium shop light shade. Here's a picture of the finished product.


DIY Ring Flash
DIY Ring Flash

List of Materials needed for making DIY Ring Flash


  1. One 4"-5" galvanized vent reducer (coupler) available at home depot costing approximately $6.
  2. One aluminium shop light shade (10 1/2" clamp reflector light) available at home depot for about $10.
  3. One 1 1/4" galvanized bar stock 3 feet approximately $7 (1-1/4" x 1/8" x 36" metal bar).
  4. roll carpet tape (heavy duty double sided tape)
  5. double sided foam tape roll
  6. 1/4" thumb screw to fasten camera
  7. 3/16" screws, nuts and lock washer/washers to fasten bracket to reflector
  8. JB weld epoxy
  9. fabric tape to cover flash hole rough opening
  10. flat balck spray paint and primer
  11. michael's fun foam 8 1/2" x 11" sheet (black)
  12. Chefmate cutting mat 4 pack for flash diffuser


Tools Required for making DIY Ring Flash


  1. Dremel
  2. Hacksaw
  3. Drum sander
  4. Sand Paper
  5. Scissors
  6. Marker
  7. Steel Pop Rivets
  8. Tin snips / Meal Sheers


Here's the first part of the video tutorial


And here's part 2


Notice the extra layer of diffusing material at the 5 to 7 o-clocked position (in the picture given below). This is due to the flash head entering the 6 o-clock position thus creating a hot-spot.

DIY Ring Flash Tutorial

Here's a picture from the construction phase.

Ring Flash - DIY Photography

And finally some shots taken with the diy ring flash for your inspiration.

diy ring flash for your dslr
diy ring flash strobist
diy photography ring flash
DIY Ring Flash Video Tutorial
How to Make a DIY Ring Flash
Have Fun: Roy Niswanger 

DIY Extension Tube using PVC Pipe

Here is my Pipe Extension Tube set-up.


DIY Extension Tube using PVC Pipe


Once again I don't know of anyone else who has done this so maybe I am an inventor!!!!

You can cut the pipe to any length you want. I am not an engineer so going over 100mm would be a bit overboard.

Basic Build


A pot with about 1 inch of boiling water will soften one end of the pipe. Stand the pipe up in the middle of the pot and let it heat up for a few minutes. You can lift it up and touch it to see how it is doing.

1. Fit the reversing ring into the soft end of the pipe and clamp it. Run some cold water over it and leave the clamp on for now. The heated pipe will form a seal on the threads of the reversing ring.

2. Stick the second end of the pipe into the pot and heat it up as before. This time put the end cap into the end of the pipe making sure to push it down on a counter top so that it is flush with the end of the pipe. The cap should fit nicely into the heated pipe. You may find that you have to heat the pipe up longer than the first end due to how far the lens cap has to go into the pipe.

A "Genuine" Nikon cap fits best....some of the 3rd party Nikon caps don't fit. The Nikon cap flairs out to fit snug into the pipe.

Once the lens cap is in flush then rinse under cold water.

3. Once pipe has cooled down below room temperature you then will need to pop out the lens cap with a ruler or dowel or anything you can find.

Why? because you will have to dremel or drill a hole out of the center of the lens cap so that the light will travel down the tube. Once you drill out the hole you will have to re-insert it back into the tube AND CHECK IT WITH THE LENS ATTACHED. This dry fit is critical.

Make sure you clean the pipe of any loose dust or plastic pieces. These can get into your lens and camera...and we don't want that!

* On my 50mm lens it has some metal flanges that stopped me from securing the lens into the cap when it was flush with the end of the pipe. In the end I had to have the lens cap stick out from the end of the pipe by about 1/8 of an inch. This space allowed the flanges to mount properly....the dry fit is very, very important.

When it looks good add some drops of crazy glue along the edge of the end cap where it matches the pipe - AND LET IT SET-UP REALLY GOOD (Can you tell that I didn't and had to re-glue it?). If there is a better way to bond these then please let me know....

4. One last finishing touch! Get some FLAT BLACK spray paint and spray all the inside parts of the tube where light will be moving through. This includes the inside of the pipe and the end cap section (both sides). Stick the paint nozzle right in the ends and try to spray a nice even coat on all sections.

Why? Cause if you don't then the light coming in from the lens will bounce off the smooth insides of the pipe and end cap causing a really weird ghosty/overexposed blur in the middle of your pictures.

Now let the paint dry for the time specified on the can and then go out and get introduced to your manual settings!!!!!

On a sunny day you could try F8, 320 shutter speed and 400 ISO. Make sure your histogram has a nice camels hump to it so that you know you are exposing properly.

To focus you will need to move your camera towards the subject. Once you find the focal range start clicking away. Take lots of pictures and throw away the bad and keep the good.

This set-up works good on the older lenses where you have to turn the F-stop collar on the lens itself. I don't see how it can be done with the new digital VR lenses....you need to have control over the F-stops.....hmmmmm maybe if I rammed a toothpick in the ..,.;'-;[]=-+-$ nope, better not do that.....

If you do take up this project I would sure love to have at least one more person in the club. Hey, do post some results in the comments!

Here are some shots taken with my pipe extension tube for your inspiration.


macro photography using extension tube
Photo by: Pat Kavanagh

diy macro photography
Photo by: Pat Kavanagh

extreme macro photography using extension tubes
Photo by: Pat Kavanagh

extreme macro photography
Photo by: Pat Kavanagh

using extension tubes for macro photography
Photo by: Pat Kavanagh


All the best!

 
Support : Creating Website | Johny Template | Mas Template
Copyright © 2011. Technology Share - All Rights Reserved
Template Created by Creating Website Published by Mas Template
Proudly powered by Blogger