Latest Post :
Recent Post
Showing posts with label Macro Photography. Show all posts

Getting Backgrounds Right in Macro Photography


Background is as important as the main subject in all genres of photography, especially macro. Backgrounds have a huge impact on the photograph; it could be used to emphasize the subject and to relate it to its environment.  One can achieve a completely different look to a photograph just by changing its background.


macro photography background
Photo by: Thomas Shahan


To achieve an interesting background the photographer should get many variables right. The color of background, its brightness, saturation and even the amount of blur affect the final result.

Choosing the right background color


To create aesthetically pleasing backgrounds one must make sure the color of the background chosen would work well with the subject being photographed.

A very useful tool which helps you choose the right color background for your macro photograph is the color wheel.


color wheel
color wheel


Using Complementary Colors


Colors that are opposite in hue (colors that are opposite to each other in the color wheel) to the color of the subject works well as backgrounds.


getting backgrounds right in macro photography
Photo by: Tarique Sani

Using complementary colors will help emphasize the colors of the subject and make it stand out from the background.

Using Analogous Colors


background macro photography
Photo by: Rovanto


Color schemes using colors that are adjacent to each other on the color wheel are called analogous color schemes. Colors that are adjacent to each other in a color wheel are naturally harmonious and using them will help create an organic feel to the image. Analogous colors work well as backgrounds when photographing highly camouflaged insects and animals.

Brightness Level of Background


The brightness level of background is also very important to create interesting photographs. Usually photographers prefer to work with different brightness levels for the subject and the background. The reason for this is that if the subject and the background is of same brightness level then the final image will have very little contrast making the image uninteresting. However one should remember not to overdo it as backgrounds that are too dark or too bright could also throw an image off balance. The trick is to achieve a lighting ratio that works.


macro photography tips
Photo by: Walwyn

  • A completely black background often caused when using flash looks artificial and is therefore considered far less appealing. 
  • A background that is a stop or two darker than the subject works really well and makes the subject stand out, especially subjects that are very colorful.
  • A very bright background can work well in some situations if not in all. A background that is brighter than the subject will work as long as it doesn't divert the viewers’ attention from the main subject.


Amount of Background Blur


A photographer can control the amount of blur in his/her shots by controlling Focal length/shooting distance, aperture, subject magnification, adjusting subject to background distance etc.  In general majority of photographers prefer a clean background with not much detail so as to bring all attention to the main subject. However the choice of a very smooth even toned background or one with recognizable shapes and details is more a matter personal choice.


bokeh background macro photography
Photo by: Bùi Linh Ngân


Depending on the subject and what constitutes the background one may work better than the other. It is recommended to experiment a bit and find out what difference a background with or without detail make on your shots.

Making a Background


The simplest method of obtaining the desired background is to use colored paper. Plain color paper works very well, they are easily available, cheap, easy to carry and to work with and they come in all sorts of colors. For macro photography choose thicker sheets over thinner ones. You can cut the paper into smaller sizes, since the size of the subjects being shot is very small. 

Backgrounds can also be made by using different color gels on flash. An alternative which gives you much more control is to use a field monitor to display a Photoshop color. A much cheaper alternative is to use your Smartphone or Tablet; just import a jpg made on the PC to display a color gradient on them. We will discuss this in more detail in a future article.


Related Reading


  1. Compositing Images for Increased Depth Of Field In Macro Photography
  2. HDR Macro
  3. Diffraction and Macro Motion Blur
  4. Macro Photography - High Magnification, High Fstop, and High Detail
  5. The Sunny 16 Rule For Macro

Diy Flash Diffuser for Macro Photography Using Styrofoam Plate


This is perhaps the easiest flash diffuser project ever. Take a styrofoam plate, the larger the plate the better, it need not be circular even rectangle or oval shaped plates work quite well.


diy flash diffuser
diy flash diffuser


Take out your lens filter, press it gently on the styrofoam plate so as to make a mark, then cut out the circle,  (cut the inside of the line so that the plate attaches tightly on to the lens filter) attach the filter back on to the lens, slid the styrofoam plate on to the filter and you are good to go.


styrofoam dish flash diffuer


There is some light loss with this setup as a considerable amount of light gets reflected back from the white surface of the styrofoam plate. But the impotant thing for us is that most of the light will pass through the plate, the surface of the plate now acts as the light source which is many times larger than the flash head also the light gets spread in all angles evenly illuminating the area ahead.

With this diy flash diffuser it is possible to get soft light very close to the lens which is not possible without it as the lens itself would cast its shadow on the subject. 


macro photography flash diffuser


This will also work with a dedicated flash unit mounted on top of the camera. The most important thing to remember is that this setup is only effective for macro photography, for subjects that is a little bit distant from the camera this wont work well due to the light loss and spread of the light beam. But for macro photography this works like a charm.

Here's a shot taken with our diy flash diffuser


flash diffuser for macro photography


Related Reading


  1. How to turn any Lens into a Macro Lens the Lens Reversal Technique
  2. How to Lock a Lens at a Certain Aperture
  3. Stacking Lenses with Coupling Rings for Extreme Macro Photography
  4. Macro Photography Using Extension Tubes
  5. Lens Extension and Effective F Stop

Complete Guide to Choosing Macro Lenses


Macro Lenses
Macro Lenses


What is a macro lens?


There are many lenses out there in the market which have a symbol of a small flower indicating macro. However those lenses are not macro lenses in true sense. In order to qualify as a true macro lens it should be able to produce life size (1:1) magnification on the camera sensor. Any lens which is capable of reasonable subject magnification but is not capable of achieving 1:1 is called close up lenses and not macro lenses.

What is Life Size (1:1) Magnification?


Magnification or magnification ratio is the ratio between the size of the subject (in focus at the closest focusing distance) and its size on the image sensor. So if a subject measuring 1cm in reality appears the same size in the sensor it is called life size or 1:1 magnification.


Lens magnification
Lens magnification


If an object is 100cm in reality but its projected size is only 1cm on the image sensor then magnification of the lens will be 1cm/100cm or 1/100. Similarly if a subject that is 10cm long and its projected size is only 2cm on the image sensor then the lens magnification will be 2cm/10cm or 2/10.

Magnification of lenses is notated using a colon; so the above examples will be noted as 1:100 and 2:10 respectively.

A ratio of 2:10 means that in reality the subject is five times larger than its projection on the image sensor.

Macro Lenses are Flat Field Lenses


Generally all lenses except macro lenses are curved field lenses and images shot with them will have a field curvature; meaning the point of focus will be slightly different at the corners than the center. 
  

Flat Field Lens
Flat Field Lens


In the illustration given above first one is a normal lens which has a curved field and as a result if you focus the lens on the green star in the center, then the stars on the corners will be out of focus due to the field curvature of the lens. If the stars were in the position indicated by the red stars then they would be in focus too.

The second lens in the illustration is a flat field lens and you could see that all the three stars, the one in the center and those towards the corners are all in sharp focus. This is extremely important when photographing small objects such as postage stamps as we need to get both the center and corners in sharp focus.

Having a flat field lens might not be that important for other types of photography, some genres of photography like portraiture could actually benefit from a little field curvature and in certain situations it is also possible to reduce the side effects of field curvature by stopping down the lens to a narrow aperture. But this is not possible in all situations and depending on the lens you're using and how close the lens is to your subject, the edges might still be soft even after you stop down to smaller apertures.

Magnification and Sensor Size


Before going into details let us first clarify one important point which many people often confuse; when we talk about magnification of macro lenses we are actually referring to the magnification at the sensor plane and not about the size of the image on a print or when viewed on a computer screen.

Another important point of confusion is the size of the sensor and how it effects lens magnification. The truth is that the lens magnification remains the same irrespective of the size of the sensor used to capture images. A lens focused at a certain distance produces an image circle of a certain size at the image plane; this does not change when the lens is mounted on a full frame camera or on a crop sensor camera. The only difference is that the crop sensor only captures the center portion of the image cropping away the rest.

Does this mean magnification obtained is the same when a lens is mounted on a full frame camera and on a crop sensor camera?


Full Frame Camera Sensor Vs APS C Camera Sensor


No even though the actual magnification produced by the lens at the image plane remains the same you will get more magnification when it is mounted on a crop sensor camera than when used on a full frame camera.

For example:

A 100mm macro lens set to 1:1 magnification will project an image in life size on the sensor plane. So if a subject measuring 15mm is shot at the same setting using the same lens set to 1:1 but using two different cameras, one a full frame camera and another a crop sensor camera, the full frame camera will be recoding an image which is 15mm on a sensor that is 24mm x 36mm in size, the subject will be half the height of the sensor. But on a crop sensor camera with a sensor size of 15.7mm X 23.7mm the 15mm subject will fill most of the frame. So for practical purposes, you do get more magnification with the smaller sensor, the subject fills up more of the image frame.

Macro Focal Length


Generally macro lenses are grouped into three heads according to their focal length, they are:

  • Normal (macro lenses with focal lengths of 50mm – 60mm)
  • Short Tele Photo (macro lenses with focal lengths of 90mm-105mm) and
  • Tele Macro  (macro lenses with focal lengths of 180mm-200mm).


The major differences between these lenses are in their working distance and perspective. The longer the focal length, the greater the working distance and vice versa. 1:1 magnification will be achieved by a 50mm lens at a distance of approximately 8 inches where as a short tele macro will achieve the same magnification at around 12 inches and a tele macro at 19 inches. 

Macro Lens Focal length and Working Distance


Remember in macro photography especially of live subjects (read skittish insects) working distance is often crucial to getting the shot, longer working distance also makes lighting the subject much easier. Now about perspective shooting closer to the subject expands perspective, while shooting from farther away compresses it. so shorter focal lengths provide an immersed feel but reduces chances of getting the shot, longer focal length lenses compresses the perspective thereby producing flat images but the longer working distance greatly increases your chance of getting the shot.

However when selecting the focal length required you should also consider some other factors, one is the crop factor of your cameras sensor. An APS-C sensor with a crop factor of 1.5x or 1.6x will turn the above macro lenses into 75mm, 150mm and 300mm respectively.

Cross Compatibility


All macro lenses designed to be used with full frame cameras could also be used with APS-C cameras but not all lenses designed for APS-C format could be used on full frame cameras. For example APS-C-format Canon lenses can't be mounted on full frame Canon DSLRs; APS-C-format Nikon lenses can be mounted on full-frame Nikon DSLRs, but the camera will crop the image to DX format; APS-C-format Sony lenses can be mounted on full-frame Sony DSLRs, but will vignette; APS-C-format Sigma, Tamron and Tokina lenses are for APS-C-format DSLRs only; all Pentax DSLRs (except the new 645 medium-format model) are designed for APS-C sensors.

So before choosing a particular lens (especially the one’s designed for APS-C cameras) think ahead, if there are chances that you will upgrade to a full frame system in future then it is recommended you go for lenses designed for full frame cameras.

Internal Vs External Extension


Lens elements are closest to the sensor when the lens is focused to infinity and they are farthest from the sensor when the lens is focused at its closest focusing distance. Achieving life size magnification requires the lens elements to move a considerable distance away from the sensor. In case of older lenses the front element will extend further forward as one focus closer and closer, this is very inconvenient as the lens could cast its shadow on the subject or even accidentally strike the subject while trying to focus. Modern macro lenses have Internal extension, here the lens does not extend forward as one focus closer instead it’s the inner elements that move to achieve focus.  This also allows for a closer minimum focusing distance and a more compact lens design as the internal elements are both considerably smaller and lighter than the front element; this also makes things easier for the AF motor, resulting in quicker auto focus.

Macro Lenses - Auto Focus and Image Stabilization
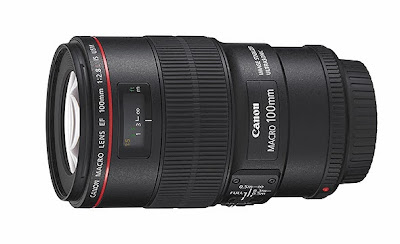


Canon 100mm f/2.8 IS USM Macro Lens


There are some macro lenses like the Canon 100mm f/2.8 IS USM which feature Canon’s ‘Hybrid’ optical image stabilization system designed to compensate for two distinct types of camera shake. Which not only detect and correct changes in the angle the lens is pointing by also compensates for vertical and horizontal shifts in the position of the lens caused by handshake. This has little benefit at long focusing distances, but as the subject gets closer and closer it becomes progressively more important.

Photographers are divided on their opinion about the usefulness of autofocus and image stabilization at high magnifications. But my personal experience is that a macro lens such as a 100mm is not always used at 1:1 in fact most of the shots are taken at far less magnifications and when working in the field at less than ideal lighting conditions. I find both auto focus and image stabilization quite useful and is worth the extra money that you need to pay.

So to conclude when choosing a macro lens, consider the following points:

  1. Amount of magnification required.
  2. Type of use (whether moving or stationary) this dictates the working distance and thus the focal length of the lens. (also consider sensor size when deciding focal lengths).
  3. Full Frame Lens Vs APS-C (if chances are you will upgrade to a full frame camera, choose a full frame lens)
  4. Image Stabilization & Auto Focus
  5. Lens Extension - Internal Vs External Extension

Related Reading


An Introduction to Macro Bellows


Extension bellows fits between the camera lens and the camera body and functions on the same principle of extension tubes. They are superior to extension tubes because they provide the ability to vary the extension to control the amount of magnification.


Macro Bellows
Macro Bellows


Most major camera manufacturers have bellows systems and there are some made by third party manufacturers which work with most camera bodies by using adapter rings. Bellows systems come from the basic bellows unit with no electrical contacts to the ones that have advanced features like providing full electrical communication between the camera body and the lens (when using same brand camera and lens), ones with controls to make very fine adjustments for precision focusing, units equipped with focusing rails, the ability to move both front and back standards and ability to make tilt/shift movements to re-position the depth of field as needed etc.

Tips for Using Bellows for Macro Photography


macro extension bellows
Photo by: Patrick Dobeson

  1. Bellows units could be quite cumbersome to use; and it is strongly recommended to use a strong, sturdy tripod when shooting with bellows.
  2. With Bellows systems the minimum magnification is usually around 1:1 or greater so it can only be used to photograph tiny objects.
  3. Better quality bellows units will be fitted with a focusing rail and will have the ability to move either the front or back element.  It is recommended that you first set the desired magnification and then focus by moving the whole bellows assembly nearer or farther from the subject.
  4. There are special lenses available in the market designed specifically to be used with bellows units; they are known as bellows macro lenses or simply lens heads; they are available in a range of focal lengths from 12.5mm to 135mm (Some of them come with automatic diaphragms). They could provide up to 20X magnification. The shorter the focal length the greater the magnification is at a given extension and vice versa.  Longer focal length lenses could focus at infinity while it is not possible with shorter focal length lenses. In general these special lenses deliver excellent image quality when compared to other lenses.
  5. Good quality enlarging lenses work well with bellows and produce excellent results. 
  6. If you plan to use normal (Ordinary) lenses on bellows use a lens reverse ring to reverse mount the lens reversed on the bellows for better image quality.
  7. If the lens used (when using normal lenses) have floating elements in them (macro or fast wide angle lenses) set focus to close focus and not at infinity for better image quality.


Advantages of Using Bellows for Macro Photography


macro bellows
Photo by: Wade Saathoff

  1. Can easily vary the extension to adjust the magnification.
  2. Greater range of extension (magnification) possible than other methods.
  3. Bellows with built in high quality focusing rails make critical focusing at high magnification a lot easier with a "focusing rail" that moves the camera and the lens together as one unit.
  4. Bellows provides serious advantages for people who do a lot of focus stacking.
With other kinds of macro systems (either via a conventional macro lens's standard focus collar or using focus rails) when you take several pictures at different depths the front of the lens moves causing a change in perspective. This change in perspective produces strange artifacts commonly referred to as "fringing" or "echos" (they appear as weird little borders around edges). Advanced bellows systems like the Nikon PB-4 or PB-6 bellows allows you to use a focusing technique called "bellows draw". Here the front of the lens stays in place and stacking is done by moving only the rear standard; as the lens in front remains in place there is no perspective shift and as a result you get perfect, fringe free stacks.


Disadvantages of Using Bellows for Macro Photography


macro bellows
Photo by: mikkokam

  1. Bellows units are comparatively expensive than other macro options except a dedicated macro lens.
  2. Large minimum extension, minimum magnification is at least 1:1 in most cases.
  3. Heavy and cumbersome to be used in the field.
  4. Bellows assembly is delicate and very fragile and is easily damaged if not treated with care.

Here are some exemplary macro shots for your inspiration.


macro extension bellows
Photo by: Thomas Shahan

macro photography bellows
Photo by: Thomas Shahan

macro-photography-bellows
Photo by: Thomas Shahan

macro_extension_bellows
Photo by: Thomas Shahan

macro_photography_bellows
Photo by: Thomas Shahan

Related Reading


Using Close Up Lenses / Filters for Macro Photography


Close up lenses are also called close up filters as they are designed to screw on to the filter thread in the front of your lens, just the same as any other filter. They act like a magnifying glass placed between your subject and your camera lens. when a close up filter is attached to a lens the lens's effective focal length is decreased. The minimum focusing distance of the lens is also reduced there by allowing greater magnification.


The magnifying power of close up lenses / filters are specified in terms of "diopters". Most commonly available are in the range of +2 to +4 diopters. The higher the number the greater the magnifying power. For extreme macro photography there are some high power closeup lenses available in the range of +10; it is also possible to stack multiple filters to achieve even higher magnifications.

Types of Close Up Lenses


There are two types of close up lenses they are:

1. Single Element Close Up Lens


As the name suggests, Single Element close up lenses have only one optical element in them; they are cheaper than those which feature double elements, but provide less image quality. Lack of edge sharpness and chromatic aberrations are common issues with them especially when used at wide open apertures.

2. Double Element Close Up Lens


Double element close up lenses also known as dual element or achromatic close up lenses have a design that features two optical elements. The second element is used to correct the defects of the first and this results in much improved image quality than single element filters especially noticeable towards the corners. Double element close up filters are much more expensive than single element close up filters.

Tips for getting the most out of your close up filters


1. Close up lenses yield greatest magnification when used with longer focal length lenses.

For example

a +10 diopter on a 50mm lens will only give you magnification of 0.5X where as the same magnification could be achieved on a 200mm lens with just a +2.5 diopter.

2. Generally Close-up lenses are not corrected for optical aberrations and this causes quality loss especially towards the edges. Stop down your lens couple of stops for getting better image quality. Bear in mind the issue is more pronounced when shooting with longer focal length lenses (as magnification increases so does the defects in lenses and filters). Use high quality filter on tele lenses to reduce such issues.

3. To attain higher magnifications it is possible to use close up lenses stacked. The effect of stacking closeup lenses is additive so combining a +2 and +4 diopters will give you results equivalent to a +6 diopter.

4. Stacking more than two close up filters is not recommended due to loss in image quality.

5. To get better results when stacking close up lenses make sure you mount the stronger one (one with higher diopter) directly on the camera lens.

6. Like UV and other filters, the make of close up filters is not important. They can be used on any camera regardless of the brand. The important point is to make sure the diameter of your close up filter and that of your lens filter thread match.

7. Attaching a close up filter does not affect the focusing and metering ability of your camera. So you will be able to autofocus just as normal and exposure metering also works just fine. However you will not be able to focus on infinity (at objects located very far) with the close up lens attached.

8. A close up lens does not restrict the amount of light passing through the lens and so the viewfinder does not grow dark when they are attached.

Advantages and Disadvantages of using close up lenses for macro photography


Advantages of Close Up Lenses


1. They are Small, light weight, easy to carry.

2. They provide more magnification than extension tubes especially when used with longer focal length lenses.

3. They are Not expensive especially single element models.

4. They don’t affect exposure.

5. To attach close up lenses one need not dismount the lens from the camera body thus reducing chances of dust entering the sensor.

6. Viewfinder brightness is not affected making it easier to focus.

7. Autofocus works as normal.

Disadvantages of Close Up Lenses


1. Image quality suffers when used at wide apertures.

2. Difficult to work with in the field, in-order to change magnification one need to add or remove filters and experiment with different combinations.

3. For each filter size you will need a different close up filter set; they are also not available for filter sizes greater than 77mm.

4. The lens cannot focus at infinity (at far away objects) when a close up lens is attached.

5. Image definition provided by close up lenses are not as good as a dedicated macro lens.

6. Not very useful when used with shorter focal length lenses as they provide only very little magnification.

7. Low quality filters could significantly reduce the image quality.

8. It may not be possible to use other filters with a close up lens attached.

Here are some shots taken mostly with canon 550d,sigma 105mm,raynox dcr 250.


Close-Up Lenses in macro photography
Photo by: Karthi Keyan S

close up lens for macro photography
Photo by: Karthi Keyan S

Close-up and macro photography lenses
Photo by: Karthi Keyan S

Close-up filter
Photo by: Karthi Keyan S

Close-up Lens Filters
Photo by: Karthi Keyan S

Close-up lenses
Photo by: Karthi Keyan S

How To Use Macro (Close Up) Filters
Photo by: Karthi Keyan S

Related Reading


Macro Photography Understanding Focal Length Working Distance and Closest Focusing Distance

Lens Focal Length, Working Distance and Closest Focusing Distance

Working Distance


Perhaps one of the most important factors to consider when choosing a lens for macro photography is its working distance. Working distance of a macro lens is the distance from the front of your lens to the subject (when the lens is set to its highest magnification).

For example the working distance of Canon 100mm f/2.8 IS USM Macro is 5.2" (133mm) at 1:1.

Closest Focusing Distance


Closest focusing distance is measured from the sensor to the subject (with the lens set to 1:1).

For example the closest focusing distance of Canon 100mm f/2.8 IS USM Macro is 1 foot (0.3 m) at 1:1.

Focal Length


Focal length is not a measurement of the actual length of the lens. It is a calculation of an optical distance from the point where light rays converge to form a sharp image of an object to the digital sensor at the focal plane in the camera. The focal length is expressed in millimeters and is determined when the lens is focused at infinity.

The focal length tells us the angle of view of the lens, i.e. how much of the scene will be captured and also the magnification; how large individual elements will be. The longer the focal length, the narrower the angle of view and the higher the magnification. The shorter the focal length, the wider the angle of view and the lower the magnification.

Tips for Choosing a Lens for Macro Photography


When considering lenses for macro photography the two aspects one should consider are the focal length and working distance. These two go hand in hand; generally at any given magnification, the working distance increases with an increase in focal length. 

For example, Canon's 100 mm f/2.8 macro lens has a working distance of ~150 mm (6") at 1:1 magnification, whereas Canon's 180 mm f/3.5L macro lens has a working distance of ~300 mm (12") at 1:1 magnification.

The importance of Working Distance in Macro Photography


Working distance of a lens dictates how close you need to get to the subject to capture it at the lens's maximum magnification. This is important for many reasons.

If you are photographing insects or other live subjects the closer you try to get to them, the more the chances of you scaring them away. So longer the focal length / working distance the greater the chances of you getting the shot.

Sometimes when the subject is placed in not very accessible places it is impossible to get close (like when an insect is resting on grass or other foliage) in such cases having a longer working distance is critical.

Another important factor is lighting; with very short working distance you will actually be blocking the light from reaching the subject and it gets very hard to get the light to hit the subject without being blocked by the lens. Even specialist macro lighting equipment like twin flashes and ring flashes find it had to light subjects that are just millimeters away from the lens.

so should one always look for the longest focal length / working distance when choosing a macro lens.
Well the answer is both yes and no. Yes because it makes things easier and No because longer focal length macro lenses tend to be much more expensive than macro lenses of short focal lengths.

If you are shooting subjects that are stationary like flowers then you could easily get the work done with any macro lens irrespective of its working distance, the subject is not going to be scared away and you have many options to set your scene and light it the way you like.

Another important advantage of a macro lens with short focal length is that they provide a more three dimensional feel to the photograph. The viewer feels immersed and not as a spectator. The reason for this is because when a longer focal length lens compresses and flattens perspective a shorter focal length lens widens it and provides a greater sense of depth.

So weigh the pros and cons, think about the intended use of the lens and choose a lens that suits both your nature of work and budget.

Lens Extension and Effective F Stop

lens extension
Photo by: Kirill Ignatyev

What does f number mean?


The f number is a measure of the amount of light the lens passes on to the sensor. 

What does focal length mean?


The focal length engraved on the lens barrel is a measurement taken when the lens is focused at infinity (∞ position). They are calculated using the following equation.

F number = focal length of the lens (at ∞ position) / working diameter of the lens aperture.

So when we say f/4 for a 50mm lens; we are referring to a certain amount of light passing through a hole which is 12.5mm.

4=50/? Which translates to ?=50/4 and that is 12.5mm.

So focal length at infinity divided by working diameter is the f number; "f" is thus an abbreviation for "focal ratio".

Now it’s time for us to look at what happens when we attempt to focus the lens at even closer distances than normally possible. As we bring the focus point closer and closer; the lens need to be moved further and further away from the sensor. This movement of lens is called extension, to achieve low magnification the lens only need to move a tiny bit and the lens always stays at the expected distance which will be roughly one focal length from the sensor.

However when we try to attain even greater magnifications, from 0.25x onwards, the lens would have moved so far away from its original position that it starts to behave like a lens of longer focal length. It its estimated that at life size or 1:1 magnification the lens would have moved twice the focal length from the camera’s sensor.


Lens Extension and Effective F Stop


So let us know discuss what happens to our earlier equation when the focusing distances change.

F number = focal length of the lens (at ∞ position)/ working diameter of the lens aperture.

We know that the focal length has now doubled and its now 100mm instead of the earlier 50mm. diameter of the lens aperture remains the same at 12.5mm so to find out the effective f number.

?=100/12.5 = 8 thus we now have an effective aperture of f/8 which is 2 stops higher than the earlier f number. Thus our findings substantiate the general rule of thumb that at 1:1 the effective f-stop becomes about 2 stops greater than the value set using your camera.

Now the formula to estimate the effective f-stop at other magnifications:

Effective F-Stop = F-Stop x (1 + Magnification)

For example

When shooting at 0.5X magnification, then the effective f-stop for a lens set to f/4 will be somewhere between f/5.6 and f/6.3. (Effective f stop = 4 x (1 + 0.5) i.e 4 x 1.5 = 6)

The formula given above work pretty well for lenses near 50mm focal length. For longer lenses such as the 180mm you will need to know and factor in the pupil magnification of your lens into the formula given below to get accurate results.

Effective F-Stop = F-Stop x (1 + Magnification / Pupil Magnification)

Even this has its limitations first you need to know the pupil magnification of the lens to be used, things get even more complicated when we consider the fact that pupil magnification changes with focusing distance and it is rarely published by camera lens manufacturers.

So considering all this it is better to leave this at this, you need to know that the effective aperture will be different than what’s set on your camera when shooting at high magnifications. At 1:1 the effective f stop will be 2 stops higher than what’s set on the camera. Use the formula given to calculate effective f stop for any other magnifications (only remember results will be approximations and not exacts) and everything will be just fine.

What are the Consequences of Effective F stop increase?


Don’t be fooled by the expression “effective f stop”. For all practical purposes the lenses f stop has really changed and with this changes the depth of field, exposure time and the lenses susceptibility to diffraction. The depth of field will increase, so does the exposure time and the lens become more susceptible to diffraction (meaning the narrowest aperture you can use before diffraction sets is now a couple of stops wider). If earlier it was f/22 now it will be f/16 or f/11 depending upon the amount of magnification.

The viewfinder display would become darker due to low level of light coming through.
Some cameras lose the ability to autofocus with the minimum aperture goes beyond a certain f/stop.

If the F Stop actually increases then why is it called Effective F STOP?


The f stop does increase and as a result the amount of light getting into the sensor is reduced and you will need to increase your exposure time (either decrease shutter speed or increase ISO) to compensate for that.

A simple practical test to prove the point 


  1. Attach a true macro lens to your camera (in this case a Canon 100mm f/2.8 IS USM Macro to a Canon 5d mkii). 
  2. Set the camera on a tripod.
  3. Set shooting mode to aperture priority and set it to f/2.8
  4. Set the lens to infinity focus (set focus mode to manual on lens)
  5. Half press the shutter button to get a reading of shutter speed.
  6. Now turn the focus to reach the 1:2 magnification and press the shutter button half way to take a reading of shutter speed.
  7. Repeat the same with the lens set to the 1:1 magnification. 
  8. You will notice that with everything else being the same (ISO, Aperture, Lighting conditions etc) the camera is suggesting slower and slower shutter speeds as the magnification increases. Also if you look through the viewfinder you will notice that it has also become darker (more like what you see when the lens is set to f/5.6 and the depth of field button is pressed). This is proof that the aperture has indeed changed but the camera is just showing the set aperture.


So the only the only reason why the word "effective" is used is because many cameras still show the uncompensated f-stop setting (as it would appear at low magnification).

With Nikon cameras it is the effective f/stop that is displayed and not the f/stop set on the lens, you could notice that without any input from your side the f/stop progressively increases as the focusing distance decreases.  Even more proof.
.
When it comes to setting exposure variables, your camera's TTL (Through The Lens) meter will take into consideration the fall in light levels and will set the exposure so as to compensate that.

Related Reading


  1. Macro Photography Using Extension Tubes
  2. Tips for Buying Used Camera Lenses
  3. DIY Extension Tube using PVC Pipe
  4. How to Use Old Film Camera Lenses on Your DSLR
  5. Stacking Lenses with Coupling Rings for Extreme Macro Photography

Macro Photography Using Extension Tubes


There are many people who would like to give Macro photography a try to explore the micro world around them. But one single factor that stops most from taking the plunge is the high cost of equipment needed. Here in a series of articles we will discuss ways to bypass these costs and attain the high magnifications needed. In this article we will discuss about extension tubes, what are they, how they work, their advantages and disadvantages etc etc.


Extension Tubes
Extension Tubes

What is an Extension Tube?


Extension tubes are spacers that you put between the camera and the lens so as to move the lens farther away from the sensor.

How Extension Tubes Work?


When distance from the lens to the sensor is increased it allows the lens to focus even closer on the subject than its normally possible, thereby increasing magnification.
Facts about Extension Tubes

Here are some basic facts about extension tubes which every photographer aspiring to do macro photography should know.

  1. Extension tubes are metal tubes which has a camera body mount at one end and a rear lens mount at the other. 
  2. They are hollow tubes and do not have any lens elements in them.
  3. As extension tubes do not add any extra lens element to the equation it does not alter the quality of the image in any way. Image quality depends solely on the quality of the lens mounted on the tubes. So image quality should not be the criteria when choosing between different brands of extension tubes, instead you should choose one that has a better build quality especially if you intend to mount heavier lenses on it.
  4. When using extension tubes the lens will not focus to infinity. The focus range will be greatly limited to a very close focusing distance. So you are effectively gaining the ability to focus at very close distances by sacrificing the lens’s ability to focus at very far distances.
  5. Regardless of the type or make of extension tubes there is always a loss of light when extension tubes are used, the greater the length of the tube the greater the light loss, you will need to compensate for this when setting your exposure; but your TTL meter will be able to tell you the variables.
  6. If you plan on using relatively new macro or fast wide angle lenses which feature floating elements, it is recommended that you set the lens to close focus rather than setting it for infinity focus for better image quality.


There are two different kinds of extension tubes available in the market.

Auto Extension Tubes


Auto Extension Tubes


There are extension tubes that have ability to maintain the electrical connections between the camera and the lens there by ensuring that aperture, exposure, autofocus etc all function as normal even with the extension tubes mounted between the camera and the lens. These are called Auto Extension Tubes. Major camera manufacturers like Canon, Nikon and Olympus make such extension tubes for their lenses but they tend to be very expensive, you could also get auto extension tubes from third party manufacturers like Kenko, Vivitar, Fotodiox etc. But even they are pricey when compared with extension tubes that are manual. 

Manual Extension Tubes


Manual Extension Tubes


These are just hollow pipes with camera mount on one end and a rear lens mount on the other. They do not allow any electrical contact between the camera and the lens. They are very cheap to own, if you are opting for manual extension tubes it is better to use a lens that has manual aperture ring so that you can easily adjust aperture. Setting exposure will not be an issue as the camera’s ttl meter will function as normal and all you need to do is set it to manual and adjust shutter speed and ISO to get exposure right. Focusing is also no big deal in macro as most professional macro photographers never use auto focus; it is much easier and much more precise when you do it manually. The live view feature combined with the ability to zoom the display up to 10x has really made this easier in this department.

Extension Tube Sizes


Extension Tube Sizes


Extension tubes come in various sizes ranging from 8mm to 35mm. They are usually sold as sets of 3 tubes of three different lengths For example a 12 mm, 20 mm, and 36 mm, which can be used individually or in any combination to obtain the desired magnification. You can even stack multiple extension tube sets. The greater the extension is the greater the magnification.

Formula to Calculate Magnification achieved by different Extensions

An extension tube increases lens magnification by an amount equal to the extension distance divided by the lens focal length.

Here’s the formula for computing the magnification obtained using extension tubes of various lengths.


formula to calculate magnification given by extension tubes


So from the equation it is evident that Extension tubes work best with lenses that are of short to medium focal lengths. They are less effective when used with telephoto lenses.

Pros and Cons of using Extension Tubes for Macro Photography


While extension tubes are certainly an effective method of getting high magnifications; they are definitely not the only way to do so. Weigh the following points carefully before deciding whether using extension tubes are the best solution for your macro needs or should you explore other ways to attain similar magnifications like using close up filters or even a dedicated macro lens.

Advantages of Using Extension Tubes for Macro Photography


  1. Extension tubes are inexpensive when compared to a dedicated macro lens.
  2. Different combinations of extension tubes allow you to get a wide range of magnifications with a single lens.
  3. Extension tubes do not have any glass elements and so they do not degrade the optical quality of your lens.
  4. The brand of extension tube is not important as they do not affect picture quality.


Disadvantages of Using Extension Tubes for Macro Photography


  1. They do not work well with lenses of longer focal length.
  2. Your lens loses the ability to focus on distant objects with extension tubes mounted between the camera and the lens.
  3. They significantly increase the effective f stop of your lens.
  4. Extension Tubes are rather awkward to use, to obtain different magnifications one should dis-assemble the set up add/remove tubes and then re-assemble everything. This along with focusing movement is how particular magnifications are obtained.
  5. Frequently taking of the lens and putting it back again raises the risk of dust settling on your camera sensor
  6. Not all lenses perform well when used with extension tubes some zoom lenses and macro lenses requires their rear element to be at a fixed distance from the sensor for optimum image quality.
  7. If you need feature like exposure, aperture, auto focus etc to work; you will need to buy auto extension tubes and they are expensive.


If you find the advantages outweigh the disadvantages do give it a try, if it’s the other way around will discuss some other alternatives to these extension tubes in future articles.

Here are some shots taken with extension tubes for your inspiration. The following images are all taken with a 90mm Tamron Macro lens along with a set of Kenko extension tubes.

extension tube macro photography tutorial

extension tube macro photography

extension tube macro tips

extension tube macro

how to use extension tubes

macro photography using extension tubes

using extension tubes for macro photography

tips for using extension tubes
 
Support : Creating Website | Johny Template | Mas Template
Copyright © 2011. Technology Share - All Rights Reserved
Template Created by Creating Website Published by Mas Template
Proudly powered by Blogger