 |
| Flowers |
Textures are used extensively in post production to enhance the look and feel of the photographs. They could make a photograph look old, add emotion, evoke a feeling of nostalgia and much much more. Proper use of textures among other techniques can change a straight photo into what might be called a work of art and this is the reason for their huge popularity among the photographers community.
We have already covered How to Find Textures, Tips for Photographing Textures and Lighting for Photographing Texture and Pattern in pervious articles. In this tutorial I will show you how to add a texture to your photograph using Adobe Photoshop. But before we get started it should be understood that textures does not look good in all photos. It suits certain subjects well and certain others not. Also the base image that you plan to add texture should be a good photo on its own, adding texture is no quick fix solution to repair poorly taken photos.
Adding Texture in Photoshop – A Step by Step Tutorial
Step 1
Open the image to which you wish to add texture in photoshop. For our example I am using this picture of a flower (some variety of glory I guess) which I just took from my backyard.
 |
| Flower |
Step 2
Open the texture that you wish to add. I am using this photo of a wooden fence by a flickr friend Miuenski.
 |
| Photo By Miuenski |
Step 3
Drag the texture file onto your original image file to add it as a layer. The screen should now look like this.
 |
| adding-texture-in-photoshop |
I didn't want the concrete slab to be part of the texture so with the texture layer as the active layer I pressed Ctrl + T for Free Transform and simply stretched the wood fence picture vertically so that the slab is outside of our visible area.
 |
| photoshop-texture |
Step 4
I experimented with various blending modes for the texture layer and finally settled on Screen mode with opacity of 62%. This is the real trick, it is the blend mode which decides how one layer interacts with the layer/s below it; experiment and find out which one works best for your project.
 |
| texture-photoshop |
Step 5
Now we need to make the effect subtle so in order to tone down the texture I duplicated the background layer.
Press Ctrl + J with background as the active layer. Now the background layer has been duplicated and a new layer named background copy appears.
Step 6
Drag and drop the texture layer below the background copy layer so that now it sits in between those two.
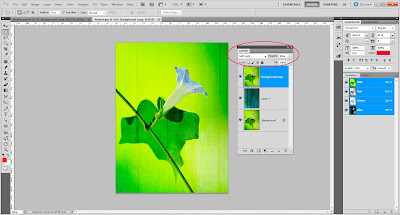
Step 7
Change the blend mode of the background copy to Soft light and opacity to 85. Your screen should now look like this.
 |
| how-to-add-texture-in-photoshop |
Do experiment with opacity and blend modes, and even layer order.
Step 8
We are mostly done here, but to make it a bit more interesting we’ll add one more texture. This time im going to add a bokeh shape to our photo. Did a quick google search for free bokeh and one from a blog.
Repeat steps 2, 3 and 4
Step 9
Drag the bokeh layer below the background copy layer. Of this example I settled with a blend mode of Hard light with opacity 32%.
 |
| adobe-photoshop-tutorial |
Step 10
Now all we need to do is fine tune our final images, I didn’t want the bokeh shapes on top of flower and leaf so with the bokeh layer active I selected eraser and carefully erased the shapes from top of the main subject. The intention was to make it feel like the bokeh is in the background.
 |
| photoshop-texture-tutorial |
If you look closely at the layers palette you will find the areas from which bokeh shapes were erased.
Depending upon your needs you could further enhance the photograph by applying selective textures to different areas and all, now that you know how to get it done, do give it a try and post your results in comments. Cheers!!!
Related Reading
- How to Photographs Fireworks - Tips for Photographing Fireworks Displays
- How to Capture Motion Blur in Photography - Tips for Photographing Moving Subjects
- How to Get Shallow Depth of Field in Your Digital Photos
- How to Recover Deleted Photos From Camera's Memory Card
- CandleLight Photography - How to Photograph In Candle Light
Post a Comment