Latest Post :
Recent Post
Showing posts with label Photography Tutorial. Show all posts

How To Photograph Reflections In Water


In Nature reflections are everywhere, in lakes, rivers, ponds and other water bodies etc. one could even find reflections in a small puddle of water. Reflections help add powerful emotions and thus create visually interesting images.  Subjects like colourful autumn foliage in trees, mountains, buildings, harbor and boats etc are all subjects that make great reflections.


How To Photograph Reflections In Water
Photo by: Morbcn


There are many types of reflections and many different ways of capturing them; in this article we will discuss how best to capture the beauty of reflections in photographs.

Photographing reflections could be quite simple and anyone with a basic understanding of the fundamentals of photography could create stunning images by following a few simple rules which we are going to discuss here.

1. Best Time of the Day to Shoot Reflections


How To Photograph Reflections In Water
Photo by: Jeff S Photo Art

Early morning is the best time to shoot reflections in water. One big advantage of shooting in early hours is that there will be very little wind and the water will be usually very still during those times.

2. Best Shooting Conditions for Water Reflections


dslr reflection photography tips
Photo by: Trey Ratcliff


Overcast days are the best to shoot reflections in water, best case scenario is when you subject is illuminated by the sun’s light and the water in front of you is still in shade, such conditions produce very dramatic images.

3. Place the Sun at Your Back


This is the most important tip to remember while shooting reflections in water, always place the sun at your back, else you will end up with very dark reflections.

4. Workflow


tips for photographing reflections in water
Photo by: Jeff S Photo Art


Arrive early (before sunrise) at the scene you wish to shoot, this will give you plenty of time to plan and setup your shot. Use a compass to find out where is East (most smart phones have one) this will give you a general idea of where the sun is going to show up. Now face west and look for some interesting subjects with a water body in front of it. once you find your subject, decide on the composition and set up your shot, now all you need to do is wait for the sun to come up, when the golden rays of the rising sun hit the subject it will produce highly saturated reflections in the water which is still in shade. Shoot fast as the light changes very fast.

5. Where to Place the Horizon for Maximum Effect.


You have lot of options as to where to place the horizon in your shots, but there are three options that work well.

  1. Placing the horizon line in the upper third of the image helps give more emphasis to the reflection and thus draw the viewer’s eyes directly to it.
  2. Placing the horizon line in the center of the image gives equal importance to the scene and the reflection.
  3. Photograph only the reflection; here the horizon line is not included in the picture and the entire frame is comprised of the reflection.


photography water reflection
Photo by: Denis Collette

6. Make sure Horizons are Level


In the previous tip we discussed three different options of placing the horizon in your compositions but this tip is more important. No matter where you place your horizon make sure it is level, if your camera has a built in level use it, if not use a bubble level to make sure you have in right in camera.

7. Focus on the reflection.


how to capture reflections in water
Photo by: Denis Collette


Manual focus works well while shooting reflections; shift your lens to manual focus and focus on the reflection to make sure they are in sharp focus.

8. Use Large Depth of Field


reflection photography tips
Photo by: Jeff S Photo Art


Use a narrow aperture (f/11 or narrower) to make sure you have both the reflections and also the main subject reasonably sharp.

9. Even our Light Levels Using Graduated Neutral Density Filter


reflection pictures
Photo by: Stuart Williams


One problem photographer’s face when trying to photograph reflections in water is the difference in brightness levels of the scene. Usually the subject is much brighter than the water and this causes certain issues. If we try to expose for the main subject then reflections turn out very dark and if we try to expose for the reflections then main subject becomes over exposed. The solution to this issue is to use a graduated neutral density filter, make sure you align the dark part of the filter with your subject and the clear part over the reflection.

10. Controlling Glare Using Polarizing Filter


reflection photography ideas
Photo by: Morbcn


If you have a circular polarizing filter it could be come in handy to control the glare from the water’s surface thereby enhancing some reflections. Rotate the filter to see its effect on the scene, also try taking it off, some scenes are better off without it.

11. Shoot From Low Angle


how to shoot water reflections landscape
Photo by: Chris Gin


The lower the angle you shoot from the greater the reflection you will see. A tripod without a center column will come in handy to set the camera close to the ground.

12. Use Live View


Reflections in water are a good candidate for using the live view function of your DSLR camera.

13. Use Depth of Field Preview Button


Use the depth of field preview button to stop down your lens to the set aperture and check the depth of field available for the set aperture. Alternatively you could take a picture and review it in your LCD display on the back of your DSLR camera; this has the added advantage of being able to zoom in to check minute details for sharpness.

14. Ripples in Waters Surface


how to take photos of reflections
Photo by: Lisa


Small ripples on the water’s surface could produce some interesting results, the reflections will appear slightly blurred but this adds character to certain scenes. Usually an hour or so after sunrise you’ll sense the wind picking up and causing ripples on the water’s surface. Or you could create your own concentric pattern of ripples using a stick or your feet or if you need it certain distance away, simply toss a stone into the water. The ripples break up the reflections adding a sense of intrigue to the picture.

15. Capture a Panoramic Shot of Water Reflection


tips for shooting panoramic water reflections
Photo by: Chris Gin

The 3:2 image format of the DSLR camera may not be the best when it comes to shooting landscapes with reflections, something like 3:1 or even 5:1 would be much better. Try stitching multiple shots taken with a slight overlap in Photoshop or simply create a Crop Panorama.  

16. Try Inverting Your Picture


Some shots could be made interesting just by inverting it (flipping upside down) in Photoshop.

Related Reading


  1. How to Photograph the Milky Way in Ten Easy Steps
  2. Forest Photography Tips
  3. Composition Tips for Photographing Waterfalls
  4. 20 Common Mistakes Beginners Make in Landscape Photography and How to Avoid Them
  5. 22 Tips for Photographing Stunning Seascapes

How to Photograph the Milky Way in Ten Easy Steps

Capturing the Milky way by Sapna Reddy


how do we take pictures of the milky way


This is in response to all the questions I have been asked about how to capture Milky way.

1. Timing : June/July are the best months. Clear nights with little or no moon.

2. Location : Rural areas far from city lights.

3. Equipment : Camera with decent high ISO capability, tripod, f 2.8 wide angle lens.

4. Settings : ISO 3200 or higher, f 2.8, 25-30 seconds exposure. Run test shots and fine tune ISO and exposure.

5. Shoot in Manual mode and RAW images.

6. Exposure : Do not exceed 30 seconds for exposure. ( will generate star trails)

7. Focussing : Turn your lens to infinity, then dial back just a little bit. Lock in manual focus.

8. Noise reduction : Remember to turn on Long exposure/high ISO noise reduction in camera.

9. Composition : Try to incorporate foreground components to make the shots more interesting.

10. Postprocess using lightroom or PS. Make adjustments to exposure, color, contrast, noise reduction and lens corrections in camera RAW as needed.

Here are some shots of the milky way for your inspiration

How to Photograph the Milky Way

how to photograph the milky way with a dslr

how are pictures of the milky way taken
how do we photograph the milky way

All the best ! Happy clicking !

Related Reading


  1. How to Photograph the Milky Way
  2. Star Trails Photography Tutorial
  3. How to Photograph the Sun
  4. Night Photography Tips
  5. How to Photograph the Moon

How To Photograph Christmas Trees


Now that everyone has their Christmas trees decorated and have piled up presents underneath it, let’s see how best to capture the beauty of the Christmas tree in our photographs.


How To Photograph Christmas Trees
Photo by: Stephen Vance


Here are some tips to photograph Christmas Trees.


1. Use a Tripod


Shooting Christmas trees means shooting indoors mostly in low light situations (often times the main lighting in the room is turned off or reduced in strength to reveal the beauty of the Christmas tree and to make it stand out in the scene) using a solid tripod gives you the ability to get sharp pictures even with very slow shutter speeds.  This also helps you shoot in low ISO’s for better image quality.

2. Cable Release / Remote or Self Timer


To further improve the sharpness of our pictures we can use a cable release or camera remote to release the shutter, if you don’t have a cable release or a remote you can simply set your camera to self timer and get sharp images.

3. Use White Balance Creatively


christmas tree photography technique
Photo by: Andy Castro


You can play with white balance settings of your camera to get creative effects. Set white balance to warmer settings and give your Christmas images a Cozy feel alternatively set your white balance to cooler settings and give your Christmas images a wintery feel. Do also try shooting in black and white, Christmas images look great without all those colors detracting attention of the viewers from the subjects.

4. Shoot RAW


christmas tree photography tips
Photo by: Trey Ratcliff


The previous tip was about creative use of white balance to enhance the feel of your shots, one could either experiment while shooting or shoot in RAW and choose the settings that work best later while post processing. Shooting in RAW format also gives you more control over exposure in post processing.

5. Use Evaluative or Matrix Metering Mode


Photographing Christmas lights could prove tricky to your camera’s meter, it is better to use Evaluative or Matrix metering modes rather than spot metering mode.  If you use spot metering mode, depending upon where you get your meter readings from (it could be from a bright light source or a shadow) your exposure could be way off.

6. Meter from a Neutral Subject


While taking a meter reading it is recommended to meter off a neutral subject in the scene, and not with the camera pointed directly at a light source or a shadow area consider some area that is somewhere in between.

7. Use Your Camera’s Histogram to Correct Exposures


christmas tree bokeh
Photo by: Jack


Consult your camera’s histogram regularly to determine correct exposures, in such tricky situations your cameras metering system could fail and will give you incorrect exposures. Do not rely just the LCD display to check your exposure but use the histogram feature (use both RGB and Luminosity histograms) to make sure your exposure is correct and you are not clipping highlights or shadows.

8. Play with Depth of Field


Try experimenting with depth of field to get different effects, if you have an uninteresting background or if you wish to make your Christmas tree stand out in your picture use wide apertures (f/2.8, f/4 etc). if you wish to include the features in the background also reasonably sharp use narrow aperture (f/11, f/16 etc).


Christmas Light Photography


Shooting light sources with narrow apertures in lowlight has a very nice side effect; all the lights in your picture will look like starbursts (similar to the effect you get using a starburst filter). This could make your picture stand out from the rest, but remember shooting in low light conditions with narrow aperture will require either a very high ISO setting or very low shutter speeds or a combination of both.

9. Shutter Speeds and How it affects the lights


The shutter speed used to capture the scene also affects the way the lights are rendered in the picture. Slower shutter speeds capture movement in the lights and faster shutter speeds freeze them completely.


Christmas lights and shutter speeds


Lights appear larger and a bit blurred when shot using slower shutter speeds whereas they appear smaller (like points of light) when shot with faster shutter speeds.

10. Capture Details


how to photograph christmas tree
Photo by: Flood G


You have taken a lot of care to make sure your Christmas tree look great and have decorated it with all sorts of items carefully chosen to match the scene. Once you have captures wide shots of the Christmas tree it’s time to move in close, use a macro lens if you have one and capture details like branches, presents and lights.

11. Mind the Reflections


christmas tree photography
Photo by: Mohammadali F


When shooting up close, shiny objects could reflect the world around them and that could mean you and your camera could also get reflected. Sometimes it creates a very interesting picture and sometimes it appears as a detail which the photographer forgot to notice while photographing the object. Keep this in mind and if you choose to keep reflections it should appear intentional and make it artistic else it is better to avoid it entirely by changing shooting angles.

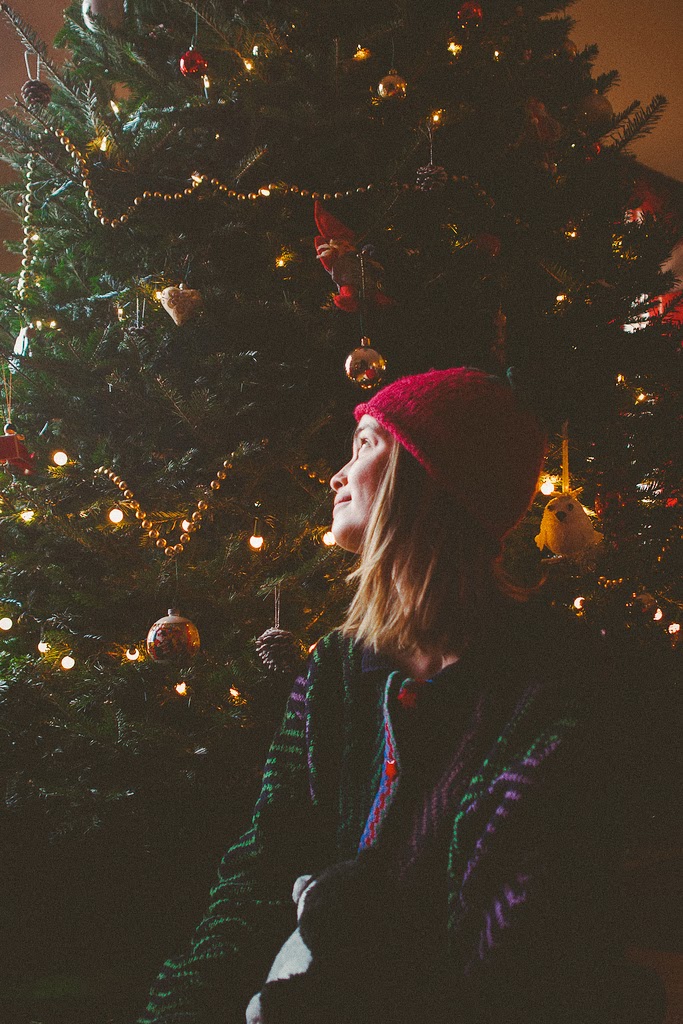
12. Take Christmas Portraits with Your Christmas Tree Included


christmas portraits
Photo by: Jeff Meyer


Take pictures of your friends and family and try to include your Christmas tree also in the shot, to get best results, turn on every light on the Christmas tree, adjust ambient light (light in the room) to match the brightness of the lights in the Christmas tree. It is better to keep the ambient light a bit lower than the lights on the Christmas tree to create a mood. Remember when photographing people in such conditions it is better to get shutter speeds a bit faster even if you are shooting on a tripod as chances are your subjects could move slightly and cause blur. Raising the ISO is many times the only option to get the required shutter speed.

13. Add Light to the Scene


photographing christmas trees
Photo by: Lulu Lovering


To get a sparkly feel to your Christmas pictures you will need an additional light source (other than the lights on the Christmas tree) this is even more important when shooting with narrow apertures. It could either be a continuous light source or your camera flash.

14. Using Flash to Add Light


tips for photographing christmas trees
Photo by: Jason Mrachina


When using flash to capture Christmas pictures make sure you only use it as a fill light source and never as the main light. Also never use flash front on, use it bounced off the walls or the ceiling. Control the brightness of the flash or use adequate flash exposure combination to get the balance between the ambient and the flash right. It is also advisable to set your flash to rear curtain (second curtain) sync and drag the shutter to expose the scene. If you room is lit predominantly with tungsten lights then gel your flash yellow to match the colour temperature of the room lights.

Have fun, use the tips, take lots of pictures and do share it with us in comments… Merry Christmas.

Related Reading


  1. Best Camera Settings for Photographing Christmas Lights
  2. 12 Photography Tips for Better Party Photos
  3. Shaped Bokeh Tutorial
  4. 20 Digital Photography Tips for Better Christmas Pictures
  5. How to Photograph Christmas Lights

Star Trail Tutorial

The photo given below was taken in the Moroccan Atlas mountains while on a hiking trip. The total exposure time is 56 minutes, the photo consists of 28 2-minute images stacked using startrails.exe.


Star Trail Tutorial
Star Trail Tutorial


The map position is very approximate.

Here's my tutorial:


To capture the movement of the stars at night, you'll need to have a very, very long exposure, 5 minutes as a minimum, but usually more like an hour. To do so, you could just produce one ultra-long-exposure frame using your camera's bulb mode, but there are several problems with that. First of all, if any problem occurs during this time (ie your camera shuts down, the memory card has a write issue) you will lose all the information, which can be a tremendous annoyance if you had a three-hour exposure underway. In addition, if your picture has any other elements that might be brighter than the stars, such as the tent in my shot, (which it should have to make it an interesting image) these will be very; very overexposed if you use a shutter speed such as 60 minutes. Therefore, almost everyone doing star trail pictures uses the so-called stacking method, in which a number of images are taken, and then stacked to simulate a very long exposure.

Below, a step-by-step guide:


Startrail Tutorial
Startrail Tutorial  - This photo was taken in the  Moroccan Atlas
 mountains while on a hiking trip. The total exposure time is 39 minutes,
 the photo consists of 13 3-minute images stacked using startrails.exe.


1. Set your camera up on a very sturdy tripod, and frame your composition. If possible, frame your shot before nightfall, since when the stars appear it will be very difficult to compose because of the lack of light.

2. Decide how long you want your total exposure to be. Keep in mind that the stars will be moving along concentric circles centered on the northern star. Therefore, if you point to the north, you will need a much longer exposure for your trails to be a of a given length, and conversely, it you will need a shorter exposure as you point more to the south.

3. Now, you will divide this total exposure time you chose into many shorter exposures. I like to use 2 minutes, but use anything that does not overexpose any parts of the frame, while trying to stay under 8 minutes or so. So say you wanted a total exposure time of 56 minutes, which would be 28 2 minute exposures. You will achieve this by setting your camera to the bulb setting in manual mode and then connecting an intervalometer (50$ online). The intervalometer will send the signal to your camera to open and close the shutter every two minutes. The only reasons cameras are not able to do this natively, as well as many other features, is because manufacturers purposefully limit their functionality. So set your intervalometer to the desired exposure time and number of frames, and set the interval between frames to 0. (in my case: exposure time:2 min; number of shots: 28)

4. Set the focus to infinity manually and start the intervalometer. Wait until all the shots are taken.

5. Now the stacking: you will need to use a program that stacks the images by choosing the brightest pixel when there is a conflict. This will make sure the little pieces of star trails are all combined in the final image. I recommend startrails.exe for windows, but you can just google star trails stacking and you’ll find lots.

Have fun: Thomas Sittler

Related Reading


  1. How to Photograph the Sun
  2. How to Photograph the Milky Way
  3. How to Photograph Rain Drops
  4. 22 Tips for Photographing Stunning Seascapes
  5. Forest Photography Tips

Shaped Bokeh Tutorial

In recent articles we have covered what is bokeh and how best to capture them in our photographs. Now let’s see how we can add a touch of fun to our holiday photos.

While discussing bokeh we mentioned that the number of aperture blades and the shape it creates will be visible in the photographs as the shape of the bokeh will reflect the shape formed by the aperture diaphragm. It is even possible to count the number of blades in the diaphragm. So if the shape of the diaphragm changes the shape of the bokeh why can’t we change those pentagons, hexagons, heptagons and nonagons to a shape that's more to our heart’s liking?

What we are going to do is to cover the lens with black construction paper in the center of which we have cut out the shape we wish our bokeh to be. Now the size of the cut shape will be smaller than the diaphragm opening of the lens and hence the cut shape on the black paper will now act as the diaphragm and the bokeh will be of the shape rather than the shape of the lens diaphragm.

Shaped Bokeh Step By Step Tutorial


1. Cut the black construction paper into a strip large enough to cover the entire front of your lens.


shaped bokeh tutorial


2. Measure the front of the lens


shaped bokeh tutorial


Measure both the outer diameter of the lens and also the diameter of the lens aperture.  

3. Now set your compass to half the value of the outer diameter.


how to make shaped bokeh


4. Now draw a circle using the set value (radius) on a piece of black paper.


how to make bokeh shapes


5. Once the circle is complete draw 4 handles with a pencil


diy shaped bokeh
diy shaped bokeh


4. Now cut the shape out


Custom bokeh tutorial


6. Now we can cut our desired shape from the center. 


Custom bokeh tutorial


For the purpose of this tutorial I cut out a heart shape using a knife, it would have been a lot easier and neat if you use a shape punch instead. Remember we had measured the lens aperture diameter earlier, you shape should be a tad smaller than that for this trick to work.

7. Attach the shape to the lens and we are ready to go.


diy shaped bokeh
diy shaped bokeh


8. Set camera to Aperture priority mode, set aperture to the lens’s maximum aperture.

9. Find an interesting subject with some light sources in the far background.

10. Focus on the subject in the foreground and shoot. Viola Heart Shaped Bokeh…..

Sorry i cant find my data cable anywhere and the test pic will have to wait for the time being.... 

Meanwhile here are some custom bokeh shots from more talented photographers around the world for your inspiration.

love shaped bokeh
Photo by: Kevin Eddy

bokeh photography
Photo by: Roni Amin

bokeh masters kit
Photo by: J Star

discussing shaped bokeh
Photo by: Pablo Fernández

how to make heart shaped bokeh
Photo by: Maxime Dehaye

Related Reading


What is Bokeh in Photography?


Bokeh is a Japanese word which literally translates as “blur”. Bokeh is described as the aesthetic quality of the out of focus areas in a picture. It is how the camera lens renders points of light in a scene which are not in focus.


what is bokeh
Photo by: Amir Kuckovic


As photographers we are familiar with the concept of Depth of Field; when a picture is shot using a wide aperture (shallow depth of field) objects that fall outside of the depth of field range will appear blurred. 


Bokeh Tutorial
Bokeh Tutorial


In the diagram given above light rays coming from the plane of focus will be perfectly sharp, those rays coming from within the range covered by the available depth of field will be acceptably sharp and those will appear as a sharp point in the sensor, but light rays coming from outside of the depth of field will appear as blurred circles.

This is what we generally call background blur (or foreground blur); bokeh is not the blur itself or the amount of blur present in the picture; rather it is the quality or feel of the blur and the reflected points of light.

Good Bokeh and Bad Bokeh


what is bokeh in photography
Photo by: Amir Kuckovic


Lens design is a complicated thing, a perfect lens will render out of focus points as evenly lit circles of light with sharp edges but that’s not what we call a perfect bokeh. To get perfect bokeh the lens should render the points of light as a Guassian distribution.  Thus what is perfect for physics is not perfect when seen from an artistic point of view.

A technically perfect lens which has no spherical aberration focuses all points of light as cones of light behind the lens. When the sensor plane is at the exact location where the cone reaches its finest point the image is said to be in focus. The better the lens the finer the points will be. But if the sensor plane is not located where the con of light reaches its smallest point, then the point is rendered as a disk of light instead of as points. These discs are called "blur circle," or "circle of confusion".

In a lens with no spherical aberration this blur circle is an evenly illuminated disc, all out of focus points will look like perfect discs with sharp edges. But in reality no lens is perfect, the all have differing amounts of spherical aberration present and this aberration alters the way the lens renders the out of focus points of light. Thus even though all the light coming through the lens from a point may meet at a precise point on the sensor; the light distribution within the cone may be uneven. They may have more of the light collect in the middle of the disc or towards the edges.

It should be noted that Under corrected spherical aberration and Over corrected spherical aberration causes light to collect in two different ways. If light tends to collect towards the middle of the out-of-focus discs on one side of the cone, then it will collect on the outsides of the discs on the other side of the cone and therefore, a lens with great bokeh for backgrounds has awful bokeh for foregrounds, and vice versa.


Bokeh
Bokeh


In the above diagram it is clear that in the out of focus circle for poor bokeh and good bokeh both lenses display some degree of spherical aberration in the case of poor bokeh light is collected towards the edges and in case of good bokeh light is collected at the center.


bokeh tips
Photo by: Quentin Descotte


Artistically most people tend to prefer sharper foregrounds and softer backgrounds. Blurred foreground elements are distracting while blurred backgrounds are perfectly fine. Therefore lenses with good background bokeh are said to be lenses with good bokeh.

Diaphragm Blades and Bokeh Shapes


The shape and number of lens diaphragm blades define the shape of the blur circle. The out of focus circles actually appear as shapes with as many sides as there are blades in the aperture diaphragm. Thus a diaphragm with five blades will produce pentagons, one with six blades will produce hexagons, one with seven blades will produce heptagons and ones with nine blades will produce nonagons and so on and lately lens diaphragms are being designed with curved blades to give a close approximation of a circle. The more the number of blades, the more the shape looks like circles thus more the number of blades better the bokeh right? 


Camera lens aperture diaphragm


Not entirely, the shape of the circle is only one part of the equation, the other being how well is the light distributed. And when shooting with aperture wide open the diaphragm has absolutely no role in determining the shape of the circle.

How to Determine if a Lens has Good Bokeh or Bad Bokeh?


lens bokeh
Photo by: Colton Witt


You can determine the quality of bokeh a lens produces either by looking at a picture taken with the lens or by observing a point of light through the lens.

 If you find a picture that shows distant points of light at night or of light shining through leaves during day you could easily judge the quality of bokeh of the lens.

  • The lens has good bokeh if the points of light all blend together nicely and
  • The lens has neutral bokeh if the points of light appear as distinct circles.
  • The lens has bad bokeh if the points of light looks like donuts (dim center with brighter well defined edges).


You can also tell the quality of bokeh a lens could produce by looking at a light source through the lens. Point the lens at a light source and turn the focusing ring.

  • The lens has good bokeh if you see soft edged circles.
  • The lens has neutral bokeh if you see perfect round discs and
  • The lens has bad bokeh if you see doughnut shaped discs.

It should be noted that the above test of bokeh is not conclusive, the following parameter all influence how the bokeh is delivered by a lens:


  1. Focal length
  2. f-number
  3. Picture format
  4. Distance from camera to subject
  5. Distance from the subject to the background or the foreground
  6. Shapes and patterns of the subject
  7. Aperture iris shape
  8. Aberrations of the lens
  9. Speed of the lens
  10. Foreground/background brightness and
  11. Colour


Changes to any of these parameters will change the way a lens delivers bokeh and this is the reason why we often hears different or even contradictory judgement about the bokeh of many lenses. So never judge a lens based on single observations, there are many effects that are attributed to the lens but in reality are caused by the subject in front of the camera. Differences between lenses are often very marginal but grossly exaggerated.

Related Reading

  1. How to Capture Nice Bokeh in Your Photos
  2. 20 Digital Photography Tips for Better Christmas Pictures
  3. How to Photograph Christmas Lights
  4. How To Photograph Christmas Trees
  5. Best Camera Settings for Photographing Christmas Lights


Support : Creating Website | Johny Template | Mas Template
Copyright © 2011. Technology Share - All Rights Reserved
Template Created by Creating Website Published by Mas Template
Proudly powered by Blogger