Beauty dishes are so called because they make people look beautiful. The diffused light coming out of the beauty dish is much softer than direct flash and the soft light fills in small blemishes in the skin and gives a soft feel to it. The property of light coming out of a beauty dish is that of a circle of light with an opaque centre and in general beauty dishes are more effective in close range.
Just like many other photographic equipments, beauty dishes from major brands will cost you dearly. So in this article let us discuss how we can make one ourselves that is functionally effective and professional in looks. And should I say costs next to nothing.
Just like many other photographic equipments, beauty dishes from major brands will cost you dearly. So in this article let us discuss how we can make one ourselves that is functionally effective and professional in looks. And should I say costs next to nothing.
 |
| DIY Beauty Dish |
List of Materials
- Aluminium cooking vessel
- Auto mobile rear view mirror
- A piece of aluminium
- Aluminium rivets / nuts and bolts
- 2 key rings
- A strip of broad elastic
- Paint
The aluminium cooking pan we used for our beauty dish project was 14 inch in diameter and had a flat base designed to be used with induction cookers. The cost of the pan was Rs 60/-.
 |
| DIY Beauty Dish |
First step is to remove the handles; we cut of the head of the rivet holding it in place, removed the handles and refilled the hole with the same rivets we removed. Refilling the hole is not that important as it will not be a big issue affecting results.
 |
| DIY Beauty Dish |
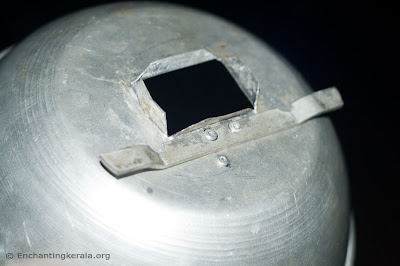
Next we need to cut the hole in the bottom for our flash, keep the flash head aligned to the centre of the vessel and mark the boundaries with a pencil or a marker.
 |
| DIY Beauty Dish |
There are many ways to cut the hole; how we did it was using the minus end of a combination screw driver (one head minus the other star). Use a grinding stone to sharpen the minus end and it will make your job much easier.
 |
| DIY Beauty Dish |
Next step is to trace the outline of the flash and bend leafs outward.
 |
| DIY Beauty Dish |
OK our flash head fits snugly, neither loose nor too tight.
 |
| DIY Beauty Dish |
This is how it looks from the back, check the angle and correct the position of the leaves so that it is a perfect fit.
 |
| DIY Beauty Dish |
Now we need to make a holder for our primary reflector. I found this aluminium piece from inside of an old door bell.
 |
| DIY Beauty Dish |
We have bent the aluminium piece and made a ‘C’ shape.
 |
| DIY Beauty Dish |
We will reduce the width of the piece in a way that does not reduce its strength much. If it is too broad then it may affect the light falling on that area creating a blind spot in our otherwise perfect do-nut shaped lighting set-up.
 |
| DIY Beauty Dish |
Next step is to reduce the height of one of the legs of our ‘C’. The leg with the short length is going to be fixed on the dish and this way it will ensure that the other hand of the ‘C’, holding the mirror will be perfectly in centre of the dish.
 |
| DIY Beauty Dish |
Now we need a mechanism to attach the flash unit to our beauty dish and to hold it firmly in place. I used the other piece of aluminium from the doorbell, slit it into two halves to reduce width and bent it like shown in the picture.
 |
| DIY Beauty Dish |
Now we have riveted the holder and the other attachment together to the dish. If you have trouble riveting feel free to use small size bolts and nuts.
 |
| DIY Beauty Dish |
This is how it looks from the other side; note the back piece and the holder in front is all riveted together.
 |
| DIY Beauty Dish |
Next we will make the strap that will hold the flash firmly on to our beauty dish, once it is attached, keep the flash unit in the beauty dish, measure the approximate length needed, cut a piece of broad elastic, sew in two key rings on either side and your beauty dish strap is ready.
 |
| DIY Beauty Dish |
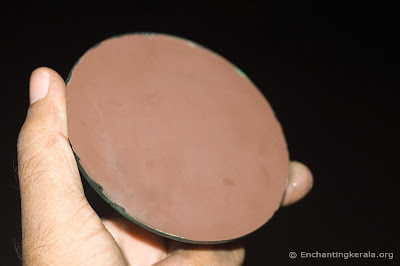
Now time to finish our primary reflector, I stripped an auto mobile mirror from its case. The auto mobile rear view mirror is a convex mirror perfectly suited for our purpose.
 |
| DIY Beauty Dish |
Even though it does not affect its functionality, in order to give it a professional look, I applied white sticker to the back side of the mirror. You may also get the job done by applying white paint.
 |
| DIY Beauty Dish |
This is how the inside of our beauty dish looks once its painted white.
 |
| DIY Beauty Dish |
I applied matt finish black paint on the back side of the beauty dish. You can see how the elastic strap is holding the flash unit in place.
 |
| DIY Beauty Dish |
And here is our beauty dish finished with the primary reflector also in place. The mirror was glued on to the holder using quick setting adhesive.
 |
| DIY Beauty Dish |
Here are some of the results from the diy beauty dish field test.
 |
| DIY Beauty Dish |
 |
| DIY Beauty Dish |
In the next article we will discuss about Photography - DIY - DIY Beauty Dish - Diy Bare Bulb Beauty Dish made from Cooking Pan
Related Reading
- Diy Expodisc Easily Get Your White Balance Right
- How To Make A Hood For Your Lens
- Pinhole Photography
- How To Make a Close Up Filter for Your Lens
- DIY Remote Shutter Release Cable / Trigger for Canon Cameras
Post a Comment