In this article let us discuss how to How to apply Smooth Skin effect in Photoshop.
Either click File > Open or use keyboard short cut Ctrl + O.
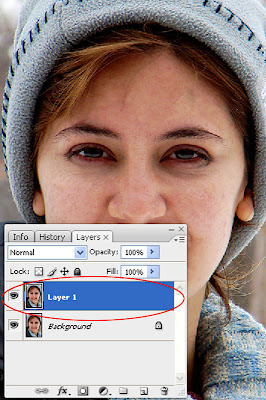
By default when you open an image in photoshop the image is embedded in a layer called background. We will first make a copy of this layer. You can do this by either right clicking on the background layer in the layers palette and selecting duplicate layer or use keyboard short cut Ctrl + J.
Note: if you right click and duplicate your layer, your new layer will be named background copy and if you duplicate your background layer by using keyboard short cut Ctrl + J then your new layer will be named Layer 1. However in both the cases the new layer will be placed above the current layer i.e. the background layer.
In this article we will assume that we used the keyboard short cut Ctrl + J to duplicate our background layer and so from now on we will address the new layer as Layer 1.
Click on Layer 1 in the layers palette to make it the active layer.
In order for our picture to look soft we need to apply a little blue to it. Click Filter > Noise > Median. Watch the preview and enter a value as you seem proper. In this example we entered a value of 20.
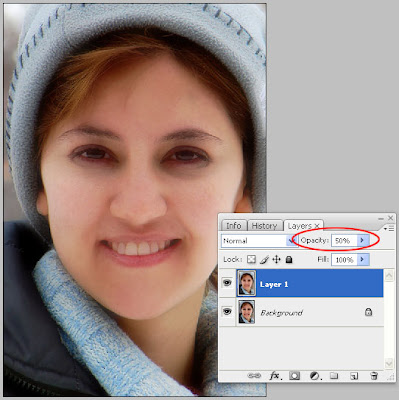
Since Layer 1 is above the background layer, the content on the layer 1 is what is visible to the viewer’s. we will set the opacity of the layer so that content of the background layer will be visible through the contents of the Layer 1. Basically what we are doing is reducing the amount of blur and bringing back some details from the original image. The opacity control slider is located on the top right corner of the layers palette. Select layer 1 to make it the active layer and use the slider to control the opacity. Here again there is no hard and fast rule. How much of the original image you wish to reveal is entirely your choice. For this example I set my values to 50 %.
There is a keyboard short cut to set opacity of layers. You may press any key from 0 to 9 in the Num’s Panel to set the opacity value. If you press 5 the opacity of the active layer will be set to 50 % and so on.
With layer 1 as the active layer click on the Layer Mask icon located at the bottom of the layers palette. You will notice a layer mask thumbnail has appeared next to Layer 1 in the layers palette.
When you apply a layer mask photoshop will automatically set your foreground colour to black and background colour to white. If not Press D to make the foreground colour white and the background colour black. You may press X to switch the foreground and background colours.
Press B to select the brush tool. Select a brush size that suits your image, set mode to normal, opacity and hardness to 100%.
Press \ to view the mask start painting on the areas of the image that you would like to remain sharp. In this example it is everything other than the skin on face. Do not forget to mask areas like the mouth, fine hairs, eyebrows, eyelashes and the contours of nose and nostrils. For those areas use a smaller size brush with a soft tip and low opacity.
If you wish to change your masks opacity for better control double click inside the layer mask icon next to layer 1 in the layers palette and in the window that pops up set the opacity value.
You can return to the normal view by clicking on the layer 1 thumbnail in the layers palette.
Open the picture
Either click File > Open or use keyboard short cut Ctrl + O.
 |
| Photo By Hamed |
Duplicate Background Layer
By default when you open an image in photoshop the image is embedded in a layer called background. We will first make a copy of this layer. You can do this by either right clicking on the background layer in the layers palette and selecting duplicate layer or use keyboard short cut Ctrl + J.
 |
| How to apply Smooth Skin Effect To Your Picture in Photoshop |
Note: if you right click and duplicate your layer, your new layer will be named background copy and if you duplicate your background layer by using keyboard short cut Ctrl + J then your new layer will be named Layer 1. However in both the cases the new layer will be placed above the current layer i.e. the background layer.
In this article we will assume that we used the keyboard short cut Ctrl + J to duplicate our background layer and so from now on we will address the new layer as Layer 1.
Click on Layer 1 in the layers palette to make it the active layer.
Apply Blur Effect to Layer 1
In order for our picture to look soft we need to apply a little blue to it. Click Filter > Noise > Median. Watch the preview and enter a value as you seem proper. In this example we entered a value of 20.
 |
| How to apply Smooth Skin Effect To Your Picture in Photoshop |
Set Opacity for Layer 1
Since Layer 1 is above the background layer, the content on the layer 1 is what is visible to the viewer’s. we will set the opacity of the layer so that content of the background layer will be visible through the contents of the Layer 1. Basically what we are doing is reducing the amount of blur and bringing back some details from the original image. The opacity control slider is located on the top right corner of the layers palette. Select layer 1 to make it the active layer and use the slider to control the opacity. Here again there is no hard and fast rule. How much of the original image you wish to reveal is entirely your choice. For this example I set my values to 50 %.
 |
| How to apply Smooth Skin Effect To Your Picture in Photoshop |
There is a keyboard short cut to set opacity of layers. You may press any key from 0 to 9 in the Num’s Panel to set the opacity value. If you press 5 the opacity of the active layer will be set to 50 % and so on.
Masking the Blurred Layer
With layer 1 as the active layer click on the Layer Mask icon located at the bottom of the layers palette. You will notice a layer mask thumbnail has appeared next to Layer 1 in the layers palette.
 |
| How to apply Smooth Skin Effect To Your Picture in Photoshop |
When you apply a layer mask photoshop will automatically set your foreground colour to black and background colour to white. If not Press D to make the foreground colour white and the background colour black. You may press X to switch the foreground and background colours.
Press B to select the brush tool. Select a brush size that suits your image, set mode to normal, opacity and hardness to 100%.
Press \ to view the mask start painting on the areas of the image that you would like to remain sharp. In this example it is everything other than the skin on face. Do not forget to mask areas like the mouth, fine hairs, eyebrows, eyelashes and the contours of nose and nostrils. For those areas use a smaller size brush with a soft tip and low opacity.
 |
| How to apply Smooth Skin Effect To Your Picture in Photoshop |
If you wish to change your masks opacity for better control double click inside the layer mask icon next to layer 1 in the layers palette and in the window that pops up set the opacity value.
You can return to the normal view by clicking on the layer 1 thumbnail in the layers palette.
Here is our final result.
 |
| How to apply Smooth Skin Effect To Your Picture in Photoshop |
Congratulations you have now successfully applied the smooth skin effect in photoshop.
Related Reading
- How to Add a Rainbow to your Photograph in Photoshop
- Adding Lip Gloss To a Photograph Using Photoshop
- How to Apply Lipstick to your Photograph using Photoshop
- How to Change Eye Colour in Photoshop
- How to Change Hair Colour In Photoshop
Post a Comment